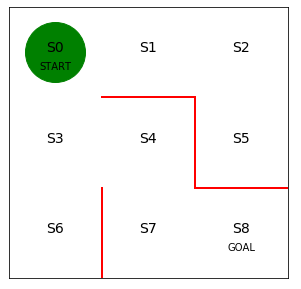
迷路をQ学習で解く

価値反復法の1つQ学習で迷路を攻略します。
Q学習では1エピソードごとではなく1ステップごとに更新を行います。

まず使用するパッケージをインポートします。

1
2
3
4
# 使用するパッケージの宣言
import numpy as np
import matplotlib.pyplot as plt
%matplotlib inline

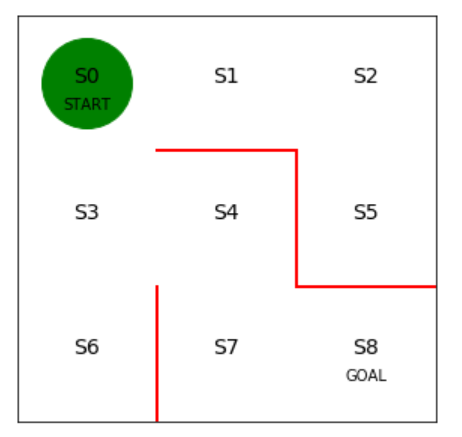
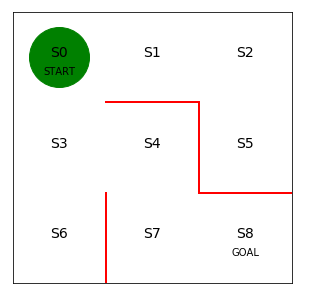
次に迷路の初期状態を描画します。

1
2
3
4
5
6
7
8
9
10
11
12
13
14
15
16
17
18
19
20
21
22
23
24
25
26
27
28
29
30
31
32
33
# 初期位置での迷路の様子

# 図を描く大きさと、図の変数名を宣言
fig = plt.figure(figsize=(5, 5))
ax = plt.gca()

# 赤い壁を描く
plt.plot([1, 1], [0, 1], color='red', linewidth=2)
plt.plot([1, 2], [2, 2], color='red', linewidth=2)
plt.plot([2, 2], [2, 1], color='red', linewidth=2)
plt.plot([2, 3], [1, 1], color='red', linewidth=2)

# 状態を示す文字S0~S8を描く
plt.text(0.5, 2.5, 'S0', size=14, ha='center')
plt.text(1.5, 2.5, 'S1', size=14, ha='center')
plt.text(2.5, 2.5, 'S2', size=14, ha='center')
plt.text(0.5, 1.5, 'S3', size=14, ha='center')
plt.text(1.5, 1.5, 'S4', size=14, ha='center')
plt.text(2.5, 1.5, 'S5', size=14, ha='center')
plt.text(0.5, 0.5, 'S6', size=14, ha='center')
plt.text(1.5, 0.5, 'S7', size=14, ha='center')
plt.text(2.5, 0.5, 'S8', size=14, ha='center')
plt.text(0.5, 2.3, 'START', ha='center')
plt.text(2.5, 0.3, 'GOAL', ha='center')

# 描画範囲の設定と目盛りを消す設定
ax.set_xlim(0, 3)
ax.set_ylim(0, 3)
plt.tick_params(axis='both', which='both', bottom='off', top='off',
labelbottom='off', right='off', left='off', labelleft='off')

# 現在地S0に緑丸を描画する
line, = ax.plot([0.5], [2.5], marker="o", color='g', markersize=60)

実行結果1

初期の方策を決定するパラメータtheta_0を設定します。

行は状態0~7を表し、列は上、右、下、左へ行動できるかどうかを表します。
状態8はゴールなので方策の定義は不要です。

1
2
3
4
5
6
7
8
9
10
11
# 初期の方策を決定するパラメータtheta_0を設定
# 行は状態0~7、列は移動方向で↑、→、↓、←を表す
theta_0 = np.array([[np.nan, 1, 1, np.nan], # s0
[np.nan, 1, np.nan, 1], # s1
[np.nan, np.nan, 1, 1], # s2
[1, 1, 1, np.nan], # s3
[np.nan, np.nan, 1, 1], # s4
[1, np.nan, np.nan, np.nan], # s5
[1, np.nan, np.nan, np.nan], # s6
[1, 1, np.nan, np.nan], # s7、※s8はゴールなので、方策はなし
])

方策パラメータθ0をランダム方策piに変換する関数を定義します。

1
2
3
4
5
6
7
8
9
10
11
12
13
14
15
# 方策パラメータtheta_0をランダム方策piに変換する関数の定義
def simple_convert_into_pi_from_theta(theta):
'''単純に割合を計算する'''

[m, n] = theta.shape # thetaの行列サイズを取得
pi = np.zeros((m, n))
for i in range(0, m):
pi[i, :] = theta[i, :] / np.nansum(theta[i, :]) # 割合の計算

pi = np.nan_to_num(pi) # nanを0に変換

return pi

# ランダム行動方策pi_0を求める
pi_0 = simple_convert_into_pi_from_theta(theta_0)

初期の行動価値関数Qを設定します。

行動価値関数は、行が状態sを表し、列が行動aを表します。
最初は正しい行動価値がわからないのでランダムな値を設定します。

1
2
3
4
5
# 初期の行動価値関数Qを設定

[a, b] = theta_0.shape # 行と列の数をa, bに格納
Q = np.random.rand(a, b) * theta_0 * 0.1
# *theta0をすることで要素ごとに掛け算をし、Qの壁方向の値がnanになる

ε-greedy法を実装します。
一定確率εでランダムに行動し、残りの1-εの確率で行動価値Qが最大になる行動をとります。

get_action()が行動を求める関数で、get_s_next()が行動を引数に次の状態を求める関数になります。

1
2
3
4
5
6
7
8
9
10
11
12
13
14
15
16
17
18
19
20
21
22
23
24
25
26
27
28
29
30
31
32
33
34
35
36
37
38
39
# ε-greedy法を実装
def get_action(s, Q, epsilon, pi_0):
direction = ["up", "right", "down", "left"]

# 行動を決める
if np.random.rand() < epsilon:
# εの確率でランダムに動く
next_direction = np.random.choice(direction, p=pi_0[s, :])
else:
# Qの最大値の行動を採用する
next_direction = direction[np.nanargmax(Q[s, :])]

# 行動をindexに
if next_direction == "up":
action = 0
elif next_direction == "right":
action = 1
elif next_direction == "down":
action = 2
elif next_direction == "left":
action = 3

return action

def get_s_next(s, a, Q, epsilon, pi_0):
direction = ["up", "right", "down", "left"]
next_direction = direction[a] # 行動aの方向

# 行動から次の状態を決める
if next_direction == "up":
s_next = s - 3 # 上に移動するときは状態の数字が3小さくなる
elif next_direction == "right":
s_next = s + 1 # 右に移動するときは状態の数字が1大きくなる
elif next_direction == "down":
s_next = s + 3 # 下に移動するときは状態の数字が3大きくなる
elif next_direction == "left":
s_next = s - 1 # 左に移動するときは状態の数字が1小さくなる

return s_next

行動価値関数Q(s,a)が正しい値になるように学習して更新する処理を実装します。
gammaは時間割引率で未来の報酬を割り引いています。

SarsaとQ学習の違いはこのコードだけになります。
Sarsaは更新時に次の行動を求めて更新に使用していましたが、Q学習では状態の行動価値関数の値のうち、最も大きいものを更新に使用します。

1
2
3
4
5
6
7
8
9
10
# Q学習による行動価値関数Qの更新
def Q_learning(s, a, r, s_next, Q, eta, gamma):

if s_next == 8: # ゴールした場合
Q[s, a] = Q[s, a] + eta * (r - Q[s, a])

else:
Q[s, a] = Q[s, a] + eta * (r + gamma * np.nanmax(Q[s_next,: ]) - Q[s, a])

return Q

Q学習に従って迷路を解く処理を実装します。

1
2
3
4
5
6
7
8
9
10
11
12
13
14
15
16
17
18
19
20
21
22
23
24
25
26
27
28
29
30
31
32
33
34
35
36
37
# Q学習で迷路を解く関数の定義、状態と行動の履歴および更新したQを出力
def goal_maze_ret_s_a_Q(Q, epsilon, eta, gamma, pi):
s = 0 # スタート地点
a = a_next = get_action(s, Q, epsilon, pi) # 初期の行動
s_a_history = [[0, np.nan]] # エージェントの移動を記録するリスト

while (1): # ゴールするまでループ
a = a_next # 行動更新

s_a_history[-1][1] = a
# 現在の状態(つまり一番最後なのでindex=-1)に行動を代入

s_next = get_s_next(s, a, Q, epsilon, pi)
# 次の状態を格納

s_a_history.append([s_next, np.nan])
# 次の状態を代入。行動はまだ分からないのでnanにしておく

# 報酬を与え, 次の行動を求めます
if s_next == 8:
r = 1 # ゴールにたどり着いたなら報酬を与える
a_next = np.nan
else:
r = 0
a_next = get_action(s_next, Q, epsilon, pi)
# 次の行動a_nextを求めます。

# 価値関数を更新
Q = Q_learning(s, a, r, s_next, Q, eta, gamma)

# 終了判定
if s_next == 8: # ゴール地点なら終了
break
else:
s = s_next

return [s_a_history, Q]

価値関数の更新を繰り返す処理を実装します。
今回の学習終了条件は、100エピソードを行うこととしました。

Q学習で迷路を解く部分は、各エピソードでの状態価値関数の値を変数Vに格納しています。

1
2
3
4
5
6
7
8
9
10
11
12
13
14
15
16
17
18
19
20
21
22
23
24
25
26
27
28
29
30
31
# Q学習で迷路を解く
eta = 0.1 # 学習率
gamma = 0.9 # 時間割引率
epsilon = 0.5 # ε-greedy法の初期値
v = np.nanmax(Q, axis=1) # 状態ごとに価値の最大値を求める
is_continue = True
episode = 1

V = [] # エピソードごとの状態価値を格納する
V.append(np.nanmax(Q, axis=1)) # 状態ごとに行動価値の最大値を求める

while is_continue: # is_continueがFalseになるまで繰り返す
print("エピソード:" + str(episode))
# ε-greedyの値を少しずつ小さくする
epsilon = epsilon / 2

# Q学習で迷路を解き、移動した履歴と更新したQを求める
[s_a_history, Q] = goal_maze_ret_s_a_Q(Q, epsilon, eta, gamma, pi_0)

# 状態価値の変化
new_v = np.nanmax(Q, axis=1) # 状態ごとに行動価値の最大値を求める
print(np.sum(np.abs(new_v - v))) # 状態価値関数の変化を出力
v = new_v
V.append(v) # このエピソード終了時の状態価値関数を追加

print("迷路を解くのにかかったステップ数は" + str(len(s_a_history) - 1) + "です")

# 100エピソード繰り返す
episode = episode + 1
if episode > 100:
break

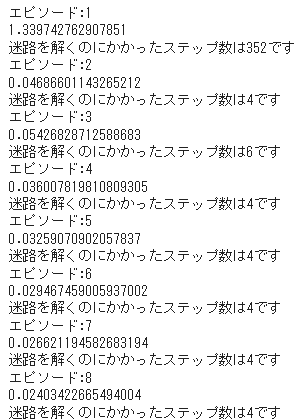
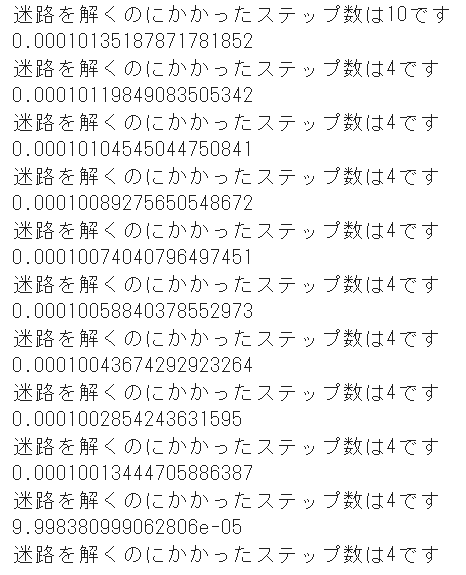
実行結果 エピソード:1~8

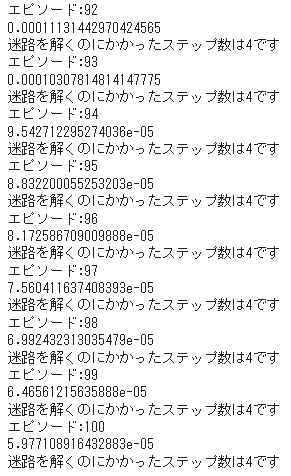
エピソード6以降はずっと最小の4ステップで安定しました。

実行結果 エピソード:92~100

エピソードごとに状態価値関数がどのように変化したのかを可視化します。

1
2
3
4
5
6
7
8
9
10
11
12
13
14
15
16
17
18
19
20
21
22
23
24
25
26
27
28
29
30
31
32
33
34
35
36
37
38
# 状態価値の変化を可視化します
from matplotlib import animation
from IPython.display import HTML
import matplotlib.cm as cm # color map

def init():
# 背景画像の初期化
line.set_data([], [])
return (line,)

def animate(i):
# フレームごとの描画内容
# 各マスに状態価値の大きさに基づく色付きの四角を描画
line, = ax.plot([0.5], [2.5], marker="s",
color=cm.jet(V[i][0]), markersize=85) # S0
line, = ax.plot([1.5], [2.5], marker="s",
color=cm.jet(V[i][1]), markersize=85) # S1
line, = ax.plot([2.5], [2.5], marker="s",
color=cm.jet(V[i][2]), markersize=85) # S2
line, = ax.plot([0.5], [1.5], marker="s",
color=cm.jet(V[i][3]), markersize=85) # S3
line, = ax.plot([1.5], [1.5], marker="s",
color=cm.jet(V[i][4]), markersize=85) # S4
line, = ax.plot([2.5], [1.5], marker="s",
color=cm.jet(V[i][5]), markersize=85) # S5
line, = ax.plot([0.5], [0.5], marker="s",
color=cm.jet(V[i][6]), markersize=85) # S6
line, = ax.plot([1.5], [0.5], marker="s",
color=cm.jet(V[i][7]), markersize=85) # S7
line, = ax.plot([2.5], [0.5], marker="s",
color=cm.jet(1.0), markersize=85) # S8
return (line,)

# 初期化関数とフレームごとの描画関数を用いて動画を作成
anim = animation.FuncAnimation(
fig, animate, init_func=init, frames=len(V), interval=200, repeat=False)

HTML(anim.to_jshtml())

最初は青だったマス目が次第に赤く変化していく様子が分かります。
完全に赤色にならないのは時間割引率で状態価値が割り引かれているためです。

ポイントは報酬が得られるゴールから逆向きに状態価値が学習されていくことと、学習後にはスタートからゴールへの道筋ができているということです。

(Google Colaboratoryで動作確認しています。)

参考

つくりながら学ぶ!深層強化学習 サポートページ
迷路をSarsaで解く

価値反復法の1つSarsaで迷路を攻略します。
Sarsaでは1エピソードごとではなく1ステップごとに更新を行います。

まず使用するパッケージをインポートします。

1
2
3
4
# 使用するパッケージの宣言
import numpy as np
import matplotlib.pyplot as plt
%matplotlib inline

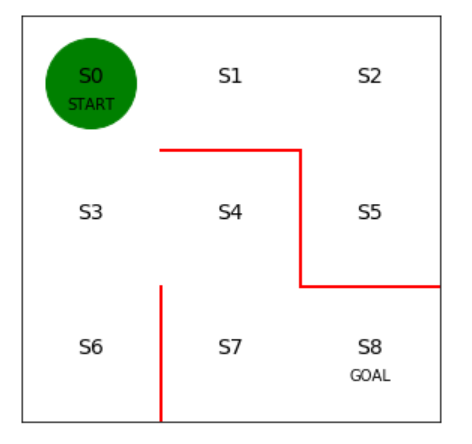
次に迷路の初期状態を描画します。

1
2
3
4
5
6
7
8
9
10
11
12
13
14
15
16
17
18
19
20
21
22
23
24
25
26
27
28
29
30
31
32
33
# 初期位置での迷路の様子

# 図を描く大きさと、図の変数名を宣言
fig = plt.figure(figsize=(5, 5))
ax = plt.gca()

# 赤い壁を描く
plt.plot([1, 1], [0, 1], color='red', linewidth=2)
plt.plot([1, 2], [2, 2], color='red', linewidth=2)
plt.plot([2, 2], [2, 1], color='red', linewidth=2)
plt.plot([2, 3], [1, 1], color='red', linewidth=2)

# 状態を示す文字S0~S8を描く
plt.text(0.5, 2.5, 'S0', size=14, ha='center')
plt.text(1.5, 2.5, 'S1', size=14, ha='center')
plt.text(2.5, 2.5, 'S2', size=14, ha='center')
plt.text(0.5, 1.5, 'S3', size=14, ha='center')
plt.text(1.5, 1.5, 'S4', size=14, ha='center')
plt.text(2.5, 1.5, 'S5', size=14, ha='center')
plt.text(0.5, 0.5, 'S6', size=14, ha='center')
plt.text(1.5, 0.5, 'S7', size=14, ha='center')
plt.text(2.5, 0.5, 'S8', size=14, ha='center')
plt.text(0.5, 2.3, 'START', ha='center')
plt.text(2.5, 0.3, 'GOAL', ha='center')

# 描画範囲の設定と目盛りを消す設定
ax.set_xlim(0, 3)
ax.set_ylim(0, 3)
plt.tick_params(axis='both', which='both', bottom='off', top='off',
labelbottom='off', right='off', left='off', labelleft='off')

# 現在地S0に緑丸を描画する
line, = ax.plot([0.5], [2.5], marker="o", color='g', markersize=60)

実行結果1

初期の方策を決定するパラメータtheta_0を設定します。

行は状態0~7を表し、列は上、右、下、左へ行動できるかどうかを表します。
状態8はゴールなので方策の定義は不要です。

1
2
3
4
5
6
7
8
9
10
11
# 初期の方策を決定するパラメータtheta_0を設定
# 行は状態0~7、列は移動方向で↑、→、↓、←を表す
theta_0 = np.array([[np.nan, 1, 1, np.nan], # s0
[np.nan, 1, np.nan, 1], # s1
[np.nan, np.nan, 1, 1], # s2
[1, 1, 1, np.nan], # s3
[np.nan, np.nan, 1, 1], # s4
[1, np.nan, np.nan, np.nan], # s5
[1, np.nan, np.nan, np.nan], # s6
[1, 1, np.nan, np.nan], # s7、※s8はゴールなので、方策はなし
])

方策パラメータθ0をランダム方策piに変換する関数を定義します。

1
2
3
4
5
6
7
8
9
10
11
12
13
14
# 方策パラメータtheta_0をランダム方策piに変換する関数の定義
def simple_convert_into_pi_from_theta(theta):
'''単純に割合を計算する'''
[m, n] = theta.shape # thetaの行列サイズを取得
pi = np.zeros((m, n))
for i in range(0, m):
pi[i, :] = theta[i, :] / np.nansum(theta[i, :]) # 割合の計算

pi = np.nan_to_num(pi) # nanを0に変換

return pi

# ランダム行動方策pi_0を求める
pi_0 = simple_convert_into_pi_from_theta(theta_0)

初期の行動価値関数Qを設定します。

行動価値関数は、行が状態sを表し、列が行動aを表します。
最初は正しい行動価値がわからないのでランダムな値を設定します。

1
2
3
4
# 初期の行動価値関数Qを設定
[a, b] = theta_0.shape # 行と列の数をa, bに格納
Q = np.random.rand(a, b) * theta_0
# * theta0をすることで要素ごとに掛け算をし、Qの壁方向の値がnanになる

ε-greedy法を実装します。
一定確率εでランダムに行動し、残りの1-εの確率で行動価値Qが最大になる行動をとります。

get_action()が行動を求める関数で、get_s_next()が行動を引数に次の状態を求める関数になります。

1
2
3
4
5
6
7
8
9
10
11
12
13
14
15
16
17
18
19
20
21
22
23
24
25
26
27
28
29
30
31
32
33
34
35
36
37
38
39
# ε-greedy法を実装
def get_action(s, Q, epsilon, pi_0):
direction = ["up", "right", "down", "left"]

# 行動を決める
if np.random.rand() < epsilon:
# εの確率でランダムに動く
next_direction = np.random.choice(direction, p=pi_0[s, :])
else:
# Qの最大値の行動を採用する
next_direction = direction[np.nanargmax(Q[s, :])]

# 行動をindexに
if next_direction == "up":
action = 0
elif next_direction == "right":
action = 1
elif next_direction == "down":
action = 2
elif next_direction == "left":
action = 3

return action

def get_s_next(s, a, Q, epsilon, pi_0):
direction = ["up", "right", "down", "left"]
next_direction = direction[a] # 行動aの方向

# 行動から次の状態を決める
if next_direction == "up":
s_next = s - 3 # 上に移動するときは状態の数字が3小さくなる
elif next_direction == "right":
s_next = s + 1 # 右に移動するときは状態の数字が1大きくなる
elif next_direction == "down":
s_next = s + 3 # 下に移動するときは状態の数字が3大きくなる
elif next_direction == "left":
s_next = s - 1 # 左に移動するときは状態の数字が1小さくなる

return s_next

行動価値関数Q(s,a)が正しい値になるように学習して更新する処理を実装します。
gammaは時間割引率で未来の報酬を割り引いています。

1
2
3
4
5
6
7
8
# Sarsaによる行動価値関数Qの更新
def Sarsa(s, a, r, s_next, a_next, Q, eta, gamma):
if s_next == 8: # ゴールした場合
Q[s, a] = Q[s, a] + eta * (r - Q[s, a])
else:
Q[s, a] = Q[s, a] + eta * (r + gamma * Q[s_next, a_next] - Q[s, a])

return Q

Sarsaに従って迷路を解く処理を実装します。
1エピソードごとではなく1ステップごとに更新を行います。

1
2
3
4
5
6
7
8
9
10
11
12
13
14
15
16
17
18
19
20
21
22
23
24
25
26
27
28
29
30
31
32
33
34
35
36
37
# Sarsaで迷路を解く関数の定義、状態と行動の履歴および更新したQを出力
def goal_maze_ret_s_a_Q(Q, epsilon, eta, gamma, pi):
s = 0 # スタート地点
a = a_next = get_action(s, Q, epsilon, pi) # 初期の行動
s_a_history = [[0, np.nan]] # エージェントの移動を記録するリスト

while (1): # ゴールするまでループ
a = a_next # 行動更新

s_a_history[-1][1] = a
# 現在の状態(つまり一番最後なのでindex=-1)に行動を代入

s_next = get_s_next(s, a, Q, epsilon, pi)
# 次の状態を格納

s_a_history.append([s_next, np.nan])
# 次の状態を代入。行動はまだ分からないのでnanにしておく

# 報酬を与え, 次の行動を求めます
if s_next == 8:
r = 1 # ゴールにたどり着いたなら報酬を与える
a_next = np.nan
else:
r = 0
a_next = get_action(s_next, Q, epsilon, pi)
# 次の行動a_nextを求めます。

# 価値関数を更新
Q = Sarsa(s, a, r, s_next, a_next, Q, eta, gamma)

# 終了判定
if s_next == 8: # ゴール地点なら終了
break
else:
s = s_next

return [s_a_history, Q]

価値関数の更新を繰り返す処理を実装します。
今回の学習終了条件は、100エピソードを行うこととしました。

1
2
3
4
5
6
7
8
9
10
11
12
13
14
15
16
17
18
19
20
21
22
23
24
25
26
27
28
# Sarsaで迷路を解く
eta = 0.1 # 学習率
gamma = 0.9 # 時間割引率
epsilon = 0.5 # ε-greedy法の初期値
v = np.nanmax(Q, axis=1) # 状態ごとに価値の最大値を求める
is_continue = True
episode = 1

while is_continue: # is_continueがFalseになるまで繰り返す
print("エピソード:" + str(episode))

# ε-greedyの値を少しずつ小さくする
epsilon = epsilon / 2

# Sarsaで迷路を解き、移動した履歴と更新したQを求める
[s_a_history, Q] = goal_maze_ret_s_a_Q(Q, epsilon, eta, gamma, pi_0)

# 状態価値の変化
new_v = np.nanmax(Q, axis=1) # 状態ごとに価値の最大値を求める
print(np.sum(np.abs(new_v - v))) # 状態価値の変化を出力
v = new_v

print("迷路を解くのにかかったステップ数は" + str(len(s_a_history) - 1) + "です")

# 100エピソード繰り返す
episode = episode + 1
if episode > 100:
break

実行結果 エピソード:1~8
エピソード2ですでに最小ステップ4となっています。エピソード3では6ステップと増えましたがその後は、ずっと4ステップのままです。

実行結果 エピソード:92~100

エピソード100を実行するまでもなくずっと最小の4ステップで安定しました。
今回の迷路と解く問題では方策反復法よりも価値反復法の方が早く学習できるという結果になりました。

(Google Colaboratoryで動作確認しています。)

参考

つくりながら学ぶ!深層強化学習 サポートページ
迷路を方策勾配法で解く

前回はランダムに行動する方策を実装しましたが、今回は方策勾配法に従ってエージェントを動かしてみます。

まず使用するパッケージをインポートします。

1
2
3
4
# 使用するパッケージの宣言
import numpy as np
import matplotlib.pyplot as plt
%matplotlib inline

次に迷路の初期状態を描画します。

1
2
3
4
5
6
7
8
9
10
11
12
13
14
15
16
17
18
19
20
21
22
23
24
25
26
27
28
29
30
31
32
# 初期位置での迷路の様子
# 図を描く大きさと、図の変数名を宣言
fig = plt.figure(figsize=(5, 5))
ax = plt.gca()

# 赤い壁を描く
plt.plot([1, 1], [0, 1], color='red', linewidth=2)
plt.plot([1, 2], [2, 2], color='red', linewidth=2)
plt.plot([2, 2], [2, 1], color='red', linewidth=2)
plt.plot([2, 3], [1, 1], color='red', linewidth=2)

# 状態を示す文字S0~S8を描く
plt.text(0.5, 2.5, 'S0', size=14, ha='center')
plt.text(1.5, 2.5, 'S1', size=14, ha='center')
plt.text(2.5, 2.5, 'S2', size=14, ha='center')
plt.text(0.5, 1.5, 'S3', size=14, ha='center')
plt.text(1.5, 1.5, 'S4', size=14, ha='center')
plt.text(2.5, 1.5, 'S5', size=14, ha='center')
plt.text(0.5, 0.5, 'S6', size=14, ha='center')
plt.text(1.5, 0.5, 'S7', size=14, ha='center')
plt.text(2.5, 0.5, 'S8', size=14, ha='center')
plt.text(0.5, 2.3, 'START', ha='center')
plt.text(2.5, 0.3, 'GOAL', ha='center')

# 描画範囲の設定と目盛りを消す設定
ax.set_xlim(0, 3)
ax.set_ylim(0, 3)
plt.tick_params(axis='both', which='both', bottom='off', top='off',
labelbottom='off', right='off', left='off', labelleft='off')

# 現在地S0に緑丸を描画する
line, = ax.plot([0.5], [2.5], marker="o", color='g', markersize=60)

実行結果1

初期の方策を決定するパラメータtheta_0を設定します。

行は状態0~7を表し、列は上、右、下、左へ行動できるかどうかを表します。
状態8はゴールなので方策の定義は不要です。

1
2
3
4
5
6
7
8
9
10
11
# 初期の方策を決定するパラメータtheta_0を設定
# 行は状態0~7、列は移動方向で↑、→、↓、←を表す
theta_0 = np.array([[np.nan, 1, 1, np.nan], # s0
[np.nan, 1, np.nan, 1], # s1
[np.nan, np.nan, 1, 1], # s2
[1, 1, 1, np.nan], # s3
[np.nan, np.nan, 1, 1], # s4
[1, np.nan, np.nan, np.nan], # s5
[1, np.nan, np.nan, np.nan], # s6
[1, 1, np.nan, np.nan], # s7、※s8はゴールなので、方策はなし
])

方策パラメータ(theta)をsoftmax関数で行動方策(pi)に変換する関数を定義します。
betaは逆温度と呼ばれ、小さいほど行動がランダムになります。
さらに指数関数(np.exp)を使って割合を計算しています。

softmax関数を使用するとパラメータθが負の値になっても方策を算出できるというメリットがあります。

1
2
3
4
5
6
7
8
9
10
11
12
13
14
15
16
17
18
# 方策パラメータthetaを行動方策piにソフトマックス関数で変換する手法の定義
def softmax_convert_into_pi_from_theta(theta):
'''ソフトマックス関数で割合を計算する'''
beta = 1.0
[m, n] = theta.shape # thetaの行列サイズを取得
pi = np.zeros((m, n))

exp_theta = np.exp(beta * theta) # thetaをexp(theta)へと変換

for i in range(0, m):
# pi[i, :] = theta[i, :] / np.nansum(theta[i, :])
# simpleに割合の計算の場合
pi[i, :] = exp_theta[i, :] / np.nansum(exp_theta[i, :])
# softmaxで計算の場合

pi = np.nan_to_num(pi) # nanを0に変換

return pi

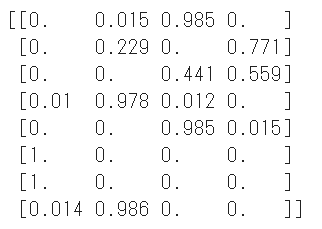
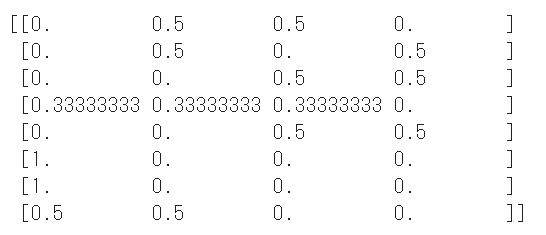
上記で定義したsoftmax_convert_into_pi_from_theta関数を使ってθ0から方策を算出します。

1
2
3
# 初期の方策pi_0を求める
pi_0 = softmax_convert_into_pi_from_theta(theta_0)
print(pi_0)

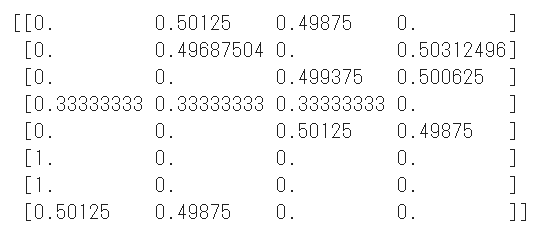
実行結果2
学習前のため前回(ランダム行動)の方策と同じ結果になりますが問題ありません。

続いてsoftmax関数による方策に従ってエージェントを行動させる関数を実装します。
1ステップ移動後のエージェントの状態とその時の行動を返します。

1
2
3
4
5
6
7
8
9
10
11
12
13
14
15
16
17
18
19
20
# 行動aと1step移動後の状態sを求める関数を定義
def get_action_and_next_s(pi, s):
direction = ["up", "right", "down", "left"]
# pi[s,:]の確率に従って、directionが選択される
next_direction = np.random.choice(direction, p=pi[s, :])

if next_direction == "up":
action = 0
s_next = s - 3 # 上に移動するときは状態の数字が3小さくなる
elif next_direction == "right":
action = 1
s_next = s + 1 # 右に移動するときは状態の数字が1大きくなる
elif next_direction == "down":
action = 2
s_next = s + 3 # 下に移動するときは状態の数字が3大きくなる
elif next_direction == "left":
action = 3
s_next = s - 1 # 左に移動するときは状態の数字が1小さくなる

return [action, s_next]

ゴールにたどり着くまでエージェントを移動させ続ける関数を定義します。
状態と行動の履歴をセットで返します。

1
2
3
4
5
6
7
8
9
10
11
12
13
14
15
16
17
18
19
# 迷路を解く関数の定義、状態と行動の履歴を出力
def goal_maze_ret_s_a(pi):
s = 0 # スタート地点
s_a_history = [[0, np.nan]] # エージェントの移動を記録するリスト

while (1): # ゴールするまでループ
[action, next_s] = get_action_and_next_s(pi, s)
s_a_history[-1][1] = action
# 現在の状態(つまり一番最後なのでindex=-1)の行動を代入

s_a_history.append([next_s, np.nan])
# 次の状態を代入。行動はまだ分からないのでnanにしておく

if next_s == 8: # ゴール地点なら終了
break
else:
s = next_s

return s_a_history

初期の方策で迷路を解いてみます。

1
2
3
4
# 初期の方策で迷路を解く
s_a_history = goal_maze_ret_s_a(pi_0)
print(s_a_history)
print("迷路を解くのにかかったステップ数は" + str(len(s_a_history) - 1) + "です")

実行結果3(途中略)
スタートからゴールまでの状態と行動のセットが表示されます。
最後にトータルで何ステップかかったかを表示しています。

方策勾配法に従い方策を更新する関数を定義します。

学習率etaは1回の学習で更新される大きさを表します。
学習率が小さすぎるとなかなか学習が進みませんし、大きすぎるときちんと学習することができません。

方策の更新のために下記の3つを入力しています。

  • 現在の方策 theta
  • 方策 pi
  • 現在の方策での実行結果 s_a_history
1
2
3
4
5
6
7
8
9
10
11
12
13
14
15
16
17
18
19
20
21
22
23
24
25
26
27
28
29
# thetaの更新関数を定義します
def update_theta(theta, pi, s_a_history):
eta = 0.1 # 学習率
T = len(s_a_history) - 1 # ゴールまでの総ステップ数

[m, n] = theta.shape # thetaの行列サイズを取得
delta_theta = theta.copy() # Δthetaの元を作成、ポインタ参照なので、delta_theta = thetaはダメ

# delta_thetaを要素ごとに求めます
for i in range(0, m):
for j in range(0, n):
if not(np.isnan(theta[i, j])): # thetaがnanでない場合

SA_i = [SA for SA in s_a_history if SA[0] == i]
# 履歴から状態iのものを取り出すリスト内包表記です

SA_ij = [SA for SA in s_a_history if SA == [i, j]]
# 状態iで行動jをしたものを取り出す

N_i = len(SA_i) # 状態iで行動した総回数
N_ij = len(SA_ij) # 状態iで行動jをとった回数

# 初版では符号の正負に間違いがありました(修正日:180703)
#delta_theta[i, j] = (N_ij + pi[i, j] * N_i) / T
delta_theta[i, j] = (N_ij - pi[i, j] * N_i) / T

new_theta = theta + eta * delta_theta

return new_theta

方策を更新し、方策がどう変化するのかを確認します。

1
2
3
4
# 方策の更新
new_theta = update_theta(theta_0, pi_0, s_a_history)
pi = softmax_convert_into_pi_from_theta(new_theta)
print(pi)

実行結果4
最初の方策から少し変化していることが分かります。

迷路をノーミスでクリアできるまで迷路内の探索とパラメータθの更新を繰り返す処理を実装します。

学習終了条件は課題に応じて調整する必要がありますが、今回は方策変化の絶対値和が10**-4より小さくなったら終了とします。

1
2
3
4
5
6
7
8
9
10
11
12
13
14
15
16
17
18
19
20
21
# 方策勾配法で迷路を解く
stop_epsilon = 10**-4 # 10^-4よりも方策に変化が少なくなったら学習終了とする

theta = theta_0
pi = pi_0

is_continue = True
count = 1
while is_continue: # is_continueがFalseになるまで繰り返す
s_a_history = goal_maze_ret_s_a(pi) # 方策πで迷路内を探索した履歴を求める
new_theta = update_theta(theta, pi, s_a_history) # パラメータΘを更新
new_pi = softmax_convert_into_pi_from_theta(new_theta) # 方策πの更新

print(np.sum(np.abs(new_pi - pi))) # 方策の変化を出力
print("迷路を解くのにかかったステップ数は" + str(len(s_a_history) - 1) + "です")

if np.sum(np.abs(new_pi - pi)) < stop_epsilon:
is_continue = False
else:
theta = new_theta
pi = new_pi

実行結果5(途中略)
最終的にゴールまで最小ステップ数の4となっていることが分かります。

最終的な方策を確認してみます。

1
2
3
# 最終的な方策を確認
np.set_printoptions(precision=3, suppress=True) # 有効桁数3、指数表示しないという設定
print(pi)

実行結果6

最後に動画でエージェントの移動を可視化します。

1
2
3
4
5
6
7
8
9
10
11
12
13
14
15
16
17
18
19
20
21
22
23
# エージェントの移動の様子を可視化します
# 参考URL http://louistiao.me/posts/notebooks/embedding-matplotlib-animations-in-jupyter-notebooks/
from matplotlib import animation
from IPython.display import HTML

def init():
# 背景画像の初期化
line.set_data([], [])
return (line,)

def animate(i):
# フレームごとの描画内容
state = s_a_history[i][0] # 現在の場所を描く
x = (state % 3) + 0.5 # 状態のx座標は、3で割った余り+0.5
y = 2.5 - int(state / 3) # y座標は3で割った商を2.5から引く
line.set_data(x, y)
return (line,)

# 初期化関数とフレームごとの描画関数を用いて動画を作成
anim = animation.FuncAnimation(fig, animate, init_func=init, frames=len(
s_a_history), interval=500, repeat=False)

HTML(anim.to_jshtml())

スタート地点からまっすぐゴールにたどり着いていることが分かります。

(Google Colaboratoryで動作確認しています。)

参考

つくりながら学ぶ!深層強化学習 サポートページ
迷路内をランダムに探索させる

3×3の迷路をランダムに探索してゴールを目指すエージェントを実装します。
S0地点がスタート位置で、S8地点がゴール位置になります。

使用するパッケージをインポートします。

1
2
3
4
# 使用するパッケージの宣言
import numpy as np
import matplotlib.pyplot as plt
%matplotlib inline

次に迷路の初期状態を描画します。

1
2
3
4
5
6
7
8
9
10
11
12
13
14
15
16
17
18
19
20
21
22
23
24
25
26
27
28
29
30
31
32
# 初期位置での迷路の様子
# 図を描く大きさと、図の変数名を宣言
fig = plt.figure(figsize=(5, 5))
ax = plt.gca()

# 赤い壁を描く
plt.plot([1, 1], [0, 1], color='red', linewidth=2)
plt.plot([1, 2], [2, 2], color='red', linewidth=2)
plt.plot([2, 2], [2, 1], color='red', linewidth=2)
plt.plot([2, 3], [1, 1], color='red', linewidth=2)

# 状態を示す文字S0~S8を描く
plt.text(0.5, 2.5, 'S0', size=14, ha='center')
plt.text(1.5, 2.5, 'S1', size=14, ha='center')
plt.text(2.5, 2.5, 'S2', size=14, ha='center')
plt.text(0.5, 1.5, 'S3', size=14, ha='center')
plt.text(1.5, 1.5, 'S4', size=14, ha='center')
plt.text(2.5, 1.5, 'S5', size=14, ha='center')
plt.text(0.5, 0.5, 'S6', size=14, ha='center')
plt.text(1.5, 0.5, 'S7', size=14, ha='center')
plt.text(2.5, 0.5, 'S8', size=14, ha='center')
plt.text(0.5, 2.3, 'START', ha='center')
plt.text(2.5, 0.3, 'GOAL', ha='center')

# 描画範囲の設定と目盛りを消す設定
ax.set_xlim(0, 3)
ax.set_ylim(0, 3)
plt.tick_params(axis='both', which='both', bottom='off', top='off',
labelbottom='off', right='off', left='off', labelleft='off')

# 現在地S0に緑丸を描画する
line, = ax.plot([0.5], [2.5], marker="o", color='g', markersize=60)

実行結果1

エージェントを実装します。エージェントは緑色の丸で表示します。

エージェントがどのように行動するのかを決めたルールは方策(Policy)といいます。
初期の方策を決定するパラメータtheta_0を設定します。

行は状態0~7を表し、列は上、右、下、左へ行動できるかどうかを表します。
状態8はゴールなので方策の定義は不要です。

1
2
3
4
5
6
7
8
9
10
11
12
# 初期の方策を決定するパラメータtheta_0を設定

# 行は状態0~7、列は移動方向で↑、→、↓、←を表す
theta_0 = np.array([[np.nan, 1, 1, np.nan], # s0
[np.nan, 1, np.nan, 1], # s1
[np.nan, np.nan, 1, 1], # s2
[1, 1, 1, np.nan], # s3
[np.nan, np.nan, 1, 1], # s4
[1, np.nan, np.nan, np.nan], # s5
[1, np.nan, np.nan, np.nan], # s6
[1, 1, np.nan, np.nan], # s7、※s8はゴールなので、方策はなし
])

パラメータtheta_0を割合に変換して確率にします。

1
2
3
4
5
6
7
8
9
10
11
# 方策パラメータthetaを行動方策piに変換する関数の定義
def simple_convert_into_pi_from_theta(theta):
'''単純に割合を計算する'''
[m, n] = theta.shape # thetaの行列サイズを取得
pi = np.zeros((m, n))
for i in range(0, m):
pi[i, :] = theta[i, :] / np.nansum(theta[i, :]) # 割合の計算

pi = np.nan_to_num(pi) # nanを0に変換

return pi

初期の方策pi_0を算出します。

1
2
# 初期の方策pi_0を求める
pi_0 = simple_convert_into_pi_from_theta(theta_0)

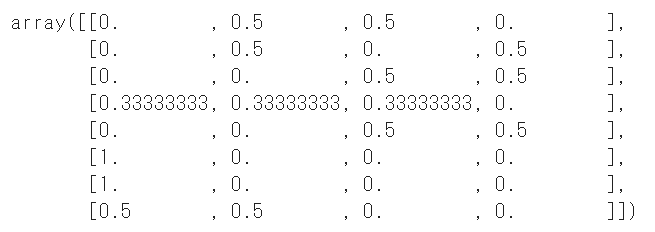
初期の方策pi_0を表示します。

1
2
# 初期の方策pi_0を表示
pi_0

実行結果2

続いて、方策pi_0に従ってエージェントを行動させます。
1step移動後の状態sを求める関数get_next_sを定義します。

迷路の位置は0~8の番号で定義しているため、上に移動する場合は数字を3小さくすればよいことになります。

1
2
3
4
5
6
7
8
9
10
11
12
13
14
15
16
# 1step移動後の状態sを求める関数を定義
def get_next_s(pi, s):
direction = ["up", "right", "down", "left"]

next_direction = np.random.choice(direction, p=pi[s, :])
# pi[s,:]の確率に従って、directionが選択される
if next_direction == "up":
s_next = s - 3 # 上に移動するときは状態の数字が3小さくなる
elif next_direction == "right":
s_next = s + 1 # 右に移動するときは状態の数字が1大きくなる
elif next_direction == "down":
s_next = s + 3 # 下に移動するときは状態の数字が3大きくなる
elif next_direction == "left":
s_next = s - 1 # 左に移動するときは状態の数字が1小さくなる

return s_next

迷路内をエージェントがゴールするまで移動させる関数を定義します。
ゴールにたどり着くまでwhile文で移動し続け、状態の軌跡をstate_historyに格納しています。

1
2
3
4
5
6
7
8
9
10
11
12
13
14
15
# 迷路内をエージェントがゴールするまで移動させる関数の定義
def goal_maze(pi):
s = 0 # スタート地点
state_history = [0] # エージェントの移動を記録するリスト

while (1): # ゴールするまでループ
next_s = get_next_s(pi, s)
state_history.append(next_s) # 記録リストに次の状態(エージェントの位置)を追加

if next_s == 8: # ゴール地点なら終了
break
else:
s = next_s

return state_history

方策pi_0に従ってエージェントを移動させます。

1
2
# 迷路内をゴールを目指して、移動
state_history = goal_maze(pi_0)

ゴールするまでの移動の軌跡と、合計何ステップかかったかを確認します。

1
2
print(state_history)
print("迷路を解くのにかかったステップ数は" + str(len(state_history) - 1) + "です")

実行結果3
ランダムに移動しているので、状態の軌跡は実行するたびに変わります。


迷路内をエージェントが移動する様子を動画にしてみます。

1
2
3
4
5
6
7
8
9
10
11
12
13
14
15
16
17
18
19
20
21
# エージェントの移動の様子を可視化します
from matplotlib import animation
from IPython.display import HTML

def init():
'''背景画像の初期化'''
line.set_data([], [])
return (line,)

def animate(i):
'''フレームごとの描画内容'''
state = state_history[i] # 現在の場所を描く
x = (state % 3) + 0.5 # 状態のx座標は、3で割った余り+0.5
line.set_data(x, y)
return (line,)

# 初期化関数とフレームごとの描画関数を用いて動画を作成する
anim = animation.FuncAnimation(fig, animate, init_func=init, frames=len(
state_history), interval=200, repeat=False)

HTML(anim.to_jshtml())

動画を見ると何回もさまよいながら最終的にはゴールにたどり着く様子を見ることができます。

(Google Colaboratoryで動作確認しています。)

参考

つくりながら学ぶ!深層強化学習 サポートページ

ResNet (Resiidual Network) で画像分類

ResNet (Resiidual Network) で画像分類を行います。

ResNetでは残差ブロックというショートカット構造があることが特徴です。
畳み込み層にショートカットコネクション(迂回ルート)を追加し、畳み込み層で学習が不要になった場合迂回を行いより深い層の学習ができるようになります。

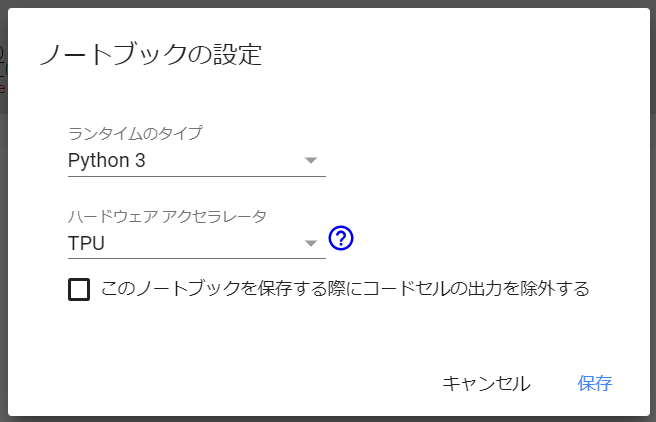
まずGoogle Colaboratoryのランタイムのハードウェアアクセラレータを「TPU」に設定します。
ハードウェアアクセラレータの設定

次にtensorflowのバージョンを1.13.1にします。

1
2
!pip uninstall tensorflow -y
!pip install tensorflow==1.13.1

インストール後にランタイムをリスタートする必要があります。


ResNetで必要なパッケージをインポートします。

1
2
3
4
5
6
7
8
9
10
11
12
# パッケージのインポート
from tensorflow.keras.datasets import cifar10
from tensorflow.keras.callbacks import LearningRateScheduler
from tensorflow.keras.layers import Activation, Add, BatchNormalization, Conv2D, Dense, GlobalAveragePooling2D, Input
from tensorflow.keras.models import Model
from tensorflow.keras.optimizers import SGD
from tensorflow.keras.preprocessing.image import ImageDataGenerator
from tensorflow.keras.regularizers import l2
from tensorflow.keras.utils import to_categorical
import numpy as np
import matplotlib.pyplot as plt
%matplotlib inline

データセットの準備を行います。

データセットの配列は下記のようになります。

配列 説明
train_images 訓練画像の配列
train_labels 訓練ラベルの配列
test_images テスト画像の配列
test_labels テストラベルの配列
1
2
# データセットの準備
(train_images, train_labels), (test_images, test_labels) = cifar10.load_data()

実行結果1

データセットのシェイプを確認します、

1
2
3
4
5
# データセットのシェイプの確認
print(train_images.shape)
print(train_labels.shape)
print(test_images.shape)
print(test_labels.shape)

実行結果2

訓練データと訓練ラベルは50000件、テスト画像とテストラベルは10000件です。
画像サイズは32×32×3です。RGB画像のため画像サイズ(32×32)×3となります。


先頭10件の訓練画像を確認します。

1
2
3
4
5
# データセットの画像の確認
for i in range(10):
plt.subplot(2, 5, i+1)
plt.imshow(train_images[i])
plt.show()

実行結果3

先頭10件の訓練ラベルの確認を行います。

1
2
# データセットのラベルの確認
print(train_labels[0:10])

実行結果4

ラベルの意味は下記の通りです。

ID 説明
0 airplane(飛行機)
1 automobile(自動車)
2 bird(鳥)
3 cat(猫)
4 deer(鹿)
5 dog(犬)
6 frog(カエル)
7 horse(馬)
8 ship(船)
9 truck(トラック)

データセットの前処理と確認を行います。

訓練ラベルとテストラベルのone-hot表現への変換を行います。

1
2
3
4
5
6
7
8
9
10
11
# データセットの前処理
train_images = train_images
train_labels = to_categorical(train_labels)
test_images = test_images
test_labels = to_categorical(test_labels)

# データセットの前処理後のシェイプの確認
print(train_images.shape)
print(train_labels.shape)
print(test_images.shape)
print(test_labels.shape)

実行結果5

畳み込み層の生成を行います。

Conv2Dのコンストラクタの引数は次の通りです。

引数 データ型 説明
filters int カーネル数
kernel_size int or tuple カーネルサイズ
strides int or tuple ストライド
padding str パディングで入力と同じサイズに戻すときはsame、戻さないときはvalid
user_bias boot バイアスを加えるかどうか
kernel_initializer str カーネルの重み行列の初期値。he_normalは正規分布による初期化
kernel_regularizer Regularizer kernelの重みに適用させる正則化。l2はL2正則化を利用
1
2
3
4
# 畳み込み層の生成
def conv(filters, kernel_size, strides=1):
return Conv2D(filters, kernel_size, strides=strides, padding='same', use_bias=False,
kernel_initializer='he_normal', kernel_regularizer=l2(0.0001))

残差ブロックAを生成します。

1
2
3
4
5
6
7
8
9
10
11
12
13
14
15
16
17
18
19
20
21
22
23
24
25
26
# 残差ブロックAの生成
def first_residual_unit(filters, strides):
def f(x):
# →BN→ReLU
x = BatchNormalization()(x)
b = Activation('relu')(x)

# 畳み込み層→BN→ReLU
x = conv(filters // 4, 1, strides)(b)
x = BatchNormalization()(x)
x = Activation('relu')(x)

# 畳み込み層→BN→ReLU
x = conv(filters // 4, 3)(x)
x = BatchNormalization()(x)
x = Activation('relu')(x)

# 畳み込み層→
x = conv(filters, 1)(x)

# ショートカットのシェイプサイズを調整
sc = conv(filters, 1, strides)(b)

# Add
return Add()([x, sc])
return f

残差ブロックBを生成します。

1
2
3
4
5
6
7
8
9
10
11
12
13
14
15
16
17
18
19
20
21
22
23
24
25
# 残差ブロックBの生成
def residual_unit(filters):
def f(x):
sc = x

# →BN→ReLU
x = BatchNormalization()(x)
x = Activation('relu')(x)

# 畳み込み層→BN→ReLU
x = conv(filters // 4, 1)(x)
x = BatchNormalization()(x)
x = Activation('relu')(x)

# 畳み込み層→BN→ReLU
x = conv(filters // 4, 3)(x)
x = BatchNormalization()(x)
x = Activation('relu')(x)

# 畳み込み層→
x = conv(filters, 1)(x)

# Add
return Add()([x, sc])
return f

残差ブロックAと残差ブロックB x 17を生成します。

1
2
3
4
5
6
7
8
# 残差ブロックAと残差ブロックB x 17の生成
def residual_block(filters, strides, unit_size):
def f(x):
x = first_residual_unit(filters, strides)(x)
for i in range(unit_size-1):
x = residual_unit(filters)(x)
return x
return f

畳み込み層を行い残差ブロック54個とプーリング層を重ねます。(特徴の抽出)
次に、全結合を1つ重ねます。(分類)

1
2
3
4
5
6
7
8
9
10
11
12
13
14
15
16
17
18
19
20
21
22
23
# 入力データのシェイプ
input = Input(shape=(32,32, 3))

# 畳み込み層
x = conv(16, 3)(input)

# 残差ブロック x 54
x = residual_block(64, 1, 18)(x)
x = residual_block(128, 2, 18)(x)
x = residual_block(256, 2, 18)(x)

# →BN→ReLU
x = BatchNormalization()(x)
x = Activation('relu')(x)

# プーリング層
x = GlobalAveragePooling2D()(x)

# 全結合層
output = Dense(10, activation='softmax', kernel_regularizer=l2(0.0001))(x)

# モデルの作成
model = Model(inputs=input, outputs=output)

TPUモデルへの変換への変換を行います。

1
2
3
4
5
6
7
8
9
# TPUモデルへの変換
import tensorflow as tf
import os
tpu_model = tf.contrib.tpu.keras_to_tpu_model(
model,
strategy=tf.contrib.tpu.TPUDistributionStrategy(
tf.contrib.cluster_resolver.TPUClusterResolver(tpu='grpc://' + os.environ['COLAB_TPU_ADDR'])
)
)

コンパイルを行います。
損失関数はcategorical_crossentropy、最適化関数はSGD、評価指標accを設定します。

1
2
# コンパイル
tpu_model.compile(loss='categorical_crossentropy', optimizer=SGD(momentum=0.9), metrics=['acc'])

ImageDataGeneratorを使って、データセット画像の正規化と水増しを行います。

1
2
3
4
5
6
7
8
9
10
11
12
13
14
# ImageDataGeneratorの準備
train_gen = ImageDataGenerator(
featurewise_center=True,
featurewise_std_normalization=True,
width_shift_range=0.125,
height_shift_range=0.125,
horizontal_flip=True)
test_gen = ImageDataGenerator(
featurewise_center=True,
featurewise_std_normalization=True)

# データセット全体の統計量を予め計算
for data in (train_gen, test_gen):
data.fit(train_images)

LearningRateSchedulerを準備します。
LearningRateSchedulerは学習中に学習率を変化させるコールバックです。
学習率をはじめに0.1、80エポック以降0.01、120エポック以降0.001となるように設定します。
学習率は正解から遠い時には大きく、正解に近くなった時には小さく更新することで、速く正確に正解にだとりつけるように調整します。

1
2
3
4
5
6
7
# LearningRateSchedulerの準備
def step_decay(epoch):
x = 0.1
if epoch >= 80: x = 0.01
if epoch >= 120: x = 0.001
return x
lr_decay = LearningRateScheduler(step_decay)

訓練画像と訓練ラベルの配列をモデルに渡して、学習を行います。

1
2
3
4
5
6
7
8
9
# 学習
batch_size = 128
history = tpu_model.fit_generator(
train_gen.flow(train_images, train_labels, batch_size=batch_size),
epochs=100,
steps_per_epoch=train_images.shape[0] // batch_size,
validation_data=test_gen.flow(test_images, test_labels, batch_size=batch_size),
validation_steps=test_images.shape[0] // batch_size,
callbacks=[lr_decay])

実行結果6(途中略)

学習結果をグラフ表示します。

1
2
3
4
5
6
7
# グラフの表示
plt.plot(history.history['acc'], label='acc')
plt.plot(history.history['val_acc'], label='val_acc')
plt.ylabel('accuracy')
plt.xlabel('epoch')
plt.legend(loc='best')
plt.show()

実行結果7

テスト画像とテストラベルの配列をモデルに渡して評価を実行し、正解率を取得します。

1
2
3
4
5
6
# 評価
batch_size = 128
test_loss, test_acc = tpu_model.evaluate_generator(
test_gen.flow(test_images, test_labels, batch_size=batch_size),
steps=10)
print('loss: {:.3f}\nacc: {:.3f}'.format(test_loss, test_acc ))

実行結果8
正解率は94.2%となりました。
畳み込みニューラルネットワークでは73.5%だったのでかなりの性能向上です。


先頭10件のテスト画像の判定を行い、予測結果を表示します。
1
2
3
4
5
6
7
8
9
10
11
12
13
14
# 推論する画像の表示
for i in range(10):
plt.subplot(2, 5, i+1)
plt.imshow(test_images[i])
plt.show()

# 推論したラベルの表示
test_predictions = tpu_model.predict_generator(
test_gen.flow(test_images[0:16], shuffle = False, batch_size=16),
steps=16) # 学習データ数を16個に増やす
test_predictions = np.argmax(test_predictions, axis=1)[0:10] # 結果数を10個に減らす
labels = ['airplane', 'automobile', 'bird', 'cat', 'deer',
'dog', 'frog', 'horse', 'ship', 'truck']
print([labels[n] for n in test_predictions])

実行結果9

全ての画像を正しく判定できていることが分かります。

(Google Colaboratoryで動作確認しています。)

参考

AlphaZero 深層学習・強化学習・探索 人工知能プログラミング実践入門 サポートページ

畳み込みニューラルネットワークで画像分類

畳み込みニューラルネットワークで写真の画像分類を行います。
畳み込みニューラルネットワークを使って効率よくデータの特徴を抽出することができます。

データセットはCIFAR-10を使用します。10個に分類された画像と正解ラベルを集めたデータセットで、訓練データ50000件、テストデータ10000件が含まれています。

まずGoogle Colaboratoryのランタイムのハードウェアアクセラレータを「TPU」に設定します。
ハードウェアアクセラレータの設定

次にtensorflowのバージョンを1.13.1にします。

1
2
!pip uninstall tensorflow -y
!pip install tensorflow==1.13.1

インストール後にランタイムをリスタートする必要があります。


畳み込みニューラルネットワークで必要なパッケージをインポートします。

1
2
3
4
5
6
7
8
9
# パッケージのインポート
from tensorflow.keras.datasets import cifar10
from tensorflow.keras.layers import Activation, Dense, Dropout, Conv2D, Flatten, MaxPool2D
from tensorflow.keras.models import Sequential, load_model
from tensorflow.keras.optimizers import Adam
from tensorflow.keras.utils import to_categorical
import numpy as np
import matplotlib.pyplot as plt
%matplotlib inline

データセットの準備を行います。

データセットの配列は下記のようになります。

配列 説明
train_images 訓練画像の配列
train_labels 訓練ラベルの配列
test_images テスト画像の配列
test_labels テストラベルの配列
1
2
# データセットの準備
(train_images, train_labels), (test_images, test_labels) = cifar10.load_data()

データセットのシェイプを確認します、

1
2
3
4
5
# データセットのシェイプの確認
print(train_images.shape)
print(train_labels.shape)
print(test_images.shape)
print(test_labels.shape)

実行結果1
訓練データと訓練ラベルは50000件、テスト画像とテストラベルは10000件です。
画像サイズは32×32×3です。RGB画像のため画像サイズ(32×32)×3となります。


先頭10件の訓練画像を確認します。

1
2
3
4
5
# データセットの画像の確認
for i in range(10):
plt.subplot(2, 5, i+1)
plt.imshow(train_images[i])
plt.show()

実行結果2
先頭10件の訓練ラベルの確認を行います。

1
2
# データセットのラベルの確認
print(train_labels[0:10])

実行結果3

ラベルの意味は下記の通りです。

ID 説明
0 airplane(飛行機)
1 automobile(自動車)
2 bird(鳥)
3 cat(猫)
4 deer(鹿)
5 dog(犬)
6 frog(カエル)
7 horse(馬)
8 ship(船)
9 truck(トラック)

データセットの前処理と確認を行います。 訓練画像とテスト画像の正規化を行います。画像のRGBは「0~255」なので255で割って「0.0~1.0」に変換します。
1
2
3
4
5
6
7
# データセットの画像の前処理
train_images = train_images.astype('float32')/255.0
test_images = test_images.astype('float32')/255.0

# データセットの画像の前処理後のシェイプの確認
print(train_images.shape)
print(test_images.shape)
![実行結果4](/img/chap3/3-4.png) 訓練ラベルとテストラベルをone-hot表現に変換します。
1
2
3
4
5
6
7
# データセットのラベルの前処理
train_labels = to_categorical(train_labels, 10)
test_labels = to_categorical(test_labels, 10)

# データセットのラベルの前処理後のシェイプの確認
print(train_labels.shape)
print(test_labels.shape)
![実行結果5](/img/chap3/3-5.png) 畳み込みニューラルネットワークのモデルを作成します。 モデルのネットワーク構造は下記の通りです。
  1. 特徴の抽出を行う。(畳み込みブロック)
  2. (1回目)畳み込み層→畳み込み層→プーリング層→Dropout
  3. (2回目)畳み込み層→畳み込み層→プーリング層→Dropout
  4. 1次元に変換する。(Flatten)
  5. 分類を行う。
  6. 全結合層
  7. Dropout
  8. 全結合層

利用するクラスは次の通りです。

クラス 説明
Conv2D 畳み込み層。引数はカーネル数、カーネルサイズ、活性化関数、パティング。
MaxPool2D プーリング層(Maxプーリング)。引数はプーリング適用領域。
Dense 全結合層。引数はユニット数と活性化関数。
Dropout ドロップアウト。引数は無効にする割合。
Flatten 層の入出力を1次元に変換。
1
2
3
4
5
6
7
8
9
10
11
12
13
14
15
16
17
18
19
20
#モデルの作成
model = Sequential()

# Conv→Conv→Pool→Dropout
model.add(Conv2D(32, (3, 3), activation='relu', padding='same', input_shape=(32, 32, 3)))
model.add(Conv2D(32, (3, 3), activation='relu', padding='same'))
model.add(MaxPool2D(pool_size=(2, 2)))
model.add(Dropout(0.25))

# Conv→Conv→Pool→Dropout
model.add(Conv2D(64, (3, 3), activation='relu', padding='same'))
model.add(MaxPool2D(pool_size=(2, 2)))
model.add(Dropout(0.25))

# Flatten→Dense→Dropout→Dense
model.add(Flatten())
model.add(Dense(512, activation='relu'))
model.add(Dropout(0.5))
model.add(Dense(10, activation='softmax'))

TPUモデルへの変換を行います。

1
2
3
4
5
6
7
8
9
# TPUモデルへの変換
import tensorflow as tf
import os
tpu_model = tf.contrib.tpu.keras_to_tpu_model(
model,
strategy=tf.contrib.tpu.TPUDistributionStrategy(
tf.contrib.cluster_resolver.TPUClusterResolver(tpu='grpc://' + os.environ['COLAB_TPU_ADDR'])
)
)

畳み込みニューラルネットワークモデルのコンパイルを行います。

1
2
# コンパイル
tpu_model.compile(loss='categorical_crossentropy', optimizer=Adam(lr=0.001), metrics=['acc'])

訓練画像と訓練ラベルの配列をモデルに渡して学習を開始します。

1
2
3
# 学習
history = tpu_model.fit(train_images, train_labels, batch_size=128,
epochs=20, validation_split=0.1)

実行結果6(途中略)
畳み込みニューラルネットワークの学習結果をグラフ表示します。

1
2
3
4
5
6
7
# グラフの表示
plt.plot(history.history['acc'], label='acc')
plt.plot(history.history['val_acc'], label='val_acc')
plt.ylabel('accuracy')
plt.xlabel('epoch')
plt.legend(loc='best')
plt.show()

実行結果7
学習が進むと正解率が上がっていくことが分かります。


テスト画像とテストラベルの配列をモデルに渡して評価を行い正解率を取得します。

1
2
3
# 評価
test_loss, test_acc = tpu_model.evaluate(test_images, test_labels)
print('loss: {:.3f}\nacc: {:.3f}'.format(test_loss, test_acc ))

実行結果8
正解率は73.5%となりました。


最後に、先頭10件のテストデータの推論を行い予測結果を取得します。

1
2
3
4
5
6
7
8
9
10
11
12
# 推論する画像の表示
for i in range(10):
plt.subplot(2, 5, i+1)
plt.imshow(test_images[i])
plt.show()

# 推論したラベルの表示
test_predictions = tpu_model.predict(test_images[0:16]) # 学習データ数を16個に増やす
test_predictions = np.argmax(test_predictions, axis=1)[0:10] # 結果数を10個に減らす
labels = ['airplane', 'automobile', 'bird', 'cat', 'deer',
'dog', 'frog', 'horse', 'ship', 'truck']
print([labels[n] for n in test_predictions])

実行結果9

画像と推測結果を比較すると正解率が90%であることが分かります。

(Google Colaboratoryで動作確認しています。)

参考

AlphaZero 深層学習・強化学習・探索 人工知能プログラミング実践入門 サポートページ

深層学習 ニューラルネットワークで回帰

ニューラルネットワークで数値データの予測を行う推論モデルを作成します。
住宅の情報から価格を予測します。

まず回帰に必要なパッケージをインポートします。

1
2
3
4
5
6
7
8
9
10
# パッケージのインポート
from tensorflow.keras.datasets import boston_housing
from tensorflow.keras.layers import Activation, Dense, Dropout
from tensorflow.keras.models import Sequential
from tensorflow.keras.callbacks import EarlyStopping
from tensorflow.keras.optimizers import Adam
import pandas as pd
import numpy as np
import matplotlib.pyplot as plt
%matplotlib inline

データセットの準備を行います。

データセットの配列は下記のようになります。

配列 説明
train_data 訓練データの配列
train_labels 訓練ラベルの配列
test_data テストデータの配列
test_labels テストラベルの配列

データ型はNumpyのndarrayになります。この配列型を使うと高速な配列演算が可能になります。

1
2
# データセットの準備
(train_data, train_labels), (test_data, test_labels) = boston_housing.load_data()

実行結果1


データセットのシェイプを確認します。

1
2
3
4
5
# データセットのシェイプの確認
print(train_data.shape)
print(train_labels.shape)
print(test_data.shape)
print(test_labels.shape)

実行結果2


先頭10件の訓練データの確認を行います。
1
2
3
4
# データセットのデータの確認
column_names = ['CRIM', 'ZN', 'INDUS', 'CHAS', 'NOX', 'RM', 'AGE', 'DIS', 'RAD', 'TAX', 'PTRATIO', 'B', 'LSTAT']
df = pd.DataFrame(train_data, columns=column_names)
df.head()

実行結果3


先頭10件の訓練ラベルの確認を行います。
1
2
# データセットのラベルの確認
print(train_labels[0:10])

実行結果4


訓練データと訓練ラベルのシャッフルを行います。 これは学習時に似たデータを連続して学習すると隔たりが生じてしまうのを防ぐためです。

また正規化を行い、同じ単位で比較しやすくします。

1
2
3
4
5
6
7
8
9
10
# データセットのシャッフルの前処理
order = np.argsort(np.random.random(train_labels.shape))
train_data = train_data[order]
train_labels = train_labels[order]

# データセットの正規化の前処理
mean = train_data.mean(axis=0)
std = train_data.std(axis=0)
train_data = (train_data - mean) / std
test_data = (test_data - mean) / std

データセットのデータが平均0、分散1になっていることを確認します。
1
2
3
4
# データセットの前処理後のデータの確認
column_names = ['CRIM', 'ZN', 'INDUS', 'CHAS', 'NOX', 'RM', 'AGE', 'DIS', 'RAD', 'TAX', 'PTRATIO', 'B', 'LSTAT']
df = pd.DataFrame(train_data, columns=column_names)
df.head()

実行結果5


ニューラルネットワークのモデルを作成します。
1
2
3
4
5
# モデルの作成
model = Sequential()
model.add(Dense(64, activation='relu', input_shape=(13,)))
model.add(Dense(64, activation='relu'))
model.add(Dense(1))

ニューラルネットワークのモデルをコンパイルします。
1
2
# コンパイル
model.compile(loss='mse', optimizer=Adam(lr=0.001), metrics=['mae'])

EarlyStoppingは任意のエポック数を実行したときに改善がないと学習を停止します。 今回は20試行の間に誤差の改善が見られない場合は学習を停止します。
1
2
# EarlyStoppingの準備
early_stop = EarlyStopping(monitor='val_loss', patience=30)

学習を実行します。callbacksにEarlyStoppingを追加します。
1
2
3
# 学習
history = model.fit(train_data, train_labels, epochs=500,
validation_split=0.2, callbacks=[early_stop])
![実行結果6](/img/chap3/16.png)

学習時の結果(fit関数の戻り値)には次の情報が含まれています。

情報 説明
loss 訓練データの誤差。0に近いほどよい。
mean_absolute_error 訓練データの平均絶対誤差。0に近いほどよい。
val_loss 検証データの誤差。0に近いほどよい。
val_mean_absolute_error 検証データの平均絶対誤差。0に近いほどよい。

mean_absolute_errorとval_mean_absolute_errorをグラフ表示します。
1
2
3
4
5
6
7
8
# グラフの表示
plt.plot(history.history['mean_absolute_error'], label='train mae')
plt.plot(history.history['val_mean_absolute_error'], label='val mae')
plt.xlabel('epoch')
plt.ylabel('mae [1000$]')
plt.legend(loc='best')
plt.ylim([0,5])
plt.show()

実行結果7


テスト画像とテストラベルの配列をモデルに渡して評価を行います。
1
2
3
# 評価
test_loss, test_mae = model.evaluate(test_data, test_labels)
print('loss:{:.3f}\nmae: {:.3f}'.format(test_loss, test_mae))

実行結果8
平均絶対誤差が2.6となっています。


先頭10件のテストデータの推論を行い、予測結果を表示します。

1
2
3
4
5
6
# 推論する値段の表示
print(np.round(test_labels[0:10]))

# 推論した値段の表示
test_predictions = model.predict(test_data[0:10]).flatten()
print(np.round(test_predictions))

実行結果9
実際の価格に近い価格が推論されています。

(Google Colaboratoryで動作確認しています。)

参考

AlphaZero 深層学習・強化学習・探索 人工知能プログラミング実践入門 サポートページ

深層学習 ニューラルネットワークで分類

画像分類のためのニューラルネットワークを作成し、手書き数字の画像から数字を推論するモデルを作ります。

まず必要なパッケージをインポートします。

1
2
3
4
5
6
7
8
9
# パッケージのインポート
from tensorflow.keras.datasets import mnist
from tensorflow.keras.layers import Activation, Dense, Dropout
from tensorflow.keras.models import Sequential
from tensorflow.keras.optimizers import SGD
from tensorflow.keras.utils import to_categorical
import numpy as np
import matplotlib.pyplot as plt
%matplotlib inline

データセットの準備と確認を行います。

データセットの配列は下記のようになります。

配列 説明
train_images 訓練画像の配列
train_labels 訓練ラベルの配列
test_images テスト画像の配列
test_labels テストラベルの配列

データ型はNumpyのndarrayになります。この配列型を使うと高速な配列演算が可能になります。

1
2
# データセットの準備
(train_images, train_labels), (test_images, test_labels) = mnist.load_data()

実行結果1


データセットのシェイプを確認します。

1
2
3
4
5
# データセットのシェイプの確認
print(train_images.shape)
print(train_labels.shape)
print(test_images.shape)
print(test_labels.shape)

実行結果2


先頭10件の訓練画像を確認します。
1
2
3
4
5
# データセットの画像の確認
for i in range(10):
plt.subplot(1, 10, i+1)
plt.imshow(train_images[i], 'gray')
plt.show()

実行結果3


データセットのラベルを確認します。 実行結果3とラベルが合致していることが分かります。
1
2
# データセットのラベルの確認
print(train_labels[0:10])

実行結果4


データセットをニューラルネットワークに適した形式に変換します。 2次元配列(28×28)を1次元配列(786)に変換します。
1
2
3
4
5
6
7
# データセットの画像の前処理
train_images = train_images.reshape((train_images.shape[0], 784))
test_images = test_images.reshape((test_images.shape[0], 784))

# データセットの画像の前処理後のシェイプの確認
print(train_images.shape)
print(test_images.shape)

実行結果5


訓練ラベルとテストラベルをone-hot表現に変換します。 one-hot表現とはある要素のみが1でそのほかの要素が0であるような表現です。
1
2
3
4
5
6
7
# データセットのラベルの前処理
train_labels = to_categorical(train_labels)
test_labels = to_categorical(test_labels)

# データセットのラベルの前処理後のシェイプの確認
print(train_labels.shape)
print(test_labels.shape)

実行結果6


ニューラルネットワークのモデルを作成します。
  • モデルのネットワーク構造は全結合層を3つ重ねたものです。
  • 入力層が784(28×28)で出力層が10になります。
  • 隠れ層は自由に決められますが今回は128としました。
  • 過学習防止のためDropoutを設定します。
  • 活性化関数はシグモイド関数とソフトマックス関数を使用します。
1
2
3
4
5
6
# モデルの作成
model = Sequential()
model.add(Dense(256, activation='sigmoid', input_shape=(784,))) # 入力層
model.add(Dense(128, activation='sigmoid')) # 隠れ層
model.add(Dropout(rate=0.5)) # ドロップアウト
model.add(Dense(10, activation='softmax')) # 出力層

ニューラルネットワークのモデルをコンパイルします。 コンパイル時には下記の3つを設定します。
  • 損失関数
    モデルの予測値と正解データの誤差を算出する関数です。
  • 最適化関数
    損失関数の結果が0に近づくように重みパラメータとバイアスを最適化する関数です。
  • 評価指標
    モデルの性能を測定するための指標です。
1
2
# コンパイル
model.compile(loss='categorical_crossentropy', optimizer=SGD(lr=0.1), metrics=['acc'])

訓練画像と訓練ラベルの配列をモデルに渡して学習を実行します。

1
2
3
# 学習
history = model.fit(train_images, train_labels, batch_size=500,
epochs=5, validation_split=0.2)

実行結果7


学習時の結果(fit関数の戻り値)には次の情報が含まれています。
情報 説明
loss 訓練データの誤差。0に近いほどよい。
acc 訓練データの正解率。1に近いほどよい。
val_loss 検証データの誤差。0に近いほどよい。
val_acc 検証データの正解率。1に近いほどよい。

accとval_accをグラフ化してみます。

1
2
3
4
5
6
7
# グラフの表示
plt.plot(history.history['acc'], label='acc')
plt.plot(history.history['val_acc'], label='val_acc')
plt.ylabel('accuracy')
plt.xlabel('epoch')
plt.legend(loc='best')
plt.show()

実行結果8


テスト画像とテストラベルの配列をモデルに渡して評価を行います。
1
2
3
# 評価
test_loss, test_acc = model.evaluate(test_images, test_labels)
print('loss: {:.3f}\nacc: {:.3f}'.format(test_loss, test_acc ))

実行結果9

正解率が91%を超えていることが分かります。
最後に先頭10件のテスト画像の推論を行い、予測結果を取得します、
1
2
3
4
5
6
7
8
9
10
# 推論する画像の表示
for i in range(10):
plt.subplot(1, 10, i+1)
plt.imshow(test_images[i].reshape((28, 28)), 'gray')
plt.show()

# 推論したラベルの表示
test_predictions = model.predict(test_images[0:10])
test_predictions = np.argmax(test_predictions, axis=1)
print(test_predictions)

実行結果10

十分に正確な結果となっています。

(Google Colaboratoryで動作確認しています。)

参考

AlphaZero 深層学習・強化学習・探索 人工知能プログラミング実践入門 サポートページ

強化学習 AlphaZero 20 (どうぶつ将棋)

AlphaZeroのアルゴリズムを使ってどうぶつ将棋の対戦ゲームを作ります。

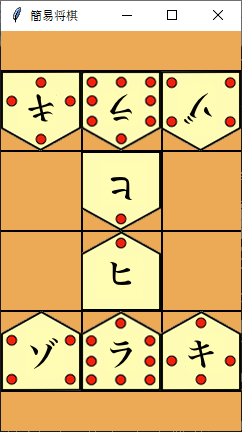
どうぶつ将棋は、駒の動きを簡易化した将棋で「ライオン」「ゾウ」「キリン」「ヒヨコ」の4種類の駒を使います。
駒の移動可能な方向は、駒に丸が描いてある方向になり、ライオンをとったら勝ちです。
また盤面は3×4の小さなものになります。

最初の盤面は次のようになります。

最初の盤面

ソースコード一覧は下記のようになります。

ソースコード 説明 3目並べとの相違
game.py ゲーム状態 全て
dual_network.py デュアルネットワーク パラメータのみ
pv_mcts.py モンテカルロ木探索 デュアルネットワークの入力変更
self_play.py セルフプレイ部 デュアルネットワークの入力変更
train_network.py パラメータ更新部 なし
evaluate_network.py 新パラメータ評価部 なし
train_cycle.py 学習サイクルの実行 ベストプレイヤーの評価を削除
human_play.py ゲームUI 全て

まずどうぶつ将棋のゲーム状態を作成します。
ゲームの盤面は駒が置かれているときは1、そうでないときは0としています。
相手の盤面は180度回転させて保持します。
持ち駒の有無は、有の場合は配列全要素を1、無の場合は配列全要素を0とします。

game.py
1
2
3
4
5
6
7
8
9
10
# ====================
# 簡易将棋
# ====================

# パッケージのインポート
import random
import math

# ゲームの状態
class State:

自分の駒の配置と相手の駒の配置を長さ15の1次元配列で保持します。
列(3)×行(4)+持ち駒種類数(3)で15です。

この1次元の配列にどの駒があるかは次の駒IDで管理します。

駒ID 説明
0 なし
1 ヒヨコ
2 ゾウ
3 キリン
4 ライオン
5 ヒヨコの持ち駒
6 ゾウの持ち駒
7 キリンの持ち駒

ほかの変数に関しては次の通りです。

  • depthは何ターン目かを表します。
  • dxyは8方向(下、左下、左、左上、上、右上、右、右下)を表します。
    自分の駒から8方向に対して、移動できるかどうかを計算する際に利用します。
game.py
1
2
3
4
5
6
7
8
9
10
11
12
13
14
# 初期化
def __init__(self, pieces=None, enemy_pieces=None, depth=0):
# 方向定数
self.dxy = ((0, -1), (1, -1), (1, 0), (1, 1), (0, 1), (-1, 1), (-1, 0), (-1, -1))

# 駒の配置
self.pieces = pieces if pieces != None else [0] * (12+3)
self.enemy_pieces = enemy_pieces if enemy_pieces != None else [0] * (12+3)
self.depth = depth

# 駒の初期配置
if pieces == None or enemy_pieces == None:
self.pieces = [0, 0, 0, 0, 0, 0, 0, 1, 0, 2, 4, 3, 0, 0, 0]
self.enemy_pieces = [0, 0, 0, 0, 0, 0, 0, 1, 0, 2, 4, 3, 0, 0, 0]

負けかどうかを判定します。

game.py
1
2
3
4
5
6
# 負けかどうか
def is_lose(self):
for i in range(12):
if self.pieces[i] == 4: # ライオン存在
return False
return True

引き分けかどうかを判定します。

game.py
1
2
3
# 引き分けかどうか
def is_draw(self):
return self.depth >= 300 # 300手

ゲーム終了かどうかを判定します。

game.py
1
2
3
# ゲーム終了かどうか
def is_done(self):
return self.is_lose() or self.is_draw()

「駒の配置の2つの1次元配列(自分と相手の駒の配列)」をデュアルネットワークの入力(14個の2次元配列)に変換します。

game.py
1
2
3
4
5
6
7
8
9
10
11
12
13
14
15
16
17
18
19
20
21
22
# デュアルネットワークの入力の2次元配列の取得
def pieces_array(self):
# プレイヤー毎のデュアルネットワークの入力の2次元配列の取得
def pieces_array_of(pieces):
table_list = []
# 0:ヒヨコ, 1:ゾウ, 2:キリン, 3:ライオン,
for j in range(1, 5):
table = [0] * 12
table_list.append(table)
for i in range(12):
if pieces[i] == j:
table[i] = 1

# 4:ヒヨコの持ち駒, 5:ゾウの持ち駒, 6:キリンの持ち駒
for j in range(1, 4):
flag = 1 if pieces[11+j] > 0 else 0
table = [flag] * 12
table_list.append(table)
return table_list

# デュアルネットワークの入力の2次元配列の取得
return [pieces_array_of(self.pieces), pieces_array_of(self.enemy_pieces)]

駒の移動先と駒の移動元を行動に変換します。

game.py
1
2
3
# 駒の移動先と移動元を行動に変換
def position_to_action(self, position, direction):
return position * 11 + direction

行動を駒の移動先と移動元に変換します。

game.py
1
2
3
# 行動を駒の移動先と移動元に変換
def action_to_position(self, action):
return (int(action/11), action%11)

合法手のリストを取得します。
マスごとに駒の移動時と持ち駒の配置時の合法手を取得します。

game.py
1
2
3
4
5
6
7
8
9
10
11
12
13
14
# 合法手のリストの取得
def legal_actions(self):
actions = []
for p in range(12):
# 駒の移動時
if self.pieces[p] != 0:
actions.extend(self.legal_actions_pos(p))

# 持ち駒の配置時
if self.pieces[p] == 0 and self.enemy_pieces[11-p] == 0:
for capture in range(1, 4):
if self.pieces[11+capture] != 0:
actions.append(self.position_to_action(p, 8-1+capture))
return actions

駒の移動時の合法手のリストを取得します。
駒の移動可能な方向を計算し、移動可能時は合法手として追加します。

game.py
1
2
3
4
5
6
7
8
9
10
11
12
13
14
15
16
17
18
19
20
21
22
23
24
25
26
27
28
# 駒の移動時の合法手のリストの取得
def legal_actions_pos(self, position_src):
actions = []

# 駒の移動可能な方向
piece_type = self.pieces[position_src]
if piece_type > 4: piece_type-4
directions = []
if piece_type == 1: # ヒヨコ
directions = [0]
elif piece_type == 2: # ゾウ
directions = [1, 3, 5, 7]
elif piece_type == 3: # キリン
directions = [0, 2, 4, 6]
elif piece_type == 4: # ライオン
directions = [0, 1, 2, 3, 4, 5, 6, 7]

# 合法手の取得
for direction in directions:
# 駒の移動元
x = position_src%3 + self.dxy[direction][0]
y = int(position_src/3) + self.dxy[direction][1]
p = x + y * 3

# 移動可能時は合法手として追加
if 0 <= x and x <= 2 and 0<= y and y <= 3 and self.pieces[p] == 0:
actions.append(self.position_to_action(p, direction))
return actions

行動に応じた次の状態を取得します。

game.py
1
2
3
4
5
6
7
8
9
10
11
12
13
14
15
16
17
18
19
20
21
22
23
24
25
26
27
28
29
30
31
32
33
34
35
36
37
# 次の状態の取得
def next(self, action):
# 次の状態の作成
state = State(self.pieces.copy(), self.enemy_pieces.copy(), self.depth+1)

# 行動を(移動先, 移動元)に変換
position_dst, position_src = self.action_to_position(action)

# 駒の移動
if position_src < 8:
# 駒の移動元
x = position_dst%3 - self.dxy[position_src][0]
y = int(position_dst/3) - self.dxy[position_src][1]
position_src = x + y * 3

# 駒の移動
state.pieces[position_dst] = state.pieces[position_src]
state.pieces[position_src] = 0

# 相手の駒が存在する時は取る
piece_type = state.enemy_pieces[11-position_dst]
if piece_type != 0:
if piece_type != 4:
state.pieces[11+piece_type] += 1 # 持ち駒+1
state.enemy_pieces[11-position_dst] = 0

# 持ち駒の配置
else:
capture = position_src-7
state.pieces[position_dst] = capture
state.pieces[11+capture] -= 1 # 持ち駒-1

# 駒の交代
w = state.pieces
state.pieces = state.enemy_pieces
state.enemy_pieces = w
return state

先手化どうかを取得します。

game.py
1
2
3
# 先手かどうか
def is_first_player(self):
return self.depth%2 == 0

ゲーム状態の文字列表示を行います。

各駒は次の文字列で表現されます。

駒の文字表現 説明
H 先手のヒヨコ
Z 先手のゾウ
K 先手のキリン
R 先手のライオン
h 後手のヒヨコ
z 後手のゾウ
k 後手のキリン
r 後手のライオン
game.py
1
2
3
4
5
6
7
8
9
10
11
12
13
14
15
16
17
18
19
20
21
22
23
24
25
26
27
28
29
30
31
32
# 文字列表示
def __str__(self):
pieces0 = self.pieces if self.is_first_player() else self.enemy_pieces
pieces1 = self.enemy_pieces if self.is_first_player() else self.pieces
hzkr0 = ('', 'H', 'Z', 'K', 'R')
hzkr1 = ('', 'h', 'z', 'k', 'r')

# 後手の持ち駒
str = ' ['
for i in range(12, 15):
if pieces1[i] >= 2: str += ' ' + hzkr1[i-11]
if pieces1[i] >= 1: str += ' ' + hzkr1[i-11]
str += ' ]\n'

# ボード
for i in range(12):
if pieces0[i] != 0:
str += ' ' + hzkr0[pieces0[i]]
elif pieces1[11-i] != 0:
str += ' ' + hzkr1[pieces1[11-i]]
else:
str += ' -'
if i % 3 == 2:
str += '\n'

# 先手の持ち駒
str += ' ['
for i in range(12, 15):
if pieces0[i] >= 2: str += ' ' + hzkr0[i-11]
if pieces0[i] >= 1: str += ' ' + hzkr0[i-11]
str += ' ]\n'
return str

動作確認用にランダム対ランダムで対戦するコードを追加します。

game.py
1
2
3
4
5
6
7
8
9
10
11
12
13
14
15
16
17
18
19
20
21
22
# ランダムで行動選択
def random_action(state):
legal_actions = state.legal_actions()
return legal_actions[random.randint(0, len(legal_actions)-1)]

# 動作確認
if __name__ == '__main__':
# 状態の生成
state = State()

# ゲーム終了までのループ
while True:
# ゲーム終了時
if state.is_done():
break

# 次の状態の取得
state = state.next(random_action(state))

# 文字列表示
print(state)
print()

試しに実行したところ下記のような結果となりました。

最終結果(途中略)

次にデュアルネットワークを実装します。
入力シェイプは、(3, 4, 14)となります。各要素数の意味は「盤面(3×4)×(自分の駒の配置(4)+自分の持ち駒の配置(3)+相手の駒の配置(4)+相手の持ち駒の配置(3))」です。
行動数は132(駒の移動先12×駒の移動元11)となります。

dual_network.py
1
2
3
4
5
6
7
8
9
10
11
12
13
14
15
16
17
18
19
20
21
22
23
24
25
26
27
28
29
30
31
32
33
34
35
36
37
38
39
40
41
42
43
44
45
46
47
48
49
50
51
52
53
54
55
56
57
58
59
60
61
62
63
64
65
66
67
68
69
70
71
72
73
74
75
# ====================
# デュアルネットワークの作成
# ====================

# パッケージのインポート
from tensorflow.keras.layers import Activation, Add, BatchNormalization, Conv2D, Dense, GlobalAveragePooling2D, Input
from tensorflow.keras.models import Model
from tensorflow.keras.regularizers import l2
from tensorflow.keras import backend as K
import os

# パラメータの準備
DN_FILTERS = 128 # 畳み込み層のカーネル数(本家は256)
DN_RESIDUAL_NUM = 16 # 残差ブロックの数(本家は19)
DN_INPUT_SHAPE = (3, 4, 14) # 入力シェイプ
DN_OUTPUT_SIZE = 132 # 行動数(駒の移動先(12)*駒の移動元(11))

# 畳み込み層の作成
def conv(filters):
return Conv2D(filters, 3, padding='same', use_bias=False,
kernel_initializer='he_normal', kernel_regularizer=l2(0.0005))

# 残差ブロックの作成
def residual_block():
def f(x):
sc = x
x = conv(DN_FILTERS)(x)
x = BatchNormalization()(x)
x = Activation('relu')(x)
x = conv(DN_FILTERS)(x)
x = BatchNormalization()(x)
x = Add()([x, sc])
x = Activation('relu')(x)
return x
return f

# デュアルネットワークの作成
def dual_network():
# モデル作成済みの場合は無処理
if os.path.exists('./model/best.h5'):
return

# 入力層
input = Input(shape=DN_INPUT_SHAPE)

# 畳み込み層
x = conv(DN_FILTERS)(input)
x = BatchNormalization()(x)
x = Activation('relu')(x)

# 残差ブロック x 16
for i in range(DN_RESIDUAL_NUM):
x = residual_block()(x)

# プーリング層
x = GlobalAveragePooling2D()(x)

# ポリシー出力
p = Dense(DN_OUTPUT_SIZE, kernel_regularizer=l2(0.0005),
activation='softmax', name='pi')(x)

# バリュー出力
v = Dense(1, kernel_regularizer=l2(0.0005))(x)
v = Activation('tanh', name='v')(v)

# モデルの作成
model = Model(inputs=input, outputs=[p,v])

# モデルの保存
os.makedirs('./model/', exist_ok=True) # フォルダがない時は生成
model.save('./model/best.h5') # ベストプレイヤーのモデル

# モデルの破棄
K.clear_session()
del model

モンテカルロ木探索を実装します。デュアルネットワークの入力を変更します。(state.pieces_array())

pv_mcts.py
1
2
3
4
5
6
7
8
9
10
11
12
13
14
15
16
17
18
19
20
21
22
23
24
25
26
27
28
29
30
31
32
33
34
35
36
37
38
39
40
41
42
43
44
45
46
47
48
49
50
51
52
53
54
55
56
57
58
59
60
61
62
63
64
65
66
67
68
69
70
71
72
73
74
75
76
77
78
79
80
81
82
83
84
85
86
87
88
89
90
91
92
93
94
95
96
97
98
99
100
101
102
103
104
105
106
107
108
109
110
111
112
113
114
115
116
117
118
119
120
121
122
123
124
125
126
127
128
129
130
# ====================
# モンテカルロ木探索の作成
# ====================

# パッケージのインポート
from game import State
from dual_network import DN_INPUT_SHAPE
from math import sqrt
from tensorflow.keras.models import load_model
from pathlib import Path
import numpy as np

# パラメータの準備
PV_EVALUATE_COUNT = 50 # 1推論あたりのシミュレーション回数(本家は1600)

# 推論
def predict(model, state):
# 推論のための入力テ゛ータのシェイフ゜の変換
a, b, c = DN_INPUT_SHAPE
x = np.array(state.pieces_array())
x = x.reshape(c, a, b).transpose(1, 2, 0).reshape(1, a, b, c)

# 推論
y = model.predict(x, batch_size=1)

# 方策の取得
policies = y[0][0][list(state.legal_actions())] # 合法手のみ
policies /= sum(policies) if sum(policies) else 1 # 合計1の確率分布に変換

# 価値の取得
value = y[1][0][0]
return policies, value

# ノードのリストを試行回数のリストに変換
def nodes_to_scores(nodes):
scores = []
for c in nodes:
scores.append(c.n)
return scores

# モンテカルロ木探索のスコアの取得
def pv_mcts_scores(model, state, temperature):
# モンテカルロ木探索のノードの定義
class Node:
# ノードの初期化
def __init__(self, state, p):
self.state = state # 状態
self.p = p # 方策
self.w = 0 # 累計価値
self.n = 0 # 試行回数
self.child_nodes = None # 子ノード群

# 局面の価値の計算
def evaluate(self):
# ゲーム終了時
if self.state.is_done():
# 勝敗結果で価値を取得
value = -1 if self.state.is_lose() else 0

# 累計価値と試行回数の更新
self.w += value
self.n += 1
return value

# 子ノードが存在しない時
if not self.child_nodes:
# ニューラルネットワークの推論で方策と価値を取得
policies, value = predict(model, self.state)

# 累計価値と試行回数の更新
self.w += value
self.n += 1

# 子ノードの展開
self.child_nodes = []
for action, policy in zip(self.state.legal_actions(), policies):
self.child_nodes.append(Node(self.state.next(action), policy))
return value

# 子ノードが存在する時
else:
# アーク評価値が最大の子ノードの評価で価値を取得
value = -self.next_child_node().evaluate()

# 累計価値と試行回数の更新
self.w += value
self.n += 1
return value

# アーク評価値が最大の子ノードを取得
def next_child_node(self):
# アーク評価値の計算
C_PUCT = 1.0
t = sum(nodes_to_scores(self.child_nodes))
pucb_values = []
for child_node in self.child_nodes:
pucb_values.append((-child_node.w / child_node.n if child_node.n else 0.0) +
C_PUCT * child_node.p * sqrt(t) / (1 + child_node.n))

# アーク評価値が最大の子ノードを返す
return self.child_nodes[np.argmax(pucb_values)]

# 現在の局面のノードの作成
root_node = Node(state, 0)

# 複数回の評価の実行
for _ in range(PV_EVALUATE_COUNT):
root_node.evaluate()

# 合法手の確率分布
scores = nodes_to_scores(root_node.child_nodes)
if temperature == 0: # 最大値のみ1
action = np.argmax(scores)
scores = np.zeros(len(scores))
scores[action] = 1
else: # ボルツマン分布でバラつき付加
scores = boltzman(scores, temperature)
return scores

# モンテカルロ木探索で行動選択
def pv_mcts_action(model, temperature=0):
def pv_mcts_action(state):
scores = pv_mcts_scores(model, state, temperature)
return np.random.choice(state.legal_actions(), p=scores)
return pv_mcts_action

# ボルツマン分布
def boltzman(xs, temperature):
xs = [x ** (1 / temperature) for x in xs]
return [x / sum(xs) for x in xs]

セルフプレイを実装します。デュアルネットワークの入力を変更します。(state.pieces_array())

self_play.py
1
2
3
4
5
6
7
8
9
10
11
12
13
14
15
16
17
18
19
20
21
22
23
24
25
26
27
28
29
30
31
32
33
34
35
36
37
38
39
40
41
42
43
44
45
46
47
48
49
50
51
52
53
54
55
56
57
58
59
60
61
62
63
64
65
66
67
68
69
70
71
72
73
74
75
76
77
78
79
80
81
82
83
84
85
86
87
88
89
90
91
92
93
94
95
# ====================
# セルフプレイ部
# ====================

# パッケージのインポート
from game import State
from pv_mcts import pv_mcts_scores
from dual_network import DN_OUTPUT_SIZE
from datetime import datetime
from tensorflow.keras.models import load_model
from tensorflow.keras import backend as K
from pathlib import Path
import numpy as np
import pickle
import os

# パラメータの準備
SP_GAME_COUNT = 500 # セルフプレイを行うゲーム数(本家は25000)
SP_TEMPERATURE = 1.0 # ボルツマン分布の温度パラメータ

# 先手プレイヤーの価値
def first_player_value(ended_state):
# 1:先手勝利, -1:先手敗北, 0:引き分け
if ended_state.is_lose():
return -1 if ended_state.is_first_player() else 1
return 0

# 学習データの保存
def write_data(history):
now = datetime.now()
os.makedirs('./data/', exist_ok=True) # フォルダがない時は生成
path = './data/{:04}{:02}{:02}{:02}{:02}{:02}.history'.format(
now.year, now.month, now.day, now.hour, now.minute, now.second)
with open(path, mode='wb') as f:
pickle.dump(history, f)

# 1ゲームの実行
def play(model):
# 学習データ
history = []

# 状態の生成
state = State()

while True:
# ゲーム終了時
if state.is_done():
break

# 合法手の確率分布の取得
scores = pv_mcts_scores(model, state, SP_TEMPERATURE)

# 学習データに状態と方策を追加
policies = [0] * DN_OUTPUT_SIZE
for action, policy in zip(state.legal_actions(), scores):
policies[action] = policy
history.append([state.pieces_array(), policies, None])

# 行動の取得
action = np.random.choice(state.legal_actions(), p=scores)

# 次の状態の取得
state = state.next(action)

# 学習データに価値を追加
value = first_player_value(state)
for i in range(len(history)):
history[i][2] = value
value = -value
return history

# セルフプレイ
def self_play():
# 学習データ
history = []

# ベストプレイヤーのモデルの読み込み
model = load_model('./model/best.h5')

# 複数回のゲームの実行
for i in range(SP_GAME_COUNT):
# 1ゲームの実行
h = play(model)
history.extend(h)

# 出力
print('\rSelfPlay {}/{}'.format(i+1, SP_GAME_COUNT), end='')
print('')

# 学習データの保存
write_data(history)

# モデルの破棄
K.clear_session()
del model

パラメータ更新部を実装します。変更はありません。

train_network.py
1
2
3
4
5
6
7
8
9
10
11
12
13
14
15
16
17
18
19
20
21
22
23
24
25
26
27
28
29
30
31
32
33
34
35
36
37
38
39
40
41
42
43
44
45
46
47
48
49
50
51
52
53
54
55
56
57
58
59
60
61
62
63
64
65
# ====================
# パラメータ更新部
# ====================

# パッケージのインポート
from dual_network import DN_INPUT_SHAPE
from tensorflow.keras.callbacks import LearningRateScheduler, LambdaCallback
from tensorflow.keras.models import load_model
from tensorflow.keras import backend as K
from pathlib import Path
import numpy as np
import pickle

# パラメータの準備
RN_EPOCHS = 100 # 学習回数

# 学習データの読み込み
def load_data():
history_path = sorted(Path('./data').glob('*.history'))[-1]
with history_path.open(mode='rb') as f:
return pickle.load(f)

# デュアルネットワークの学習
def train_network():
# 学習データの読み込み
history = load_data()
xs, y_policies, y_values = zip(*history)

# 学習のための入力テ゛ータのシェイフ゜の変換
a, b, c = DN_INPUT_SHAPE
xs = np.array(xs)
xs = xs.reshape(len(xs), c, a, b).transpose(0, 2, 3, 1)
y_policies = np.array(y_policies)
y_values = np.array(y_values)

# ベストプレイヤーのモデルの読み込み
model = load_model('./model/best.h5')

# モデルのコンパイル
model.compile(loss=['categorical_crossentropy', 'mse'], optimizer='adam')

# 学習率
def step_decay(epoch):
x = 0.001
if epoch >= 50: x = 0.0005
if epoch >= 80: x = 0.00025
return x
lr_decay = LearningRateScheduler(step_decay)

# 出力
print_callback = LambdaCallback(
on_epoch_begin=lambda epoch,logs:
print('\rTrain {}/{}'.format(epoch + 1,RN_EPOCHS), end=''))

# 学習の実行
model.fit(xs, [y_policies, y_values], batch_size=128, epochs=RN_EPOCHS,
verbose=0, callbacks=[lr_decay, print_callback])
print('')

# 最新プレイヤーのモデルの保存
model.save('./model/latest.h5')

# モデルの破棄
K.clear_session()
del model

新パラメータ評価部を実装します。変更はありません。

evaluate_network.py
1
2
3
4
5
6
7
8
9
10
11
12
13
14
15
16
17
18
19
20
21
22
23
24
25
26
27
28
29
30
31
32
33
34
35
36
37
38
39
40
41
42
43
44
45
46
47
48
49
50
51
52
53
54
55
56
57
58
59
60
61
62
63
64
65
66
67
68
69
70
71
72
73
74
75
76
77
78
79
80
81
82
83
84
85
86
87
88
89
90
91
# ====================
# 新パラメータ評価部
# ====================

# パッケージのインポート
from game import State
from pv_mcts import pv_mcts_action
from tensorflow.keras.models import load_model
from tensorflow.keras import backend as K
from pathlib import Path
from shutil import copy
import numpy as np

# パラメータの準備
EN_GAME_COUNT = 10 # 1評価あたりのゲーム数(本家は400)
EN_TEMPERATURE = 1.0 # ボルツマン分布の温度

# 先手プレイヤーのポイント
def first_player_point(ended_state):
# 1:先手勝利, 0:先手敗北, 0.5:引き分け
if ended_state.is_lose():
return 0 if ended_state.is_first_player() else 1
return 0.5

# 1ゲームの実行
def play(next_actions):
# 状態の生成
state = State()

# ゲーム終了までループ
while True:
# ゲーム終了時
if state.is_done():
break;

# 行動の取得
next_action = next_actions[0] if state.is_first_player() else next_actions[1]
action = next_action(state)

# 次の状態の取得
state = state.next(action)

# 先手プレイヤーのポイントを返す
return first_player_point(state)

# ベストプレイヤーの交代
def update_best_player():
copy('./model/latest.h5', './model/best.h5')
print('Change BestPlayer')

# ネットワークの評価
def evaluate_network():
# 最新プレイヤーのモデルの読み込み
model0 = load_model('./model/latest.h5')

# ベストプレイヤーのモデルの読み込み
model1 = load_model('./model/best.h5')

# PV MCTSで行動選択を行う関数の生成
next_action0 = pv_mcts_action(model0, EN_TEMPERATURE)
next_action1 = pv_mcts_action(model1, EN_TEMPERATURE)
next_actions = (next_action0, next_action1)

# 複数回の対戦を繰り返す
total_point = 0
for i in range(EN_GAME_COUNT):
# 1ゲームの実行
if i % 2 == 0:
total_point += play(next_actions)
else:
total_point += 1 - play(list(reversed(next_actions)))

# 出力
print('\rEvaluate {}/{}'.format(i + 1, EN_GAME_COUNT), end='')
print('')

# 平均ポイントの計算
average_point = total_point / EN_GAME_COUNT
print('AveragePoint', average_point)

# モデルの破棄
K.clear_session()
del model0
del model1

# ベストプレイヤーの交代
if average_point > 0.5:
update_best_player()
return True
else:
return False

学習サイクルを実行します。ベストプレイヤーの評価は削除しています。
この処理を実行するとベストプレイヤーのモデルが作成されます。(model/best.h5)

学習完了までにCorei5、メモリ4G、GPUなしのPCでまる2日ほどかかりました。

train_cycle.py
1
2
3
4
5
6
7
8
9
10
11
12
13
14
15
16
17
18
19
20
21
22
23
# ====================
# 学習サイクルの実行
# ====================

# パッケージのインポート
from dual_network import dual_network
from self_play import self_play
from train_network import train_network
from evaluate_network import evaluate_network

# デュアルネットワークの作成
dual_network()

for i in range(10):
print('Train',i,'====================')
# セルフプレイ部
self_play()

# パラメータ更新部
train_network()

# 新ハ゜ラメータ評価部
evaluate_network()

ゲームUIを実装します。

human_play.py
1
2
3
4
5
6
7
8
9
10
11
12
13
14
15
16
17
18
# ====================
# 人とAIの対戦
# ====================

# パッケージのインポート
from game import State
from pv_mcts import pv_mcts_action
from tensorflow.keras.models import load_model
from pathlib import Path
from threading import Thread
import tkinter as tk
from PIL import Image, ImageTk

# ベストプレイヤーのモデルの読み込み
model = load_model('./model/best.h5')

# ゲームUIの定義
class GameUI(tk.Frame):

ゲーム状態の初期化で下記の3点を準備します。

  • ゲーム状態
  • モンテカルロ木探索で行動を行う関数
  • キャンバス
human_play.py
1
2
3
4
5
6
7
8
9
10
11
12
13
14
15
16
17
18
19
20
21
22
23
24
25
26
27
28
29
30
31
32
# 初期化
def __init__(self, master=None, model=None):
tk.Frame.__init__(self, master)
self.master.title('簡易将棋')

# ゲーム状態の生成
self.state = State()
self.select = -1 # 選択(-1:なし, 0~11:マス, 12~14:持ち駒)

# 方向定数
self.dxy = ((0, -1), (1, -1), (1, 0), (1, 1), (0, 1), (-1, 1), (-1, 0), (-1, -1))

# PV MCTSで行動選択を行う関数の生成
self.next_action = pv_mcts_action(model, 0.0)

# イメージの準備
self.images = [(None, None, None, None)]
for i in range(1, 5):
image = Image.open('piece{}.png'.format(i))
self.images.append((
ImageTk.PhotoImage(image),
ImageTk.PhotoImage(image.rotate(180)),
ImageTk.PhotoImage(image.resize((40, 40))),
ImageTk.PhotoImage(image.resize((40, 40)).rotate(180))))

# キャンバスの生成
self.c = tk.Canvas(self, width = 240, height = 400, highlightthickness = 0)
self.c.bind('<Button-1>', self.turn_of_human)
self.c.pack()

# 描画の更新
self.on_draw()

人間のターンの処理を行います。

  1. ゲーム終了時はゲーム状態を初期状態に戻します。
  2. 先手でないとき操作不可とします。
  3. 持ち駒の種類を取得します。
  4. 駒の選択と移動の位置の計算を行います。
  5. 駒が未選択の場合は駒を選択し、駒の移動指定を促します。
  6. 駒の選択と移動の位置を行動に変換します。
  7. 合法手でない場合は、駒の選択を解除します。
  8. 合法手の場合は、次の状態を取得して描画の更新を行います。
  9. AIのターンへ遷移します。
human_play.py
1
2
3
4
5
6
7
8
9
10
11
12
13
14
15
16
17
18
19
20
21
22
23
24
25
26
27
28
29
30
31
32
33
34
35
36
37
38
39
40
41
42
43
44
45
46
47
48
49
50
51
52
53
54
55
56
# 人間のターン
def turn_of_human(self, event):
# ゲーム終了時
if self.state.is_done():
self.state = State()
self.on_draw()
return

# 先手でない時
if not self.state.is_first_player():
return

# 持ち駒の種類の取得
captures = []
for i in range(3):
if self.state.pieces[12+i] >= 2: captures.append(1+i)
if self.state.pieces[12+i] >= 1: captures.append(1+i)

# 駒の選択と移動の位置の計算(0?11:マス, 12?14:持ち駒)
p = int(event.x/80) + int((event.y-40)/80) * 3
if 40 <= event.y and event.y <= 360:
select = p
elif event.x < len(captures) * 40 and event.y > 360:
select = 12 + int(event.x/40)
else:
return

# 駒の選択
if self.select < 0:
self.select = select
self.on_draw()
return

# 駒の選択と移動を行動に変換
action = -1
if select < 12:
# 駒の移動時
if self.select < 12:
action = self.state.position_to_action(p, self.position_to_direction(self.select, p))
# 持ち駒の配置時
else:
action = self.state.position_to_action(p, 8-1+captures[self.select-12])

# 合法手でない時
if not (action in self.state.legal_actions()):
self.select = -1
self.on_draw()
return

# 次の状態の取得
self.state = self.state.next(action)
self.select = -1
self.on_draw()

# AIのターン
self.master.after(1, self.turn_of_ai)

AIのターンの処理を行います。

  1. ゲーム終了時は無処理とします。
  2. デュアルネットワークで行動を取得します。
  3. 取得した行動に応じて次の状態を取得し、描画の更新を行います。
human_play.py
1
2
3
4
5
6
7
8
9
10
11
12
# AIのターン
def turn_of_ai(self):
# ゲーム終了時
if self.state.is_done():
return

# 行動の取得
action = self.next_action(self.state)

# 次の状態の取得
self.state = self.state.next(action)
self.on_draw()

駒の移動先を駒の移動方向に変換します。

human_play.py
1
2
3
4
5
6
7
# 駒の移動先を駒の移動方向に変換
def position_to_direction(self, position_src, position_dst):
dx = position_dst%3-position_src%3
dy = int(position_dst/3)-int(position_src/3)
for i in range(8):
if self.dxy[i][0] == dx and self.dxy[i][1] == dy: return i
return 0

駒の描画を行います。

human_play.py
1
2
3
4
5
6
# 駒の描画
def draw_piece(self, index, first_player, piece_type):
x = (index%3)*80
y = int(index/3)*80+40
index = 0 if first_player else 1
self.c.create_image(x, y, image=self.images[piece_type][index], anchor=tk.NW)

持ち駒の描画を行います。

human_play.py
1
2
3
4
5
6
7
8
9
# 持ち駒の描画
def draw_capture(self, first_player, pieces):
index, x, dx, y = (2, 0, 40, 360) if first_player else (3, 200, -40, 0)
captures = []
for i in range(3):
if pieces[12+i] >= 2: captures.append(1+i)
if pieces[12+i] >= 1: captures.append(1+i)
for i in range(len(captures)):
self.c.create_image(x+dx*i, y, image=self.images[captures[i]][index], anchor=tk.NW)

カーソルの描画を行います。

human_play.py
1
2
3
4
5
6
# カーソルの描画
def draw_cursor(self, x, y, size):
self.c.create_line(x+1, y+1, x+size-1, y+1, width = 4.0, fill = '#FF0000')
self.c.create_line(x+1, y+size-1, x+size-1, y+size-1, width = 4.0, fill = '#FF0000')
self.c.create_line(x+1, y+1, x+1, y+size-1, width = 4.0, fill = '#FF0000')
self.c.create_line(x+size-1, y+1, x+size-1, y+size-1, width = 4.0, fill = '#FF0000')

全てのマス目、駒、持ち駒、選択カーソルを描画します。

human_play.py
1
2
3
4
5
6
7
8
9
10
11
12
13
14
15
16
17
18
19
20
21
22
23
24
25
26
27
# 描画の更新
def on_draw(self):
# マス目
self.c.delete('all')
self.c.create_rectangle(0, 0, 240, 400, width = 0.0, fill = '#EDAA56')
for i in range(1,3):
self.c.create_line(i*80+1, 40, i*80, 360, width = 2.0, fill = '#000000')
for i in range(5):
self.c.create_line(0, 40+i*80, 240, 40+i*80, width = 2.0, fill = '#000000')

# 駒
for p in range(12):
p0, p1 = (p, 11-p) if self.state.is_first_player() else (11-p, p)
if self.state.pieces[p0] != 0:
self.draw_piece(p, self.state.is_first_player(), self.state.pieces[p0])
if self.state.enemy_pieces[p1] != 0:
self.draw_piece(p, not self.state.is_first_player(), self.state.enemy_pieces[p1])

# 持ち駒
self.draw_capture(self.state.is_first_player(), self.state.pieces)
self.draw_capture(not self.state.is_first_player(), self.state.enemy_pieces)

# 選択カーソル
if 0 <= self.select and self.select < 12:
self.draw_cursor(int(self.select%3)*80, int(self.select/3)*80+40, 80)
elif 12 <= self.select:
self.draw_cursor((self.select-12)*40, 360, 40)

ゲームUIを実行します、

human_play.py
1
2
3
4
#ゲームUIの実行
f = GameUI(model = model)
f.pack()
f.mainloop()

human_play.pyを実行するとどうぶつ将棋が始まりAIと対戦することができます。
最初のクリックで移動する駒を選択し、2回目のクリックで移動先を選択します。先手は人間となります。

対戦中

かなり弱いAIで楽勝で勝ててしまいます。もうすこし学習サイクルを増やすべきでしょうか。

参考

AlphaZero 深層学習・強化学習・探索 人工知能プログラミング実践入門 サポートページ

強化学習 AlphaZero 19 (リバーシ)

AlphaZeroのアルゴリズムを使ってリバーシの対戦ゲームを作ります。

リバーシは相手の石をはさむと自分の石の色に変わり、最終的に石の多い方が勝ちとなります。

ソースコード一覧は下記のようになります。

ソースコード 説明 3目並べとの相違
game.py ゲーム状態 全て
dual_network.py デュアルネットワーク パラメータのみ
pv_mcts.py モンテカルロ木探索 なし
self_play.py セルフプレイ部 なし
train_network.py パラメータ更新部 なし
evaluate_network.py 新パラメータ評価部 なし
train_cycle.py 学習サイクルの実行 ベストプレイヤーの評価を削除
human_play.py ゲームUI 全て

まずリバーシのゲーム状態を作成します。

game.py
1
2
3
4
5
6
7
8
9
10
# ====================
# リバーシ
# ====================

# パッケージのインポート
import random
import math

# ゲーム状態
class State:

ゲーム状態の初期化を行います。
「自分の石の配置」「相手の石の配置」を長さ36(6列×6行)の1次元配列で保持します。
石の初期配置は中央に交差するように2枚ずつ石を置きます。

各変数の意味は下記の通りです。

  • depthは何ターン目かを表します。
  • pass_endは連続パスによる終了を示すフラグです。
  • dxyは8方向を示す方向定数です。
game.py
1
2
3
4
5
6
7
8
9
10
11
12
13
14
15
16
17
18
19
# 初期化
def __init__(self, pieces=None, enemy_pieces=None, depth=0):
# 方向定数
self.dxy = ((1, 0), (1, 1), (0, 1), (-1, 1), (-1, 0), (-1, -1), (0, -1), (1, -1))

# 連続パスによる終了
self.pass_end = False

# 石の配置
self.pieces = pieces
self.enemy_pieces = enemy_pieces
self.depth = depth

# 石の初期配置
if pieces == None or enemy_pieces == None:
self.pieces = [0] * 36
self.pieces[14] = self.pieces[21] = 1
self.enemy_pieces = [0] * 36
self.enemy_pieces[15] = self.enemy_pieces[20] = 1

石の数を取得する関数です。

game.py
1
2
3
4
5
6
7
# 石の数の取得
def piece_count(self, pieces):
count = 0
for i in pieces:
if i == 1:
count += 1
return count

負けかどうかを判定します。

game.py
1
2
3
# 負けかどうか
def is_lose(self):
return self.is_done() and self.piece_count(self.pieces) < self.piece_count(self.enemy_pieces)

引き分けかどうかを判定します。

game.py
1
2
3
# 引き分けかどうか
def is_draw(self):
return self.is_done() and self.piece_count(self.pieces) == self.piece_count(self.enemy_pieces)

ゲーム終了かどうかを判定します。

game.py
1
2
3
# ゲーム終了かどうか
def is_done(self):
return self.piece_count(self.pieces) + self.piece_count(self.enemy_pieces) == 36 or self.pass_end

行動に応じた次の状態を取得します。

game.py
1
2
3
4
5
6
7
8
9
10
11
12
13
# 次の状態の取得
def next(self, action):
state = State(self.pieces.copy(), self.enemy_pieces.copy(), self.depth+1)
if action != 36:
state.is_legal_action_xy(action%6, int(action/6), True)
w = state.pieces
state.pieces = state.enemy_pieces
state.enemy_pieces = w

# 2回連続パス判定
if action == 36 and state.legal_actions() == [36]:
state.pass_end = True
return state

合法手のリストを取得します。

game.py
1
2
3
4
5
6
7
8
9
10
# 合法手のリストの取得
def legal_actions(self):
actions = []
for j in range(0,6):
for i in range(0,6):
if self.is_legal_action_xy(i, j):
actions.append(i+j*6)
if len(actions) == 0:
actions.append(36) # パス
return actions

任意のマスが合法手かどうかを取得します。
引数のx,yはマスのXY座標、flipは挟んだ石を裏がえすかどうかということになります。

game.py
1
2
3
4
5
6
7
8
9
10
11
12
13
14
15
16
17
18
19
20
21
22
23
24
25
26
27
28
29
30
31
32
33
34
35
36
37
38
39
40
41
42
43
44
45
46
# 任意のマスが合法手かどうか
def is_legal_action_xy(self, x, y, flip=False):
# 任意のマスの任意の方向が合法手かどうか
def is_legal_action_xy_dxy(x, y, dx, dy):
# 1つ目 相手の石
x, y = x+dx, y+dy
if y < 0 or 5 < y or x < 0 or 5 < x or \
self.enemy_pieces[x+y*6] != 1:
return False

# 2つ目以降
for j in range(6):
# 空
if y < 0 or 5 < y or x < 0 or 5 < x or \
(self.enemy_pieces[x+y*6] == 0 and self.pieces[x+y*6] == 0):
return False

# 自分の石
if self.pieces[x+y*6] == 1:
# 反転
if flip:
for i in range(6):
x, y = x-dx, y-dy
if self.pieces[x+y*6] == 1:
return True
self.pieces[x+y*6] = 1
self.enemy_pieces[x+y*6] = 0
return True
# 相手の石
x, y = x+dx, y+dy
return False

# 空きなし
if self.enemy_pieces[x+y*6] == 1 or self.pieces[x+y*6] == 1:
return False

# 石を置く
if flip:
self.pieces[x+y*6] = 1

# 任意の位置が合法手かどうか
flag = False
for dx, dy in self.dxy:
if is_legal_action_xy_dxy(x, y, dx, dy):
flag = True
return flag

先手かどうかを取得します。

game.py
1
2
3
# 先手かどうか
def is_first_player(self):
return self.depth%2 == 0

ゲーム状態の文字表示を行います。

game.py
1
2
3
4
5
6
7
8
9
10
11
12
13
14
# 文字列表示
def __str__(self):
ox = ('o', 'x') if self.is_first_player() else ('x', 'o')
str = ''
for i in range(36):
if self.pieces[i] == 1:
str += ox[0]
elif self.enemy_pieces[i] == 1:
str += ox[1]
else:
str += '-'
if i % 6 == 5:
str += '\n'
return str

ランダム対ランダムで対戦するコードを実装します。

game.py
1
2
3
4
5
6
7
8
9
10
11
12
13
14
15
16
17
18
19
20
21
22
# ランダムで行動選択
def random_action(state):
legal_actions = state.legal_actions()
return legal_actions[random.randint(0, len(legal_actions)-1)]

# 動作確認
if __name__ == '__main__':
# 状態の生成
state = State()

# ゲーム終了までのループ
while True:
# ゲーム終了時
if state.is_done():
break

# 次の状態の取得
state = state.next(random_action(state))

# 文字列表示
print(state)
print()

試しに実行したところ下記のような結果となりました。

最終結果(途中略)

次にデュアルネットワークを実装します。
入力シェイプと行動数のパラメータのみ変更しています。
入力シェイプは、自分の石の配置(6x6)と相手の石の配置(6x6)となります。
行動数は37(配置先6x6 + 合法手がないためのパス)となります。

dual_network.py
1
2
3
4
5
6
7
8
9
10
11
12
13
14
15
16
17
18
19
20
21
22
23
24
25
26
27
28
29
30
31
32
33
34
35
36
37
38
39
40
41
42
43
44
45
46
47
48
49
50
51
52
53
54
55
56
57
58
59
60
61
62
63
64
65
66
67
68
69
70
71
72
73
74
75
# ====================
# デュアルネットワークの作成
# ====================

# パッケージのインポート
from tensorflow.keras.layers import Activation, Add, BatchNormalization, Conv2D, Dense, GlobalAveragePooling2D, Input
from tensorflow.keras.models import Model
from tensorflow.keras.regularizers import l2
from tensorflow.keras import backend as K
import os

# パラメータの準備
DN_FILTERS = 128 # 畳み込み層のカーネル数(本家は256)
DN_RESIDUAL_NUM = 16 # 残差ブロックの数(本家は19)
DN_INPUT_SHAPE = (6, 6, 2) # 入力シェイプ
DN_OUTPUT_SIZE = 37 # 行動数(配置先(6*6)+パス(1))

# 畳み込み層の作成
def conv(filters):
return Conv2D(filters, 3, padding='same', use_bias=False,
kernel_initializer='he_normal', kernel_regularizer=l2(0.0005))

# 残差ブロックの作成
def residual_block():
def f(x):
sc = x
x = conv(DN_FILTERS)(x)
x = BatchNormalization()(x)
x = Activation('relu')(x)
x = conv(DN_FILTERS)(x)
x = BatchNormalization()(x)
x = Add()([x, sc])
x = Activation('relu')(x)
return x
return f

# デュアルネットワークの作成
def dual_network():
# モデル作成済みの場合は無処理
if os.path.exists('./model/best.h5'):
return

# 入力層
input = Input(shape=DN_INPUT_SHAPE)

# 畳み込み層
x = conv(DN_FILTERS)(input)
x = BatchNormalization()(x)
x = Activation('relu')(x)

# 残差ブロック x 16
for i in range(DN_RESIDUAL_NUM):
x = residual_block()(x)

# プーリング層
x = GlobalAveragePooling2D()(x)

# ポリシー出力
p = Dense(DN_OUTPUT_SIZE, kernel_regularizer=l2(0.0005),
activation='softmax', name='pi')(x)

# バリュー出力
v = Dense(1, kernel_regularizer=l2(0.0005))(x)
v = Activation('tanh', name='v')(v)

# モデルの作成
model = Model(inputs=input, outputs=[p,v])

# モデルの保存
os.makedirs('./model/', exist_ok=True) # フォルダがない時は生成
model.save('./model/best.h5') # ベストプレイヤーのモデル

# モデルの破棄
K.clear_session()
del model

モンテカルロ木探索を実装します。変更はありません。

pv_mcts.py
1
2
3
4
5
6
7
8
9
10
11
12
13
14
15
16
17
18
19
20
21
22
23
24
25
26
27
28
29
30
31
32
33
34
35
36
37
38
39
40
41
42
43
44
45
46
47
48
49
50
51
52
53
54
55
56
57
58
59
60
61
62
63
64
65
66
67
68
69
70
71
72
73
74
75
76
77
78
79
80
81
82
83
84
85
86
87
88
89
90
91
92
93
94
95
96
97
98
99
100
101
102
103
104
105
106
107
108
109
110
111
112
113
114
115
116
117
118
119
120
121
122
123
124
125
126
127
128
129
130
# ====================
# モンテカルロ木探索の作成
# ====================

# パッケージのインポート
from game import State
from dual_network import DN_INPUT_SHAPE
from math import sqrt
from tensorflow.keras.models import load_model
from pathlib import Path
import numpy as np

# パラメータの準備
PV_EVALUATE_COUNT = 50 # 1推論あたりのシミュレーション回数(本家は1600)

# 推論
def predict(model, state):
# 推論のための入力テ゛ータのシェイフ゜の変換
a, b, c = DN_INPUT_SHAPE
x = np.array([state.pieces, state.enemy_pieces])
x = x.reshape(c, a, b).transpose(1, 2, 0).reshape(1, a, b, c)

# 推論
y = model.predict(x, batch_size=1)

# 方策の取得
policies = y[0][0][list(state.legal_actions())] # 合法手のみ
policies /= sum(policies) if sum(policies) else 1 # 合計1の確率分布に変換

# 価値の取得
value = y[1][0][0]
return policies, value

# ノードのリストを試行回数のリストに変換
def nodes_to_scores(nodes):
scores = []
for c in nodes:
scores.append(c.n)
return scores

# モンテカルロ木探索のスコアの取得
def pv_mcts_scores(model, state, temperature):
# モンテカルロ木探索のノードの定義
class Node:
# ノードの初期化
def __init__(self, state, p):
self.state = state # 状態
self.p = p # 方策
self.w = 0 # 累計価値
self.n = 0 # 試行回数
self.child_nodes = None # 子ノード群

# 局面の価値の計算
def evaluate(self):
# ゲーム終了時
if self.state.is_done():
# 勝敗結果で価値を取得
value = -1 if self.state.is_lose() else 0

# 累計価値と試行回数の更新
self.w += value
self.n += 1
return value

# 子ノードが存在しない時
if not self.child_nodes:
# ニューラルネットワークの推論で方策と価値を取得
policies, value = predict(model, self.state)

# 累計価値と試行回数の更新
self.w += value
self.n += 1

# 子ノードの展開
self.child_nodes = []
for action, policy in zip(self.state.legal_actions(), policies):
self.child_nodes.append(Node(self.state.next(action), policy))
return value

# 子ノードが存在する時
else:
# アーク評価値が最大の子ノードの評価で価値を取得
value = -self.next_child_node().evaluate()

# 累計価値と試行回数の更新
self.w += value
self.n += 1
return value

# アーク評価値が最大の子ノードを取得
def next_child_node(self):
# アーク評価値の計算
C_PUCT = 1.0
t = sum(nodes_to_scores(self.child_nodes))
pucb_values = []
for child_node in self.child_nodes:
pucb_values.append((-child_node.w / child_node.n if child_node.n else 0.0) +
C_PUCT * child_node.p * sqrt(t) / (1 + child_node.n))

# アーク評価値が最大の子ノードを返す
return self.child_nodes[np.argmax(pucb_values)]

# 現在の局面のノードの作成
root_node = Node(state, 0)

# 複数回の評価の実行
for _ in range(PV_EVALUATE_COUNT):
root_node.evaluate()

# 合法手の確率分布
scores = nodes_to_scores(root_node.child_nodes)
if temperature == 0: # 最大値のみ1
action = np.argmax(scores)
scores = np.zeros(len(scores))
scores[action] = 1
else: # ボルツマン分布でバラつき付加
scores = boltzman(scores, temperature)
return scores

# モンテカルロ木探索で行動選択
def pv_mcts_action(model, temperature=0):
def pv_mcts_action(state):
scores = pv_mcts_scores(model, state, temperature)
return np.random.choice(state.legal_actions(), p=scores)
return pv_mcts_action

# ボルツマン分布
def boltzman(xs, temperature):
xs = [x ** (1 / temperature) for x in xs]
return [x / sum(xs) for x in xs]

セルフプレイを実装します。変更はありません。

self_play.py
1
2
3
4
5
6
7
8
9
10
11
12
13
14
15
16
17
18
19
20
21
22
23
24
25
26
27
28
29
30
31
32
33
34
35
36
37
38
39
40
41
42
43
44
45
46
47
48
49
50
51
52
53
54
55
56
57
58
59
60
61
62
63
64
65
66
67
68
69
70
71
72
73
74
75
76
77
78
79
80
81
82
83
84
85
86
87
88
89
90
91
92
93
94
95
# ====================
# セルフプレイ部
# ====================

# パッケージのインポート
from game import State
from pv_mcts import pv_mcts_scores
from dual_network import DN_OUTPUT_SIZE
from datetime import datetime
from tensorflow.keras.models import load_model
from tensorflow.keras import backend as K
from pathlib import Path
import numpy as np
import pickle
import os

# パラメータの準備
SP_GAME_COUNT = 500 # セルフプレイを行うゲーム数(本家は25000)
SP_TEMPERATURE = 1.0 # ボルツマン分布の温度パラメータ

# 先手プレイヤーの価値
def first_player_value(ended_state):
# 1:先手勝利, -1:先手敗北, 0:引き分け
if ended_state.is_lose():
return -1 if ended_state.is_first_player() else 1
return 0

# 学習データの保存
def write_data(history):
now = datetime.now()
os.makedirs('./data/', exist_ok=True) # フォルダがない時は生成
path = './data/{:04}{:02}{:02}{:02}{:02}{:02}.history'.format(
now.year, now.month, now.day, now.hour, now.minute, now.second)
with open(path, mode='wb') as f:
pickle.dump(history, f)

# 1ゲームの実行
def play(model):
# 学習データ
history = []

# 状態の生成
state = State()

while True:
# ゲーム終了時
if state.is_done():
break

# 合法手の確率分布の取得
scores = pv_mcts_scores(model, state, SP_TEMPERATURE)

# 学習データに状態と方策を追加
policies = [0] * DN_OUTPUT_SIZE
for action, policy in zip(state.legal_actions(), scores):
policies[action] = policy
history.append([[state.pieces, state.enemy_pieces], policies, None])

# 行動の取得
action = np.random.choice(state.legal_actions(), p=scores)

# 次の状態の取得
state = state.next(action)

# 学習データに価値を追加
value = first_player_value(state)
for i in range(len(history)):
history[i][2] = value
value = -value
return history

# セルフプレイ
def self_play():
# 学習データ
history = []

# ベストプレイヤーのモデルの読み込み
model = load_model('./model/best.h5')

# 複数回のゲームの実行
for i in range(SP_GAME_COUNT):
# 1ゲームの実行
h = play(model)
history.extend(h)

# 出力
print('\rSelfPlay {}/{}'.format(i+1, SP_GAME_COUNT), end='')
print('')

# 学習データの保存
write_data(history)

# モデルの破棄
K.clear_session()
del model

パラメータ更新部を実装します。変更はありません。

train_network.py
1
2
3
4
5
6
7
8
9
10
11
12
13
14
15
16
17
18
19
20
21
22
23
24
25
26
27
28
29
30
31
32
33
34
35
36
37
38
39
40
41
42
43
44
45
46
47
48
49
50
51
52
53
54
55
56
57
58
59
60
61
62
63
64
65
# ====================
# パラメータ更新部
# ====================

# パッケージのインポート
from dual_network import DN_INPUT_SHAPE
from tensorflow.keras.callbacks import LearningRateScheduler, LambdaCallback
from tensorflow.keras.models import load_model
from tensorflow.keras import backend as K
from pathlib import Path
import numpy as np
import pickle

# パラメータの準備
RN_EPOCHS = 100 # 学習回数

# 学習データの読み込み
def load_data():
history_path = sorted(Path('./data').glob('*.history'))[-1]
with history_path.open(mode='rb') as f:
return pickle.load(f)

# デュアルネットワークの学習
def train_network():
# 学習データの読み込み
history = load_data()
xs, y_policies, y_values = zip(*history)

# 学習のための入力テ゛ータのシェイフ゜の変換
a, b, c = DN_INPUT_SHAPE
xs = np.array(xs)
xs = xs.reshape(len(xs), c, a, b).transpose(0, 2, 3, 1)
y_policies = np.array(y_policies)
y_values = np.array(y_values)

# ベストプレイヤーのモデルの読み込み
model = load_model('./model/best.h5')

# モデルのコンパイル
model.compile(loss=['categorical_crossentropy', 'mse'], optimizer='adam')

# 学習率
def step_decay(epoch):
x = 0.001
if epoch >= 50: x = 0.0005
if epoch >= 80: x = 0.00025
return x
lr_decay = LearningRateScheduler(step_decay)

# 出力
print_callback = LambdaCallback(
on_epoch_begin=lambda epoch,logs:
print('\rTrain {}/{}'.format(epoch + 1,RN_EPOCHS), end=''))

# 学習の実行
model.fit(xs, [y_policies, y_values], batch_size=128, epochs=RN_EPOCHS,
verbose=0, callbacks=[lr_decay, print_callback])
print('')

# 最新プレイヤーのモデルの保存
model.save('./model/latest.h5')

# モデルの破棄
K.clear_session()
del model

新パラメータ評価部を実装します。変更はありません。

evaluate_network.py
1
2
3
4
5
6
7
8
9
10
11
12
13
14
15
16
17
18
19
20
21
22
23
24
25
26
27
28
29
30
31
32
33
34
35
36
37
38
39
40
41
42
43
44
45
46
47
48
49
50
51
52
53
54
55
56
57
58
59
60
61
62
63
64
65
66
67
68
69
70
71
72
73
74
75
76
77
78
79
80
81
82
83
84
85
86
87
88
89
90
91
# ====================
# 新パラメータ評価部
# ====================

# パッケージのインポート
from game import State
from pv_mcts import pv_mcts_action
from tensorflow.keras.models import load_model
from tensorflow.keras import backend as K
from pathlib import Path
from shutil import copy
import numpy as np

# パラメータの準備
EN_GAME_COUNT = 10 # 1評価あたりのゲーム数(本家は400)
EN_TEMPERATURE = 1.0 # ボルツマン分布の温度

# 先手プレイヤーのポイント
def first_player_point(ended_state):
# 1:先手勝利, 0:先手敗北, 0.5:引き分け
if ended_state.is_lose():
return 0 if ended_state.is_first_player() else 1
return 0.5

# 1ゲームの実行
def play(next_actions):
# 状態の生成
state = State()

# ゲーム終了までループ
while True:
# ゲーム終了時
if state.is_done():
break;

# 行動の取得
next_action = next_actions[0] if state.is_first_player() else next_actions[1]
action = next_action(state)

# 次の状態の取得
state = state.next(action)

# 先手プレイヤーのポイントを返す
return first_player_point(state)

# ベストプレイヤーの交代
def update_best_player():
copy('./model/latest.h5', './model/best.h5')
print('Change BestPlayer')

# ネットワークの評価
def evaluate_network():
# 最新プレイヤーのモデルの読み込み
model0 = load_model('./model/latest.h5')

# ベストプレイヤーのモデルの読み込み
model1 = load_model('./model/best.h5')

# PV MCTSで行動選択を行う関数の生成
next_action0 = pv_mcts_action(model0, EN_TEMPERATURE)
next_action1 = pv_mcts_action(model1, EN_TEMPERATURE)
next_actions = (next_action0, next_action1)

# 複数回の対戦を繰り返す
total_point = 0
for i in range(EN_GAME_COUNT):
# 1ゲームの実行
if i % 2 == 0:
total_point += play(next_actions)
else:
total_point += 1 - play(list(reversed(next_actions)))

# 出力
print('\rEvaluate {}/{}'.format(i + 1, EN_GAME_COUNT), end='')
print('')

# 平均ポイントの計算
average_point = total_point / EN_GAME_COUNT
print('AveragePoint', average_point)

# モデルの破棄
K.clear_session()
del model0
del model1

# ベストプレイヤーの交代
if average_point > 0.5:
update_best_player()
return True
else:
return False

学習サイクルを実行します。ベストプレイヤーの評価は削除しています。
この処理を実行するとベストプレイヤーのモデルが作成されます。(model/best.h5)

学習完了までにCorei5、メモリ4G、GPUなしのPCでまる2日ほどかかりました。

train_cycle.py
1
2
3
4
5
6
7
8
9
10
11
12
13
14
15
16
17
18
19
20
21
22
23
# ====================
# 学習サイクルの実行
# ====================

# パッケージのインポート
from dual_network import dual_network
from self_play import self_play
from train_network import train_network
from evaluate_network import evaluate_network

# デュアルネットワークの作成
dual_network()

for i in range(10):
print('Train',i,'====================')
# セルフプレイ部
self_play()

# パラメータ更新部
train_network()

# 新ハ゜ラメータ評価部
evaluate_network()

ゲームUIを実装します。

human_play.py
1
2
3
4
5
6
7
8
9
10
11
12
13
14
15
16
17
# ====================
# 人とAIの対戦
# ====================

# パッケージのインポート
from game import State
from pv_mcts import pv_mcts_action
from tensorflow.keras.models import load_model
from pathlib import Path
from threading import Thread
import tkinter as tk

# ベストプレイヤーのモデルの読み込み
model = load_model('./model/best.h5')

# ゲームUIの定義
class GameUI(tk.Frame):

ゲームUIの初期化を行います。
下記の3つを用意します。

  • ゲームの状態
  • モンテカルロ木探索で行動選択を行う関数
  • キャンバス
human_play.py
1
2
3
4
5
6
7
8
9
10
11
12
13
14
15
16
17
18
# 初期化
def __init__(self, master=None, model=None):
tk.Frame.__init__(self, master)
self.master.title('リバーシ')

# ゲーム状態の生成
self.state = State()

# PV MCTSで行動選択を行う関数の生成
self.next_action = pv_mcts_action(model, 0.0)

# キャンバスの生成
self.c = tk.Canvas(self, width = 240, height = 240, highlightthickness = 0)
self.c.bind('<Button-1>', self.turn_of_human)
self.c.pack()

# 描画の更新
self.on_draw()

人間のターンの処理を行います。

  1. ゲーム終了時はゲーム状態を初期状態に戻します。
  2. 先手でない時、操作不可とします。
  3. クリック位置を行動に変換します。
  4. 合法手でない時、無処理とします。
  5. 合法手の場合、次の状態を取得して描画の更新を行います。
  6. AIのターンへの遷移を行います。
human_play.py
1
2
3
4
5
6
7
8
9
10
11
12
13
14
15
16
17
18
19
20
21
22
23
24
25
26
27
28
29
30
31
32
# 人間のターン
def turn_of_human(self, event):
# ゲーム終了時
if self.state.is_done():
self.state = State()
self.on_draw()
return

# 先手でない時
if not self.state.is_first_player():
return

# クリック位置を行動に変換
x = int(event.x/40)
y = int(event.y/40)
if x < 0 or 5 < x or y < 0 or 5 < y: # 範囲外
return
action = x + y * 6

# 合法手でない時
legal_actions = self.state.legal_actions()
if legal_actions == [36]:
action = 36 # パス
if action != 36 and not (action in legal_actions):
return

# 次の状態の取得
self.state = self.state.next(action)
self.on_draw()

# AIのターン
self.master.after(1, self.turn_of_ai)

AIのターンの処理を行います。

  1. ゲーム終了時は無処理です。
  2. デュアルネットワークで行動を取得します。
  3. 取得した行動に応じて次の状態を取得し、描画の更新を行います。
human_play.py
1
2
3
4
5
6
7
8
9
10
11
12
# AIのターン
def turn_of_ai(self):
# ゲーム終了時
if self.state.is_done():
return

# 行動の取得
action = self.next_action(self.state)

# 次の状態の取得
self.state = self.state.next(action)
self.on_draw()

石の描画を行います。
引数のindexはマス番号、first_playerは先手かどうかを表します。
先手は赤色のマルで後手は白色のマルを表します。

human_play.py
1
2
3
4
5
6
7
8
# 石の描画
def draw_piece(self, index, first_player):
x = (index%6)*40+5
y = int(index/6)*40+5
if first_player:
self.c.create_oval(x, y, x+30, y+30, width = 1.0, outline = '#000000', fill = '#C2272D')
else:
self.c.create_oval(x, y, x+30, y+30, width = 1.0, outline = '#000000', fill = '#FFFFFF')

全てのマス目と石を描画します。

human_play.py
1
2
3
4
5
6
7
8
9
10
11
12
# 描画の更新
def on_draw(self):
self.c.delete('all')
self.c.create_rectangle(0, 0, 240, 240, width = 0.0, fill = '#C69C6C')
for i in range(1, 8):
self.c.create_line(0, i*40, 240, i*40, width = 1.0, fill = '#000000')
self.c.create_line(i*40, 0, i*40, 240, width = 1.0, fill = '#000000')
for i in range(36):
if self.state.pieces[i] == 1:
self.draw_piece(i, self.state.is_first_player())
if self.state.enemy_pieces[i] == 1:
self.draw_piece(i, not self.state.is_first_player())

ゲームUIを実行します。

human_play.py
1
2
3
4
# ゲームUIの実行
f = GameUI(model=model)
f.pack()
f.mainloop()

human_play.pyを実行するとリバーシが始まりAIと対戦することができます。

対戦中

なかなか強いAIとなっています。本気でやったのに負けました。

参考

AlphaZero 深層学習・強化学習・探索 人工知能プログラミング実践入門 サポートページ