GPUを使ってFashion-MNIST

Google ColaboratoryではGPUを簡単に使うことができます。
メニューから[ランタイム]->[ランタイムのタイプを変更]で表示されるダイアログから[ハードウェアアクセラレータ]でGPUを選択するだけです。

またソースもGPU用にいくつか変更しなくてはなりません。
コメントに # GPU対応対応 を追加しておきましたので参考にしてください。

まずは必要なモジュールをインポートし、共通関数(グラフ表示、学習)を定義します。

1
2
3
4
5
6
7
8
9
10
11
12
13
14
15
16
17
18
19
20
21
22
23
24
25
26
27
28
29
30
31
32
33
34
35
36
37
38
39
40
41
42
43
44
45
46
47
48
49
50
51
52
53
54
55
56
57
58
# モジュールのインポート
import numpy as np
import matplotlib.pyplot as plt

import chainer.optimizers as Opt
import chainer.functions as F
import chainer.links as L
from chainer import Variable, Chain, config, cuda

# -------------- #
# 共通関数の定義 #
# -------------- #
# グラフ表示関数
def show_graph(result1, result2, title, xlabel, ylabel, ymin=0.0, ymax=1.0):
# 学習記録の表示(誤差)
Tall = len(result1)
plt.figure(figsize=(8, 6))
plt.plot(range(Tall), result1, label='train')
plt.plot(range(Tall), result2, label='test')
plt.title(title)
plt.xlabel(xlabel)
plt.ylabel(ylabel)
plt.xlim([0, Tall])
plt.ylim(ymin, ymax)
plt.legend()
plt.show()

# 学習用関数
def learning(model, optNN, data, T=10):
# 学習記録用エリア(返値)
train_loss = []
train_acc = []
test_loss = []
test_acc = []

data = cuda.to_gpu(data, gpu_device) # GPU対応
for time in range(T):
# 学習
config.train = True
optNN.target.cleargrads() # zerogradsより記憶容量の確保にいい
ytrain = model(data[0])
loss_train = F.softmax_cross_entropy(ytrain, data[2])
acc_train = F.accuracy(ytrain, data[2])
loss_train.backward()
optNN.update()

# テスト(検証)
config.train = False
ytest = model(data[1])
loss_test = F.softmax_cross_entropy(ytest, data[3])
acc_test = F.accuracy(ytest, data[3])

# 結果の記録
train_loss.append(cuda.to_cpu(loss_train.data)) # GPU対応
train_acc.append(cuda.to_cpu(acc_train.data)) # GPU対応
test_loss.append(cuda.to_cpu(loss_test.data)) # GPU対応
test_acc.append(cuda.to_cpu(acc_test.data)) # GPU対応
return train_loss, test_loss, train_acc, test_acc

GPU利用の設定を行い、ニューラルネットワークの作成と関数化を行います。

1
2
3
4
5
6
7
8
9
10
11
12
13
14
15
16
# GPUの利用
gpu_device = 0 # GPU対応
cuda.get_device(gpu_device).use() # GPU対応
NN.to_gpu() # GPU対応

# ニューラルネットワークの作成
C = ttrain.max() + 1
NN = Chain(l1=L.Linear(N, 400).to_gpu() , l2=L.Linear(400, C).to_gpu(), # GPU対応
bnorm1=L.BatchRenormalization(400).to_gpu()) # GPU対応

def model(x):
h = NN.l1(x)
h = F.relu(h)
h = NN.bnorm1(h) # バッチの規格化(途中結果の整理)
h = NN.l2(h)
return h

ファッションMNISTのデータセットを読み込み訓練データとテストデータに振り分けます。

1
2
3
4
# fashion_mnistのデータセット読込んでデータ分割
train, test = ds.get_fashion_mnist()
xtrain, ttrain = con.concat_examples(train) # 訓練データ
xtest, ttest = con.concat_examples(test) # テスト(検証)データ

読み込んだデータを2つほど視覚化してみます。

1
2
3
4
5
6
7
# データの視覚化
Dtrain, N = xtrain.shape
print(Dtrain, N)
plt.imshow(xtrain[0,:].reshape(28, 28))
plt.show()
plt.imshow(xtrain[10,:].reshape(28, 28))
plt.show()

結果

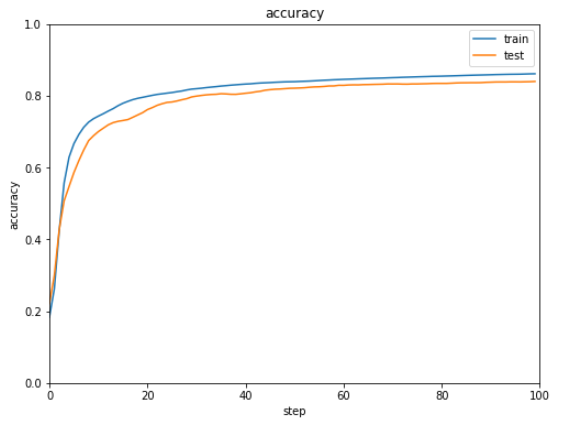
最適化手法を設定し、学習させてから、誤差と正解率のグラフを表示します。

1
2
3
4
5
6
7
8
9
10
# 最適化手法の設定
optNN = Opt.MomentumSGD()
optNN.setup(NN)

# 学習を実行
train_loss, test_loss, train_acc, test_acc = learning(model, optNN, [xtrain, xtest, ttrain, ttest], 100)

# 学習結果をグラフ表示
show_graph(train_loss, test_loss, 'loss function', 'step', 'lossfunction', 0.0, 4.0)
show_graph(train_acc, test_acc, 'accuracy', 'step', 'accuracy')

誤差
正解率

正解率は8割程度となりました。悪くない数字かもしれませんがまだまだ改善の余地はありそうです。

(Google Colaboratoryで動作確認しています。)