The Prisoner's Dilemma and Strategy Simulation

Problem: The Prisoner's Dilemma and Strategy Simulation

The Prisoner’s Dilemma is a classic example in game theory, demonstrating why two rational individuals might not cooperate, even if it appears to be in their best interest.

This example analyzes the payoff matrix and simulates multiple rounds of the dilemma using various strategies to observe long-term outcomes.


Objective

  1. Define the payoff matrix for the Prisoner’s Dilemma.
  2. Simulate repeated interactions using:
    • Always Defect
    • Always Cooperate
    • Tit-for-Tat (mimic the opponent’s previous move).
  3. Visualize the accumulated payoffs over multiple rounds for each strategy.

Python Code

1
2
3
4
5
6
7
8
9
10
11
12
13
14
15
16
17
18
19
20
21
22
23
24
25
26
27
28
29
30
31
32
33
34
35
36
37
38
39
40
41
42
43
44
45
46
47
48
49
50
51
52
53
54
55
56
57
58
59
60
61
62
63
64
65
66
67
68
69
70
71
72
73
74
75
76
77
78
79
import numpy as np
import matplotlib.pyplot as plt

# Define the payoff matrix (Player 1, Player 2)
# Rows: Player 1's actions, Columns: Player 2's actions
# Actions: 0 = Cooperate, 1 = Defect
payoff_matrix = np.array([
[[3, 3], [0, 5]], # Player 1 cooperates
[[5, 0], [1, 1]] # Player 1 defects
])

# Define strategies
def always_cooperate(history, my_history):
return 0 # Always cooperate

def always_defect(history, my_history):
return 1 # Always defect

def tit_for_tat(history, my_history):
if not history: # Cooperate in the first round
return 0
return history[-1] # Mimic the opponent's last move

# Simulate the game
def simulate_game(strategy1, strategy2, rounds=10):
history1, history2 = [], []
score1, score2 = 0, 0

for _ in range(rounds):
move1 = strategy1(history2, history1)
move2 = strategy2(history1, history2)

payoff1, payoff2 = payoff_matrix[move1, move2]
score1 += payoff1
score2 += payoff2

history1.append(move1)
history2.append(move2)

return score1, score2, history1, history2

# Run simulations
rounds = 20
strategies = [always_cooperate, always_defect, tit_for_tat]
results = {}

for i, strat1 in enumerate(strategies):
for j, strat2 in enumerate(strategies):
if i <= j: # Avoid duplicating reverse matches
label = f"{strat1.__name__} vs {strat2.__name__}"
score1, score2, hist1, hist2 = simulate_game(strat1, strat2, rounds)
results[label] = (score1, score2, hist1, hist2)

# Visualize results
fig, ax = plt.subplots(figsize=(10, 6))
labels = list(results.keys())
player1_scores = [results[label][0] for label in labels]
player2_scores = [results[label][1] for label in labels]

bar_width = 0.35
x_indices = np.arange(len(labels))

# Plot bars for Player 1 and Player 2
ax.bar(x_indices - bar_width/2, player1_scores, bar_width, label='Player 1')
ax.bar(x_indices + bar_width/2, player2_scores, bar_width, label='Player 2')

# Add labels and title
ax.set_xlabel("Strategy Pair", fontsize=12)
ax.set_ylabel("Accumulated Payoff", fontsize=12)
ax.set_title("Prisoner's Dilemma: Payoffs for Different Strategies", fontsize=14)
ax.set_xticks(x_indices)
ax.set_xticklabels(labels, rotation=45, ha='right', fontsize=10)
ax.legend()

# Show grid for clarity
ax.grid(axis='y', linestyle='--', alpha=0.7)

plt.tight_layout()
plt.show()

Explanation of the Code

  1. Payoff Matrix:

    • Each cell in the matrix represents the payoff for Player $1$ and Player $2$, given their choices (cooperate/defect).
    • Cooperation leads to mutual benefit, while defection may yield higher short-term rewards.
  2. Strategies:

    • Always Cooperate: Always chooses to cooperate.
    • Always Defect: Always chooses to defect.
    • Tit-for-Tat: Mimics the opponent’s previous move, encouraging reciprocity.
  3. Simulation:

    • The game is repeated for a fixed number of rounds.
    • Accumulated scores and move histories are recorded for both players.
  4. Visualization:

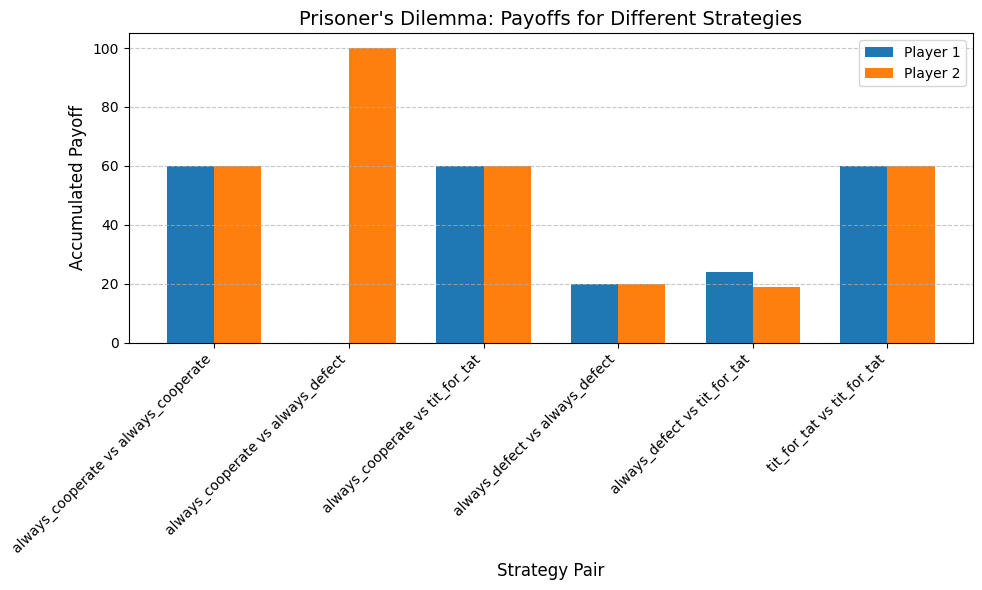
    • Bar plots display the total payoffs for Player $1$ and Player $2$ across all strategy pairs.
    • The results highlight how different strategies perform against each other.

Results and Insights
  1. Tit-for-Tat Performance:

    • Tit-for-Tat typically performs well, fostering cooperation when paired with cooperative strategies.
  2. Always Defect:

    • While it exploits cooperative players, it leads to mutual punishment when paired with itself or Tit-for-Tat.
  3. Always Cooperate:

    • Vulnerable to exploitation but performs well in fully cooperative scenarios.

This simulation illustrates the dynamics of strategic decision-making in repeated games, revealing insights into the stability and outcomes of different strategies.
Numerical Integration with the Trapezoidal Rule

Problem: Numerical Integration Using the Trapezoidal Rule

Numerical integration is a key topic in computational mathematics.

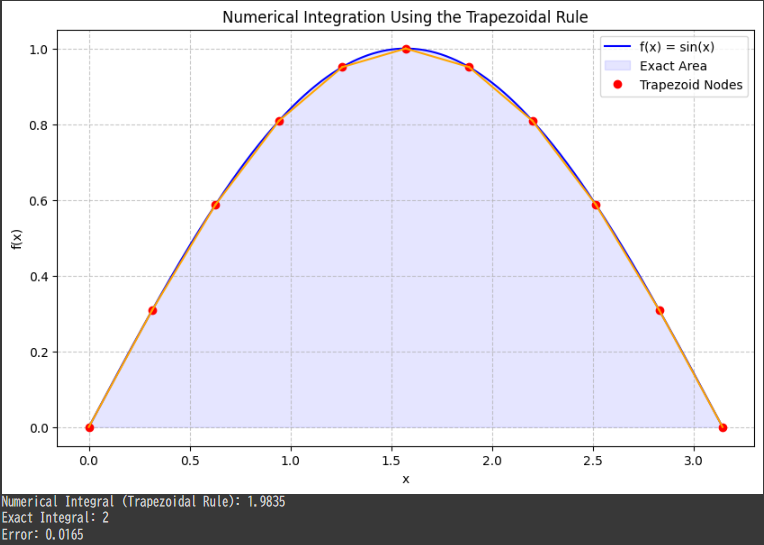
In this example, we will approximate the integral of a given function using the trapezoidal rule and compare the result to the exact value.


Objective

  1. Integrate $ f(x) = \sin(x) $ over the interval $([0, \pi])$ numerically using the trapezoidal rule.
  2. Visualize the approximation and compare it with the actual curve of the function.

Mathematical Background

The integral of $ f(x) = \sin(x) $ over $([0, \pi])$ is:
$$
\int_0^\pi \sin(x) , dx = 2
$$

The trapezoidal rule approximates the integral by dividing the interval into $( n ) $subintervals and approximating $ f(x) $ as a straight line over each subinterval.
The formula is:
$$
\int_a^b f(x) , dx \approx \frac{h}{2} \left[ f(x_0) + 2 \sum_{i=1}^{n-1} f(x_i) + f(x_n) \right]
$$
where $( h = \frac{b-a}{n} )$ is the width of each subinterval.


Python Code

1
2
3
4
5
6
7
8
9
10
11
12
13
14
15
16
17
18
19
20
21
22
23
24
25
26
27
28
29
30
31
32
33
34
35
36
37
38
39
40
41
42
43
44
45
46
47
import numpy as np
import matplotlib.pyplot as plt

# Function to integrate
def f(x):
return np.sin(x)

# Trapezoidal rule implementation
def trapezoidal_rule(func, a, b, n):
x = np.linspace(a, b, n + 1) # Subinterval points
y = func(x) # Function values at those points
h = (b - a) / n # Width of each subinterval
integral = (h / 2) * (y[0] + 2 * np.sum(y[1:-1]) + y[-1])
return integral, x, y

# Parameters
a, b = 0, np.pi # Integration limits
n = 10 # Number of subintervals

# Calculate numerical integral
numerical_integral, x_points, y_points = trapezoidal_rule(f, a, b, n)

# Exact integral
exact_integral = 2 # From analytical solution

# Plotting
x_full = np.linspace(a, b, 1000)
y_full = f(x_full)

plt.figure(figsize=(10, 6))
plt.plot(x_full, y_full, label='f(x) = sin(x)', color='blue')
plt.fill_between(x_full, 0, y_full, color='blue', alpha=0.1, label='Exact Area')
plt.plot(x_points, y_points, 'o', color='red', label='Trapezoid Nodes')
for i in range(len(x_points) - 1):
plt.plot([x_points[i], x_points[i + 1]], [y_points[i], y_points[i + 1]], color='orange')

plt.title("Numerical Integration Using the Trapezoidal Rule")
plt.xlabel("x")
plt.ylabel("f(x)")
plt.legend()
plt.grid(True, linestyle="--", alpha=0.7)
plt.show()

# Print results
print(f"Numerical Integral (Trapezoidal Rule): {numerical_integral:.4f}")
print(f"Exact Integral: {exact_integral}")
print(f"Error: {abs(numerical_integral - exact_integral):.4f}")

Explanation of the Code

  1. Function and Interval:
    • The function $( f(x) = \sin(x) )$ is defined along with the integration interval $([0, \pi])$.
  2. Trapezoidal Rule:
    • The interval is divided into $( n )$ subintervals, and the trapezoidal rule is applied to approximate the integral.
  3. Exact Solution:
    • The exact integral is $( 2 )$, used here for error comparison.
  4. Visualization:
    • The function is plotted alongside the trapezoids used for approximation.
    • The filled area under $ f(x) $ represents the exact integral.

Results and Insights

  1. Numerical Approximation:
    • The trapezoidal rule provides an approximate integral value close to the exact solution.
      For $( n = 10 )$, the numerical result is accurate within a small error margin.
  2. Graph:
    • The blue curve shows $ f(x) = \sin(x) $.
    • Red points indicate the nodes where the function is evaluated.
    • Orange lines represent the trapezoids approximating the area under the curve.
  3. Error Analysis:
    • Increasing the number of subintervals $( n )$ reduces the approximation error, demonstrating the method’s convergence.

Applications in Computational Mathematics

  1. Integration of Complex Functions:
    • Useful when analytical integration is impossible.
  2. Engineering and Physics:
    • Applied to problems involving areas, volumes, and physical quantities.
  3. Data Analysis:
    • Approximation of cumulative distributions or areas under discrete data points.

This example highlights how numerical integration works and provides a visual understanding of the trapezoidal rule.

Predicting House Prices Using Linear Regression

Problem: Predicting House Prices Using Linear Regression

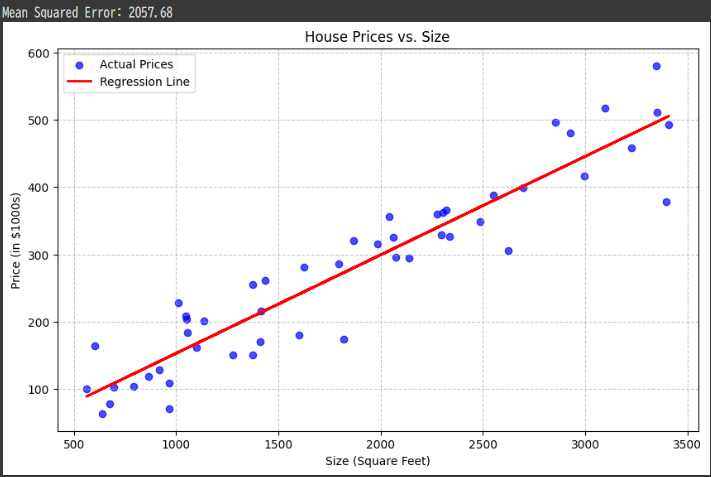
In this example, we analyze a dataset containing house features (e.g., size, number of rooms) to predict house prices using linear regression, a core technique in data science.

Objective

  1. Train a linear regression model to predict house prices based on square footage.
  2. Visualize the results, including the data points and the regression line.

Dataset

We will simulate a dataset of house sizes (in square feet) and corresponding prices (in $1000s).

This ensures reproducibility and simplicity.


Python Code

1
2
3
4
5
6
7
8
9
10
11
12
13
14
15
16
17
18
19
20
21
22
23
24
25
26
27
28
29
30
31
32
33
34
35
import numpy as np
import matplotlib.pyplot as plt
from sklearn.linear_model import LinearRegression
from sklearn.metrics import mean_squared_error

# Simulated dataset
np.random.seed(42)
sizes = np.random.uniform(500, 3500, 50) # House sizes (square feet)
prices = sizes * 0.15 + np.random.normal(0, 50, 50) # Prices with some noise

# Reshape data for sklearn
X = sizes.reshape(-1, 1) # Predictor (feature)
y = prices # Target (price)

# Train a linear regression model
model = LinearRegression()
model.fit(X, y)

# Make predictions
predicted_prices = model.predict(X)

# Evaluate the model
mse = mean_squared_error(y, predicted_prices)
print(f"Mean Squared Error: {mse:.2f}")

# Plot the results
plt.figure(figsize=(10, 6))
plt.scatter(sizes, prices, color="blue", label="Actual Prices", alpha=0.7)
plt.plot(sizes, predicted_prices, color="red", label="Regression Line", linewidth=2)
plt.title("House Prices vs. Size")
plt.xlabel("Size (Square Feet)")
plt.ylabel("Price (in $1000s)")
plt.legend()
plt.grid(True, linestyle="--", alpha=0.7)
plt.show()

Explanation of the Code

  1. Simulated Data:
    • House sizes are sampled randomly between $500$ and $3500$ square feet.
    • Prices are calculated using a simple linear relationship $( \text{Price} = 0.15 \times \text{Size} + \text{Noise} )$, where the noise simulates real-world variability.
  2. Model Training:
    • A LinearRegression model from sklearn is trained using house sizes as the feature and prices as the target.
  3. Prediction:
    • The trained model predicts house prices, which are plotted alongside the actual prices.
  4. Model Evaluation:
    • The Mean Squared Error (MSE) quantifies the model’s accuracy.

Visualization and Insights

  1. Scatter Plot:
    • Blue dots represent the actual prices for different house sizes.
  2. Regression Line:
    • The red line shows the best-fit line learned by the linear regression model.
  3. Model Performance:
    • The MSE indicates the average squared difference between the predicted and actual prices.

Applications in Data Science

  1. Regression Analysis:
    • This approach is foundational in predictive modeling for understanding relationships between variables.
  2. Real Estate Analytics:
    • Real-world data would involve more features like location, number of bedrooms, and year built.
  3. Scalability:
    • This method easily extends to multivariate regression with multiple predictors.

This example demonstrates the workflow of data science: data preprocessing, modeling, and visualization, providing insights into how features like size influence house prices.

Maxwell-Boltzmann Speed Distribution in an Ideal Gas

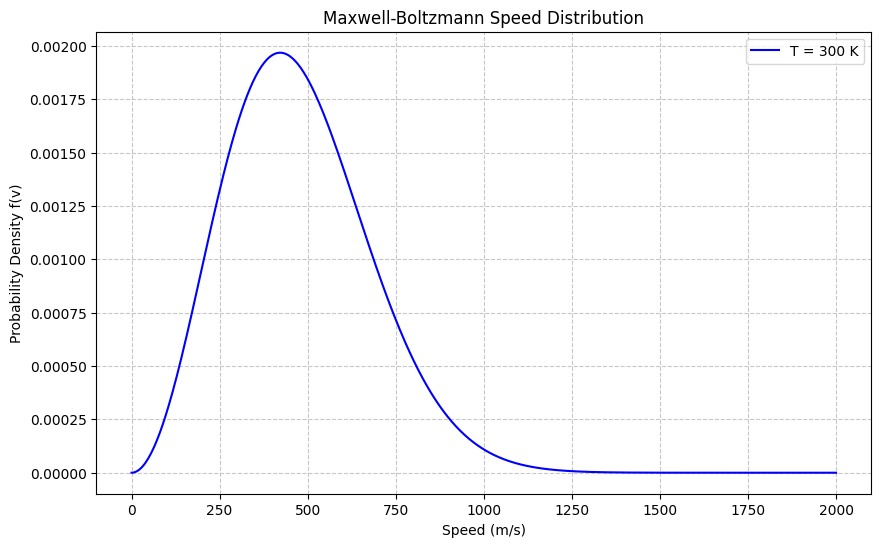
Here’s a fascinating example from statistical mechanics: the Maxwell-Boltzmann distribution of particle speeds in an ideal gas.

This distribution describes the probable speeds of particles at a given temperature, which is central to understanding gas behavior in thermodynamics.

Problem: Plotting the Maxwell-Boltzmann Speed Distribution

The Maxwell-Boltzmann distribution is a probability distribution for the speed $( v )$ of particles in an ideal gas at a certain temperature $( T )$. Given:

  • Temperature $( T )$ of the gas,
  • Particle mass $( m )$,

we can determine the likelihood of finding particles moving at different speeds.

The probability density function of the Maxwell-Boltzmann speed distribution is given by:
$$
f(v) = 4\pi \left( \frac{m}{2 \pi k_B T} \right)^{3/2} v^2 \exp \left( -\frac{mv^2}{2k_B T} \right)
$$

  • $( v )$ is the particle speed,
  • $( m )$ is the mass of each particle,
  • $( T )$ is the absolute temperature,
  • $( k_B )$ is the Boltzmann constant.

Goal

  1. Calculate the Maxwell-Boltzmann distribution for speeds.
  2. Plot the distribution to observe how it varies with temperature.

Python Code

Below is the $Python$ code to compute and plot the Maxwell-Boltzmann distribution for a given temperature and particle mass:

1
2
3
4
5
6
7
8
9
10
11
12
13
14
15
16
17
18
19
20
21
22
23
24
25
26
27
28
29
30
31
32
import numpy as np
import matplotlib.pyplot as plt

# Constants
k_B = 1.38e-23 # Boltzmann constant in J/K
m = 4.65e-26 # Mass of a nitrogen molecule in kg (example particle)

# Temperature
T = 300 # Temperature in Kelvin

# Maxwell-Boltzmann speed distribution function
def maxwell_boltzmann(v, T, m):
coefficient = 4 * np.pi * (m / (2 * np.pi * k_B * T)) ** (3/2)
return coefficient * v**2 * np.exp(-m * v**2 / (2 * k_B * T))

# Speed range
v = np.linspace(0, 2000, 500)

# Calculate distribution
f_v = maxwell_boltzmann(v, T, m)

# Plotting
plt.figure(figsize=(10, 6))
plt.plot(v, f_v, color="blue", label=f"T = {T} K")
plt.xlabel("Speed (m/s)")
plt.ylabel("Probability Density f(v)")
plt.title("Maxwell-Boltzmann Speed Distribution")
plt.legend()
plt.grid(True, linestyle="--", alpha=0.7)

# Display the plot
plt.show()

Explanation of the Code

  1. Function Definition:
    • We define a function maxwell_boltzmann(v, T, m) to calculate the probability density $ f(v) $ at different speeds $( v )$ for a given temperature $( T )$ and particle mass $( m )$.
  2. Speed Range:
    • We create an array v representing a range of speeds up to around $2000$ m/s, which covers the typical speeds of nitrogen molecules at room temperature.
  3. Distribution Calculation:
    • Using the maxwell_boltzmann function, we compute $ f(v) $ for each speed in v.
  4. Plotting:
    • We plot $( v )$ on the $x$-axis and $ f(v) $ on the $y$-axis, giving a clear visualization of the speed distribution.

Visualization and Interpretation

The graph shows:

  • Peak: The curve peaks at a specific speed, which represents the most probable speed of particles at this temperature.
  • Spread: The distribution has a long tail, indicating some particles have higher speeds, though with decreasing probability.
  • Temperature Dependence: As temperature increases (not shown here but if varied), the peak shifts to higher speeds, indicating faster-moving particles.

Insights from the Maxwell-Boltzmann Distribution

  1. Temperature Effect: Higher temperatures lead to broader, more spread-out distributions, as particles move faster on average.
  2. Statistical Behavior: The distribution embodies the statistical nature of molecular motion, providing a basis for understanding macroscopic gas properties, like pressure and temperature.
  3. Applications: Maxwell-Boltzmann statistics are crucial in fields like chemistry, thermodynamics, and kinetic theory, helping explain diffusion rates, reaction kinetics, and energy transfer.

This visualization brings out the fundamental principles of statistical mechanics and demonstrates how particle motion distributions are governed by temperature.

Visualizing Cyclic Patterns in Modular Exponentiation

Here’s a visually engaging number theory problem that explores Fermat’s Little Theorem through cyclic patterns in modular exponentiation.

Problem: Visualizing Cyclic Patterns in Modular Exponentiation

Fermat’s Little Theorem states that if $( p )$ is a prime number and $( a )$ is an integer not divisible by $( p )$, then:
$$
a^{p-1} \equiv 1 \pmod{p}
$$
This theorem implies that for each $( a )$, the sequence of powers $( a^1, a^2, \dots, a^{p-1} )$ modulo $( p )$ will eventually repeat, forming a cyclic pattern.

In this example, we will:

  1. Choose a modulus $( p )$, a prime number (e.g., $23$).
  2. Compute $( a^k \mod p )$ for each integer $( a )$ from $1$ to $( p-1 )$ and for $( k )$ from $1$ to $( p-1 )$.
  3. Plot these powers to observe any patterns and cycles.

Approach

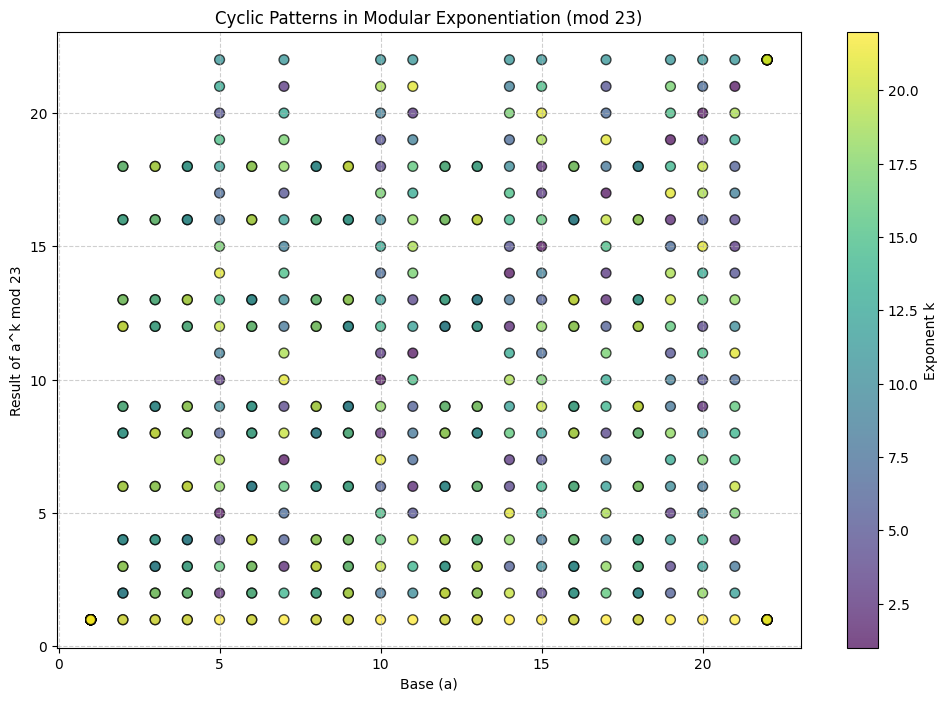
We’ll calculate $( a^k \mod p )$ for each value of $( a )$ from $1$ to $( p-1 )$ and plot the results as points, where the x-axis represents the base $( a )$, the y-axis represents the result of $( a^k \mod p )$, and different colors show different powers $( k )$.

Python Code

Here’s the $Python$ code to find and plot the cyclic patterns:

1
2
3
4
5
6
7
8
9
10
11
12
13
14
15
16
17
18
19
20
21
22
23
24
25
26
27
28
29
import matplotlib.pyplot as plt
import numpy as np

# Define a prime modulus
p = 23

# Generate data for powers
data = []
for a in range(1, p):
for k in range(1, p):
value = (a ** k) % p
data.append((a, value, k))

# Separate values for plotting
x_values = [item[0] for item in data]
y_values = [item[1] for item in data]
colors = [item[2] for item in data] # Different colors for each power k

# Plotting
plt.figure(figsize=(12, 8))
scatter = plt.scatter(x_values, y_values, c=colors, cmap="viridis", s=50, alpha=0.7, edgecolor="black")
plt.colorbar(scatter, label="Exponent k")
plt.xlabel("Base (a)")
plt.ylabel("Result of a^k mod 23")
plt.title("Cyclic Patterns in Modular Exponentiation (mod 23)")
plt.grid(True, linestyle="--", alpha=0.6)

# Show the plot
plt.show()

Explanation of the Code

  1. Modular Exponentiation Calculation:
    • For each integer $( a )$ from $1$ to $( p-1 )$, we compute $( a^k \mod p )$ for $( k = 1 )$ to $( p-1 )$.
    • These results reveal the pattern of powers under modulo $( p )$, showing the periodic behavior predicted by Fermat’s Little Theorem.
  2. Plotting:
    • Each point $(a, a^k \mod p)$ represents the result of raising $( a )$ to power $( k )$ modulo $( p )$.
    • The color of each point indicates the power $( k )$, which helps in visualizing different cycles.

Visualization

The scatter plot shows:

  • Cyclic Behavior: Each base $( a )$ follows a distinct cycle when raised to powers $( k )$ modulo $( p )$.
  • Color Coding: Different colors represent different exponents $( k )$, making it easy to observe how the results cycle back, eventually repeating after certain intervals.

Interpretation

  1. Cyclic Patterns: This visualization shows how powers of numbers “wrap around” in modular arithmetic, creating cycles based on Fermat’s Little Theorem.
  2. Applications: Modular exponentiation is central to cryptography, particularly in $RSA$ and Diffie-Hellman key exchange, where large powers modulo a prime number are computed.
  3. Visual Insight: Observing the cyclic patterns provides an intuitive grasp of Fermat’s Little Theorem and the repeating nature of modular exponentiation.

This graph effectively brings out the cyclic beauty in modular exponentiation and demonstrates the predictability and structure found in number theory.

Binomial Distribution:Probability of Getting Heads in 20 Coin Flips

Let’s look at a problem in probability theory related to binomial distributions, which are used to model the probability of a certain number of successes in a series of independent trials.

Problem: Binomial Probability of Flipping a Coin

Suppose you flip a fair coin ($50$% chance of heads and $50$% chance of tails) $20$ times.
We want to know:

  1. The probability of getting exactly $(k)$ heads for various values of $(k)$ ($0$ to $20$).
  2. How the probabilities are distributed across different numbers of heads.

Solution Outline

  1. We’ll use the binomial distribution. The probability of getting exactly $(k)$ heads in $(n)$ flips is given by:
    $$
    P(X = k) = \binom{n}{k} p^k (1 - p)^{n - k}
    $$

    • $(n)$ = number of trials ($20$),
    • $(p)$ = probability of success in a single trial ($0.5$ for heads),
    • $(k)$ = number of successes (number of heads).
  2. We’ll calculate the probabilities for each value of $(k)$ from $0$ to $20$ and visualize the distribution of these probabilities.

Python Code

Here’s the $Python$ code to calculate and plot the binomial distribution for this problem:

1
2
3
4
5
6
7
8
9
10
11
12
13
14
15
16
17
18
19
20
21
22
23
24
25
26
import numpy as np
import matplotlib.pyplot as plt
from scipy.stats import binom

# Define parameters
n = 20 # number of trials (coin flips)
p = 0.5 # probability of getting heads in a single flip

# Values of k (number of heads) from 0 to 20
k_values = np.arange(0, n + 1)

# Calculate binomial probabilities for each k
probabilities = binom.pmf(k_values, n, p)

# Plotting the binomial distribution
plt.figure(figsize=(10, 6))
plt.bar(k_values, probabilities, color="skyblue", edgecolor="black")

# Add labels and title
plt.xlabel("Number of Heads (k)")
plt.ylabel("Probability")
plt.title("Binomial Distribution: Probability of Getting k Heads in 20 Coin Flips")
plt.grid(axis="y", linestyle="--", alpha=0.7)

# Show the plot
plt.show()

Explanation of the Code

  1. Binomial Probability Calculation:
    • We use binom.pmf(k, n, p) from scipy.stats to calculate the probability mass function (PMF) of a binomial distribution, which gives the probability of getting exactly $( k )$ heads in $( n )$ trials with probability $( p )$ of heads.
  2. Plotting:
    • We plot the probabilities for each possible value of $( k )$ (from $0$ to $20$ heads).
    • A bar plot is used to visualize how probabilities are distributed across different numbers of heads.

Visualization

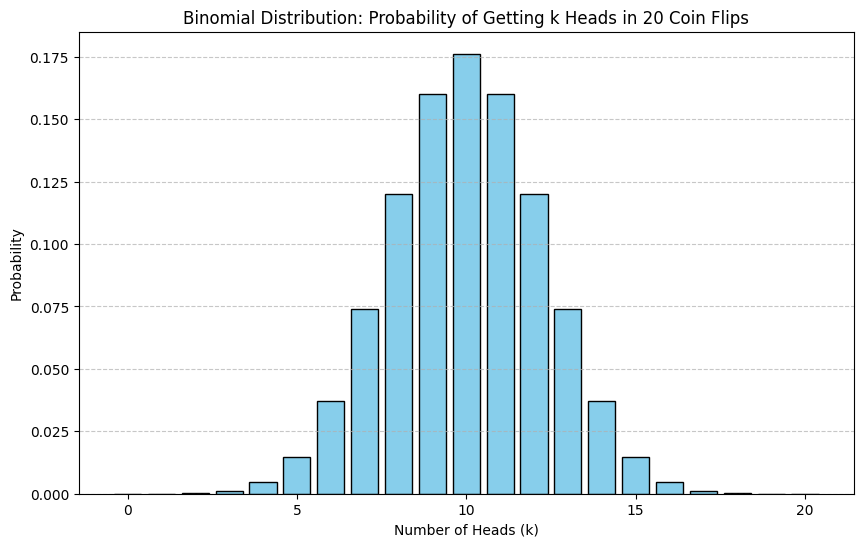
The bar chart shows:

  • The probability of each possible outcome (number of heads) when flipping a coin $20$ times.
  • The distribution is centered around $10$ heads, since we expect about half of the flips to result in heads due to the $50$% probability of success per flip.

Interpretation

  1. Peak at 10 Heads:
    The distribution peaks at $10$, which is the expected number of heads when flipping a coin $20$ times with a $50$% chance for heads each time.
  2. Symmetry:
    The binomial distribution here is symmetric around $10$ due to the equal probability of heads and tails.
  3. Applications:
    Binomial distributions model scenarios with a fixed number of independent trials and a constant probability of success in each trial, such as quality control testing, marketing response rates, and predicting outcomes in sports or games of chance.

Fuzzy Temperature Classification with Python

Let’s explore an example involving fuzzy logic, which is widely used to handle uncertainty and approximate reasoning.

Fuzzy logic extends traditional binary logic (true/false) by allowing partial truth values, typically ranging from $0$ (completely false) to $1$ (completely true).

This can be useful in various real-world applications like control systems, decision-making, and classification.

Problem: Fuzzy Temperature Classification

Suppose we want to classify temperature into three categories using fuzzy sets:

  • Cold
  • Warm
  • Hot

Each category is represented by a membership function that assigns a membership value (between $0$ and $1$) to each temperature.

A higher value indicates a stronger association with that category.

Fuzzy Membership Functions

We’ll define the membership functions for each temperature category using triangular and trapezoidal functions:

  1. Cold: Defined by a triangular function that peaks at low temperatures.
  2. Warm: Defined by a trapezoidal function that covers the middle temperature range.
  3. Hot: Defined by a triangular function that peaks at high temperatures.

These membership functions are given as follows:

  • Cold:
    $$
    \text{Cold}(x) = \begin{cases}
    1 & x \leq 10 \
    \frac{20 - x}{10} & 10 < x < 20 \
    0 & x \geq 20
    \end{cases}
    $$
  • Warm:
    $$
    \text{Warm}(x) = \begin{cases}
    0 & x \leq 15 \
    \frac{x - 15}{10} & 15 < x < 25 \
    \frac{35 - x}{10} & 25 \leq x < 35 \
    0 & x \geq 35
    \end{cases}
    $$
  • Hot:
    $$
    \text{Hot}(x) = \begin{cases}
    0 & x \leq 30 \
    \frac{x - 30}{10} & 30 < x < 40 \
    1 & x \geq 40
    \end{cases}
    $$

Objective

  1. Plot the membership functions for Cold, Warm, and Hot over a range of temperatures.
  2. Show how fuzzy logic allows overlapping categories, which allows for soft transitions between temperature classifications.

Python Code

Here’s the $Python$ code to define the membership functions and plot them:

1
2
3
4
5
6
7
8
9
10
11
12
13
14
15
16
17
18
19
20
21
22
23
24
25
26
27
28
29
30
31
32
33
34
35
36
37
38
39
40
41
42
43
44
45
46
47
import numpy as np
import matplotlib.pyplot as plt

# Define the membership functions for Cold, Warm, and Hot
def cold(x):
if x <= 10:
return 1
elif 10 < x < 20:
return (20 - x) / 10
else:
return 0

def warm(x):
if 15 < x < 25:
return (x - 15) / 10
elif 25 <= x < 35:
return (35 - x) / 10
else:
return 0

def hot(x):
if x <= 30:
return 0
elif 30 < x < 40:
return (x - 30) / 10
else:
return 1

# Generate temperature values and calculate membership values
temperature_values = np.linspace(0, 50, 500)
cold_values = [cold(x) for x in temperature_values]
warm_values = [warm(x) for x in temperature_values]
hot_values = [hot(x) for x in temperature_values]

# Plot the membership functions
plt.figure(figsize=(10, 6))
plt.plot(temperature_values, cold_values, label="Cold", color="blue")
plt.plot(temperature_values, warm_values, label="Warm", color="orange")
plt.plot(temperature_values, hot_values, label="Hot", color="red")

# Add labels and title
plt.xlabel("Temperature (°C)")
plt.ylabel("Membership Value")
plt.title("Fuzzy Temperature Classification")
plt.legend()
plt.grid(True)
plt.show()

Explanation of the Code

  1. Membership Functions:
    • We define functions for Cold, Warm, and Hot categories based on the temperature.
      Each function returns a membership value for a given temperature.
  2. Plotting:
    • Temperature values are generated from $0$ to $50$°C, and each membership function is evaluated over this range.
    • The plot shows how the membership values vary with temperature for each fuzzy set (Cold, Warm, Hot).

Visualization

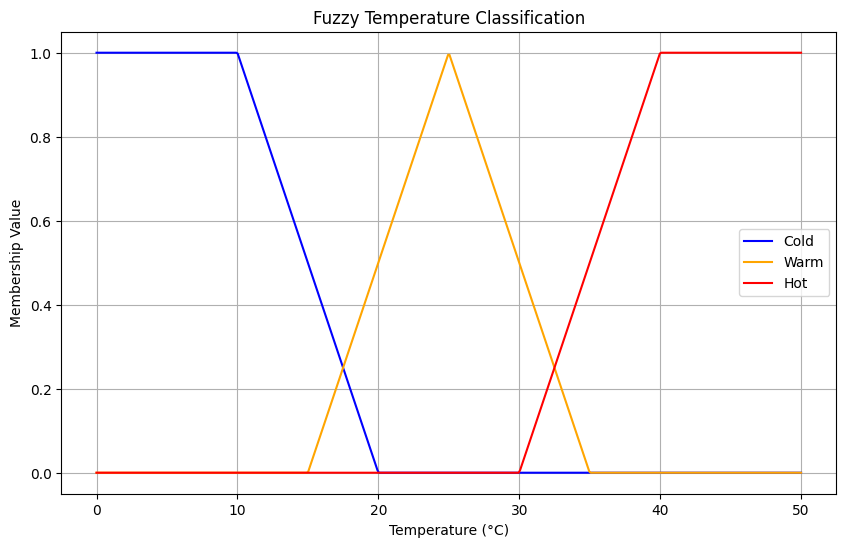
The plot shows:

  • Cold Curve (Blue): Decreases from a membership of $1$ at low temperatures to 0 as temperatures approach $20$°C.
  • Warm Curve (Orange): Peaks in the middle temperature range ($15$–$35$°C), with membership values gradually increasing and then decreasing.
  • Hot Curve (Red): Increases as temperature rises above $30$°C, reaching a maximum membership of $1$ at $40$°C and beyond.

Interpretation

  1. Overlap: The fuzzy sets overlap, allowing a temperature (e.g., $25$°C) to be partially classified as both Warm and Hot.
    This overlap represents the soft boundary between classifications, which is a key feature of fuzzy logic.
  2. Partial Membership: Temperatures do not need to belong exclusively to one category.
    For instance, $18$°C might be $0.2$ Cold and $0.8$ Warm.
  3. Applications: Fuzzy logic is widely used in systems where clear-cut boundaries are impractical, such as thermostats, climate control, and decision-making systems that need to handle ambiguity and gradual transitions.

Solving and Visualizing Quadratic Equation Roots with Python

Let’s work on an algebra problem involving solving and visualizing quadratic equations.

Quadratic equations are commonly encountered in algebra and can model various real-world phenomena like projectile motion and area calculations.

Problem: Solving a Quadratic Equation

Given a quadratic equation:
$$
f(x) = ax^2 + bx + c
$$
we want to:

  1. Solve for the roots (values of $( x )$ where $ f(x) = 0 $).
  2. Plot the quadratic function to visualize its shape, marking the roots if they exist.

Let’s use a specific example:
$$
f(x) = 2x^2 - 4x - 6
$$
In this case, $( a = 2 )$, $( b = -4 )$, and $( c = -6 )$.

Solution Outline

  1. Roots Calculation:
    • Solve the quadratic equation $ 2x^2 - 4x - 6 = 0 $ using the quadratic formula:
      $$
      x = \frac{-b \pm \sqrt{b^2 - 4ac}}{2a}
      $$
  2. Plotting the Function:
    • Plot the quadratic function to observe its parabolic shape and mark the roots for easy visualization.

Python Code

Here’s the $Python$ code to solve the equation and plot the function along with its roots:

1
2
3
4
5
6
7
8
9
10
11
12
13
14
15
16
17
18
19
20
21
22
23
24
25
26
27
28
29
30
31
32
33
34
35
36
37
38
39
40
41
42
43
44
45
46
47
48
49
50
51
52
53
import numpy as np
import matplotlib.pyplot as plt

# Coefficients of the quadratic equation
a, b, c = 2, -4, -6

# Calculate the discriminant
discriminant = b**2 - 4 * a * c

# Calculate the roots based on the discriminant
if discriminant > 0:
root1 = (-b + np.sqrt(discriminant)) / (2 * a)
root2 = (-b - np.sqrt(discriminant)) / (2 * a)
roots = [root1, root2]
elif discriminant == 0:
root = -b / (2 * a)
roots = [root]
else:
roots = []

# Define the quadratic function
def f(x):
return a * x**2 + b * x + c

# Generate x values for the plot
x_values = np.linspace(-5, 5, 400)
y_values = f(x_values)

# Plot the quadratic function
plt.figure(figsize=(10, 6))
plt.plot(x_values, y_values, label=r"$f(x) = 2x^2 - 4x - 6$", color="blue")

# Plot the roots, if they exist
if roots:
for root in roots:
plt.plot(root, f(root), 'ro') # Red dot at each root
plt.text(root, f(root), f"({root:.2f}, 0)", ha='right', color="red")

# Add labels and title
plt.xlabel("x")
plt.ylabel("f(x)")
plt.title("Quadratic Function and Its Roots")
plt.axhline(0, color="black", linewidth=0.5)
plt.axvline(0, color="black", linewidth=0.5)
plt.legend()
plt.grid(True)
plt.show()

# Output the roots
if roots:
print("Roots:", roots)
else:
print("No real roots")

Explanation of the Code

  1. Root Calculation:
    • The discriminant $ (b^2 - 4ac) $ is calculated first.
    • Depending on the discriminant’s value:
      • Two real roots if the discriminant is positive.
      • One real root if the discriminant is zero (the parabola just touches the $x$-$axis$).
      • No real roots if the discriminant is negative.
  2. Function Definition and Plotting:
    • We define $ f(x) $ and compute $ y $-$values$ for a range of $ x $-$values$ to create a smooth plot.
    • If real roots are found, they are marked on the graph with red dots.
  3. Graph Details:
    • The plot includes axis labels, a title, and a legend for clarity.

Visualization

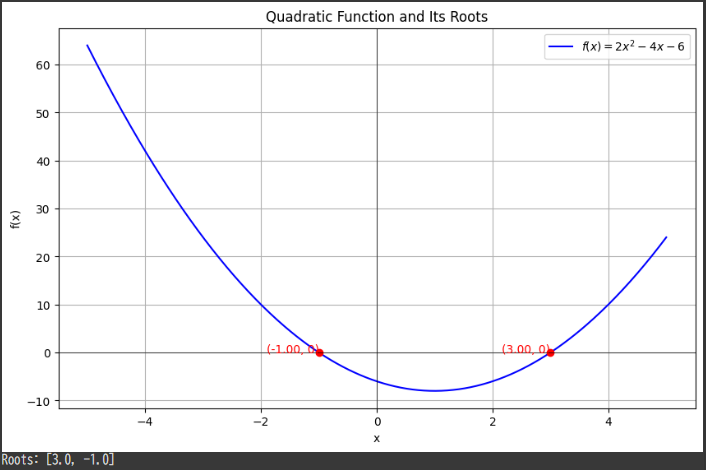
The plot shows:

  • Blue Curve: The parabola representing $ f(x) = 2x^2 - 4x - 6 $.
  • Red Dots: These indicate the roots where the parabola intersects the $x$-$axis$.

Interpretation

  1. Roots: The roots are the points where $ f(x) = 0 $. They provide key insights, such as when a quantity reaches zero or crosses a threshold.
  2. Parabola Shape: The shape of $ f(x) $ depends on $ a $; here, $ a = 2 $, so the parabola opens upwards.
  3. Applications: Quadratic functions appear in physics, economics, and engineering, making their roots crucial in problem-solving, such as determining when a projectile hits the ground or optimizing profit based on cost and revenue functions.

Analyzing a Polynomial Function and Its Derivative with Python

Let’s look at a calculus problem involving differentiation: finding the rate of change of a function at any given point.

For this example, we’ll consider a simple polynomial function and calculate its derivative.

Then, we’ll use $Python$ to graph the function along with its derivative, making it easy to understand how the slope changes across different points.

Problem: Differentiating a Polynomial Function

Given a polynomial function:
$$
f(x) = 3x^3 - 5x^2 + 2x - 4
$$
we want to:

  1. Find its derivative, $ f’(x) $.
  2. Plot both $ f(x) $ and $ f’(x) $ over a specified range to observe the behavior of the function and how the slope changes with $ x $.

Solution

  1. Differentiate $ f(x) $ with respect to $ x $.
    • The derivative, $ f’(x) $, represents the rate of change or slope of $ f(x) $ at each point.
  2. Use $Python$ to plot both $ f(x) $ and $ f’(x) $ on the same graph.

Derivative Calculation

The derivative of $ f(x) = 3x^3 - 5x^2 + 2x - 4 $ is:
$$
f’(x) = 9x^2 - 10x + 2
$$

Python Code

Here’s the $Python$ code to calculate and plot both $ f(x) $ and $ f’(x) $:

1
2
3
4
5
6
7
8
9
10
11
12
13
14
15
16
17
18
19
20
21
22
23
24
25
26
27
28
29
import numpy as np
import matplotlib.pyplot as plt

# Define the function and its derivative
def f(x):
return 3 * x**3 - 5 * x**2 + 2 * x - 4

def f_prime(x):
return 9 * x**2 - 10 * x + 2

# Generate x values for the plot
x_values = np.linspace(-2, 3, 100)
y_values = f(x_values)
y_prime_values = f_prime(x_values)

# Plot f(x) and f'(x)
plt.figure(figsize=(10, 6))
plt.plot(x_values, y_values, label="f(x) = 3x^3 - 5x^2 + 2x - 4", color="blue")
plt.plot(x_values, y_prime_values, label="f'(x) = 9x^2 - 10x + 2", color="red", linestyle="--")

# Add labels and title
plt.xlabel("x")
plt.ylabel("y")
plt.title("Function and its Derivative")
plt.legend()
plt.grid(True)
plt.axhline(0, color="black",linewidth=0.5)
plt.axvline(0, color="black",linewidth=0.5)
plt.show()

Explanation of the Code

  1. Function Definitions:
    • f(x) is defined to represent $ 3x^3 - 5x^2 + 2x - 4 $.
    • f_prime(x) represents the derivative $ 9x^2 - 10x + 2 $.
  2. Plotting:
    • We use a range of $ x $ values from $-2$ to $3$ to cover the region of interest.
    • Both $ f(x) $ and $ f’(x) $ are plotted on the same graph for easy comparison.
    • The function $ f(x) $ is shown in blue, and the derivative $ f’(x) $ is shown as a red dashed line.

Visualization

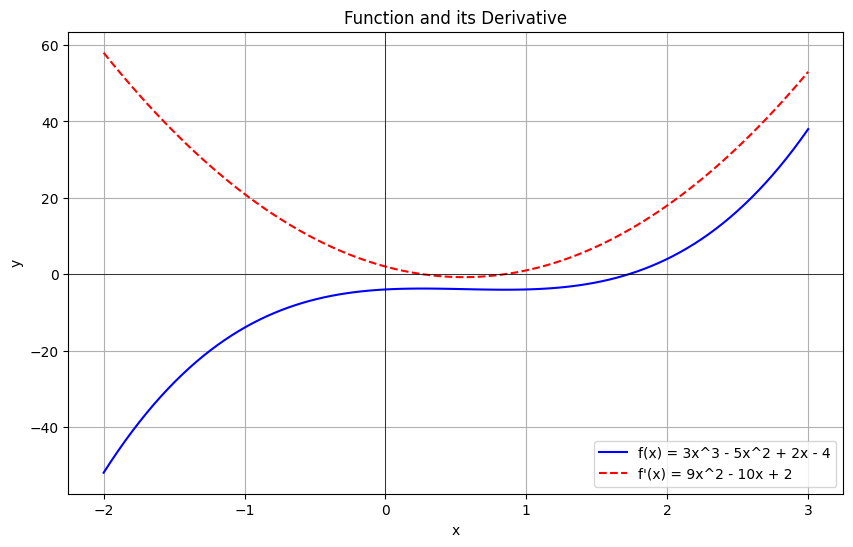
The plot shows:

  • Blue Curve: Represents $ f(x) $, the original polynomial function.
  • Red Dashed Curve: Represents $ f’(x) $, the derivative, showing the slope of $ f(x) $ at each point.

The intersection of $ f’(x) $ with the $x$-$axis$ indicates where $ f(x) $ has a local maximum or minimum (i.e., where the slope of $ f(x) $ is zero).

Interpretation

  1. Function Behavior: $ f(x) $ varies according to the cubic shape, with local peaks and troughs.
  2. Derivative Insights: $ f’(x) $ reveals where $ f(x) $ is increasing or decreasing:
    • When $ f’(x) > 0 $: $ f(x) $ is increasing.
    • When $ f’(x) < 0 $: $ f(x) $ is decreasing.
  3. Applications: Understanding the derivative function is crucial in finding the rate of change, optimizing functions, and analyzing trends, especially in fields like $physics$, $economics$, and $engineering$.

Analyzing the Impact of Education on Wage Using Linear Regression

Let’s tackle a basic econometrics problem often used to understand relationships between variables in economics: Simple Linear Regression.

This example can be applied to analyze the relationship between two variables, such as income and expenditure, or education and wage.

Problem: Relationship Between Education Level and Wage

The goal is to analyze the relationship between years of education and wage.

This example assumes we have a dataset where each data point represents an individual’s years of education and corresponding wage.

By fitting a simple linear regression model, we can determine if there is a statistically significant relationship between these variables and interpret the results.

Objective

Use Python to:

  1. Fit a simple linear regression model where the independent variable $(X)$ is Years of Education and the dependent variable $(Y)$ is Wage.
  2. Plot the regression line with the data points to visualize the relationship.

Example Dataset

For simplicity, we’ll create a synthetic dataset of years of education and wage, simulating a realistic scenario where wage generally increases with more years of education, though with some variability.

Python Code

Here’s the $Python$ code to create the dataset, fit the linear regression model, and visualize the results:

1
2
3
4
5
6
7
8
9
10
11
12
13
14
15
16
17
18
19
20
21
22
23
24
25
26
27
28
29
30
31
32
33
34
35
36
37
38
39
40
41
import numpy as np
import matplotlib.pyplot as plt
from sklearn.linear_model import LinearRegression
from sklearn.metrics import r2_score

# Generate synthetic data
np.random.seed(0) # For reproducibility
years_of_education = np.random.randint(10, 20, 50) # Education years from 10 to 20
wage = 2 * years_of_education + np.random.normal(0, 5, 50) # Linear relation with noise

# Reshape the data for sklearn
X = years_of_education.reshape(-1, 1)
y = wage

# Fit the Linear Regression model
model = LinearRegression()
model.fit(X, y)

# Predict wages based on the model
predicted_wage = model.predict(X)

# Calculate R-squared value for model performance
r_squared = r2_score(y, predicted_wage)
print(f"R-squared: {r_squared:.2f}")

# Plot the data and regression line
plt.figure(figsize=(10, 6))
plt.scatter(years_of_education, wage, color="blue", label="Actual Data", alpha=0.6)
plt.plot(years_of_education, predicted_wage, color="red", label="Regression Line", linewidth=2)
plt.xlabel("Years of Education")
plt.ylabel("Wage")
plt.title("Relationship Between Education Level and Wage")
plt.legend()
plt.grid(True)
plt.show()

# Output model parameters
slope = model.coef_[0]
intercept = model.intercept_
print(f"Slope (Effect of Education on Wage): {slope:.2f}")
print(f"Intercept: {intercept:.2f}")

Explanation of the Code

  1. Data Generation:
    • We generate random years of education for $50$ individuals, ranging from $10$ to $20$ years.
    • Wage is simulated as a linear function of education with added noise to introduce variability.
  2. Model Fitting:
    • The LinearRegression model is used to fit the data, with Years of Education as the predictor and Wage as the outcome.
  3. Visualization:
    • A scatter plot displays the actual data points.
    • The regression line represents the predicted wage based on years of education.
  4. Model Evaluation:
    • The R-squared value measures how well the model explains the variance in wage based on years of education.
    • The slope of the regression line indicates the increase in wage for each additional year of education.

Visualization

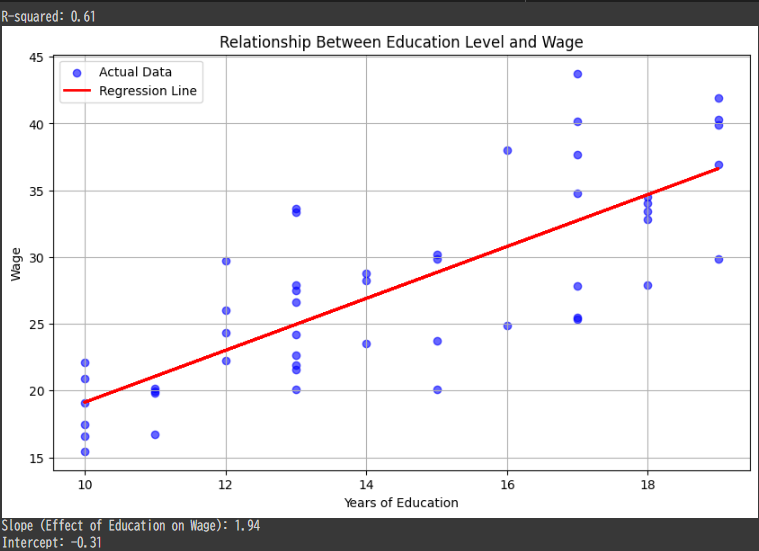
The plot shows:

  • Data Points: Each point represents an individual’s education level and wage.
  • Regression Line: The red line shows the model’s predictions, helping visualize the general trend that wage increases with education level.

Interpretation

  1. Slope: If the slope is, for example, $2.5$, this suggests that each additional year of education is associated with an increase of $$2.50$ in wage.
  2. Intercept: This is the estimated wage for an individual with $0$ years of education.
  3. R-squared: A higher R-squared value (close to $1$) indicates that the model effectively explains the variance in wage, though it’s normal to have a moderate value in real-world data with noise.

Applications in Econometrics

Simple linear regression is a foundational tool in econometrics used to explore and quantify relationships between economic variables.

By understanding such relationships, economists can make informed predictions and policy recommendations.