1
2
3
4
5
6
7
8
9
10
11
12
13
14
15
16
17
18
19
20
21
22
23
24
25
26
27
28
29
30
31
32
33
34
35
36
37
38
39
40
41
42
43
44
45
46
47
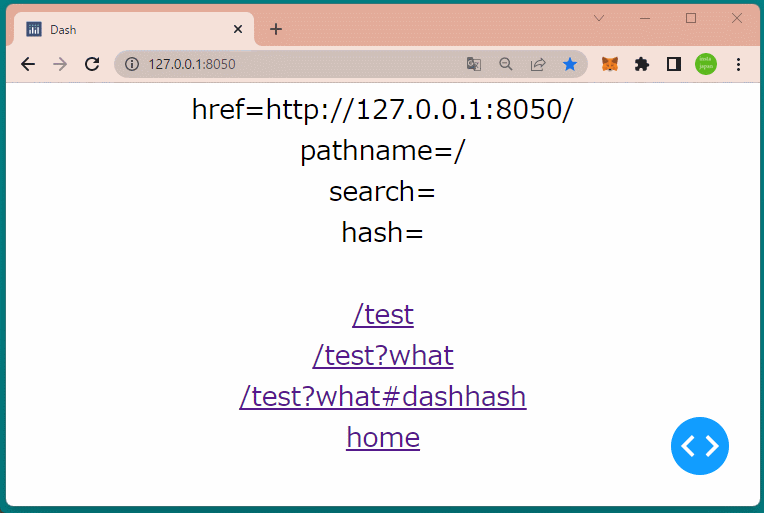
| import dash
import dash_core_components as dcc
import dash_html_components as html
from dash.dependencies import Input, Output
app = dash.Dash(__name__)
app.layout = html.Div(
[
dcc.Location(id='dcc_location'),
html.Div(id='location1'),
html.Div(id='location2'),
html.Div(id='location3'),
html.Div(id='location4'),
html.Br(),
dcc.Link('/test', href='/test'),
html.Br(),
dcc.Link('/test?what', href='/test?what'),
html.Br(),
dcc.Link('/test?what#dashhash', href='/test?what#dashhash'),
html.Br(),
dcc.Link('home', href='/')
],
style={'fontSize':30, 'textAlign':'center'}
)
@app.callback(
Output('location1', 'children'),
Output('location2', 'children'),
Output('location3', 'children'),
Output('location4', 'children'),
Input('dcc_location', 'href'),
Input('dcc_location', 'pathname'),
Input('dcc_location', 'search'),
Input('dcc_location', 'hash'),
)
def update_location(url, pathname, search, hash):
return (
'href={}'.format(url),
'pathname={}'.format(pathname),
'search={}'.format(search),
'hash={}'.format(hash)
)
if __name__ == '__main__':
app.run_server(debug=True)
|