Maximizing Detection Accuracy
Anomaly detection sits at the heart of modern monitoring systems — from fraud detection in banking to fault detection in industrial machinery. Yet the algorithms themselves are only as good as their parameters. In this article, we formulate parameter optimization for anomaly detection as a concrete mathematical optimization problem and solve it end-to-end in Python.
Problem Setup
We focus on the Isolation Forest algorithm. Its key parameters are:
- $n_estimators$: number of isolation trees
- $\max_samples$: fraction of samples per tree
- $contamination$: assumed fraction of outliers in the dataset
We optimize these to maximize the F1 score:
$$F_1 = 2 \cdot \frac{\text{Precision} \times \text{Recall}}{\text{Precision} + \text{Recall}}, \quad \text{Precision} = \frac{TP}{TP + FP}, \quad \text{Recall} = \frac{TP}{TP + FN}$$
The optimization objective is:
$$\theta^* = \arg\max_{\theta \in \Theta} ; F_1!\left(\mathcal{D}_{val},, \theta\right)$$
Since $F_1$ is non-differentiable with respect to $\theta$, we use Bayesian Optimization guided by the Expected Improvement acquisition function:
$$EI(\theta) = \mathbb{E}!\left[\max!\left(F_1(\theta) - F_1^+,, 0\right)\right]$$
where $F_1^+$ is the best observed value so far.
Synthetic Dataset

True contamination rate: $\rho = 0.08$ (8% anomalies).
Full Source Code
1 | # ============================================================ |
Code Walkthrough
Section 0 — Installing scikit-optimize
!pip install scikit-optimize -q installs the library at runtime. This must be the very first cell executed so that all subsequent imports resolve correctly.
Section 1 — Synthetic Dataset
generate_dataset() builds a controlled benchmark: 1,000 normal points from two overlapping Gaussians and 88 anomalies (~8% rate) drawn uniformly over $[-6, 6]^2$. The two Gaussians have intentionally different covariance structures to make the decision boundary non-trivial. train_test_split with stratify=y preserves the anomaly rate in both splits.
Section 2 — Bayesian Optimization
The search space covers three parameters:
| Parameter | Type | Range |
|---|---|---|
n_estimators |
Integer | $[50, 400]$ |
max_samples |
Real | $[0.1, 1.0]$ |
contamination |
Real | $[0.01, 0.25]$ |
The @use_named_args decorator wires the flat list used internally by gp_minimize to named Python arguments. The objective returns negative F1 because gp_minimize minimizes. With n_initial_points=10, the Gaussian Process is bootstrapped on 10 random draws; the remaining 40 calls are guided by the EI acquisition function — far more efficient than the $\sim 5{,}000$ evaluations a fine grid search would require over the same space.
Section 3 — Final Evaluation
The best parameter vector result.x rebuilds the optimal model. Metrics are reported with pos_label=-1 (anomaly class). A baseline IsolationForest with default contamination=0.08 provides the comparison reference.
Section 4 — Visualization
Panel 1 — Convergence Curve: Plots the F1 trajectory across all 50 BO calls. Grey dots = random initialization; cyan dots = BO-guided proposals; orange line = running best; green dashed = baseline. The shift in quality between the two phases shows BO learning the objective landscape.
Panel 2 — Decision Boundary: decision_function output is rendered as a color field. The orange contour at $z=0$ is the learned boundary. False Positives (▲) and False Negatives (▼) are individually marked to show exactly where the model errs.
Panels 3 & 4 — 3D F1 Surfaces: scipy.griddata interpolates the scattered BO evaluations onto a regular grid. Panel 3 maps contamination × max_samples → F1; Panel 4 maps contamination × n_estimators → F1. These surfaces reveal objective landscape structure — flat plateaus vs sharp ridges — that a grid search would need orders of magnitude more evaluations to uncover.
Panel 5 — Sampled Parameter Space: 2D scatter of contamination vs max_samples colored by F1, showing how BO concentrates high-F1 samples around the optimal region as iterations progress.
Panel 6 — Per-Call F1 Bar: Direct visualization of the F1 returned on every call. The quality improvement in the cyan (BO) phase versus the grey (random) phase is clearly visible.
Panel 7 — Confusion Matrix: The final 2×2 matrix of the optimal model on the validation set. Color intensity encodes count; values are printed directly in cells.
Execution Results
Train: 761 samples | Val: 327 samples
Anomaly rate (val): 0.080

Running Bayesian Optimization (50 calls)...

Best Parameters : {'n_estimators': 395, 'max_samples': 0.9802843384145278, 'contamination': 0.06691589893530461}
Best F1 Score   : 0.8750

Precision: 0.9545 | Recall: 0.8077 | F1: 0.8750
Confusion Matrix:
[[ 21   5]
 [  1 300]]
Baseline F1     : 0.7857
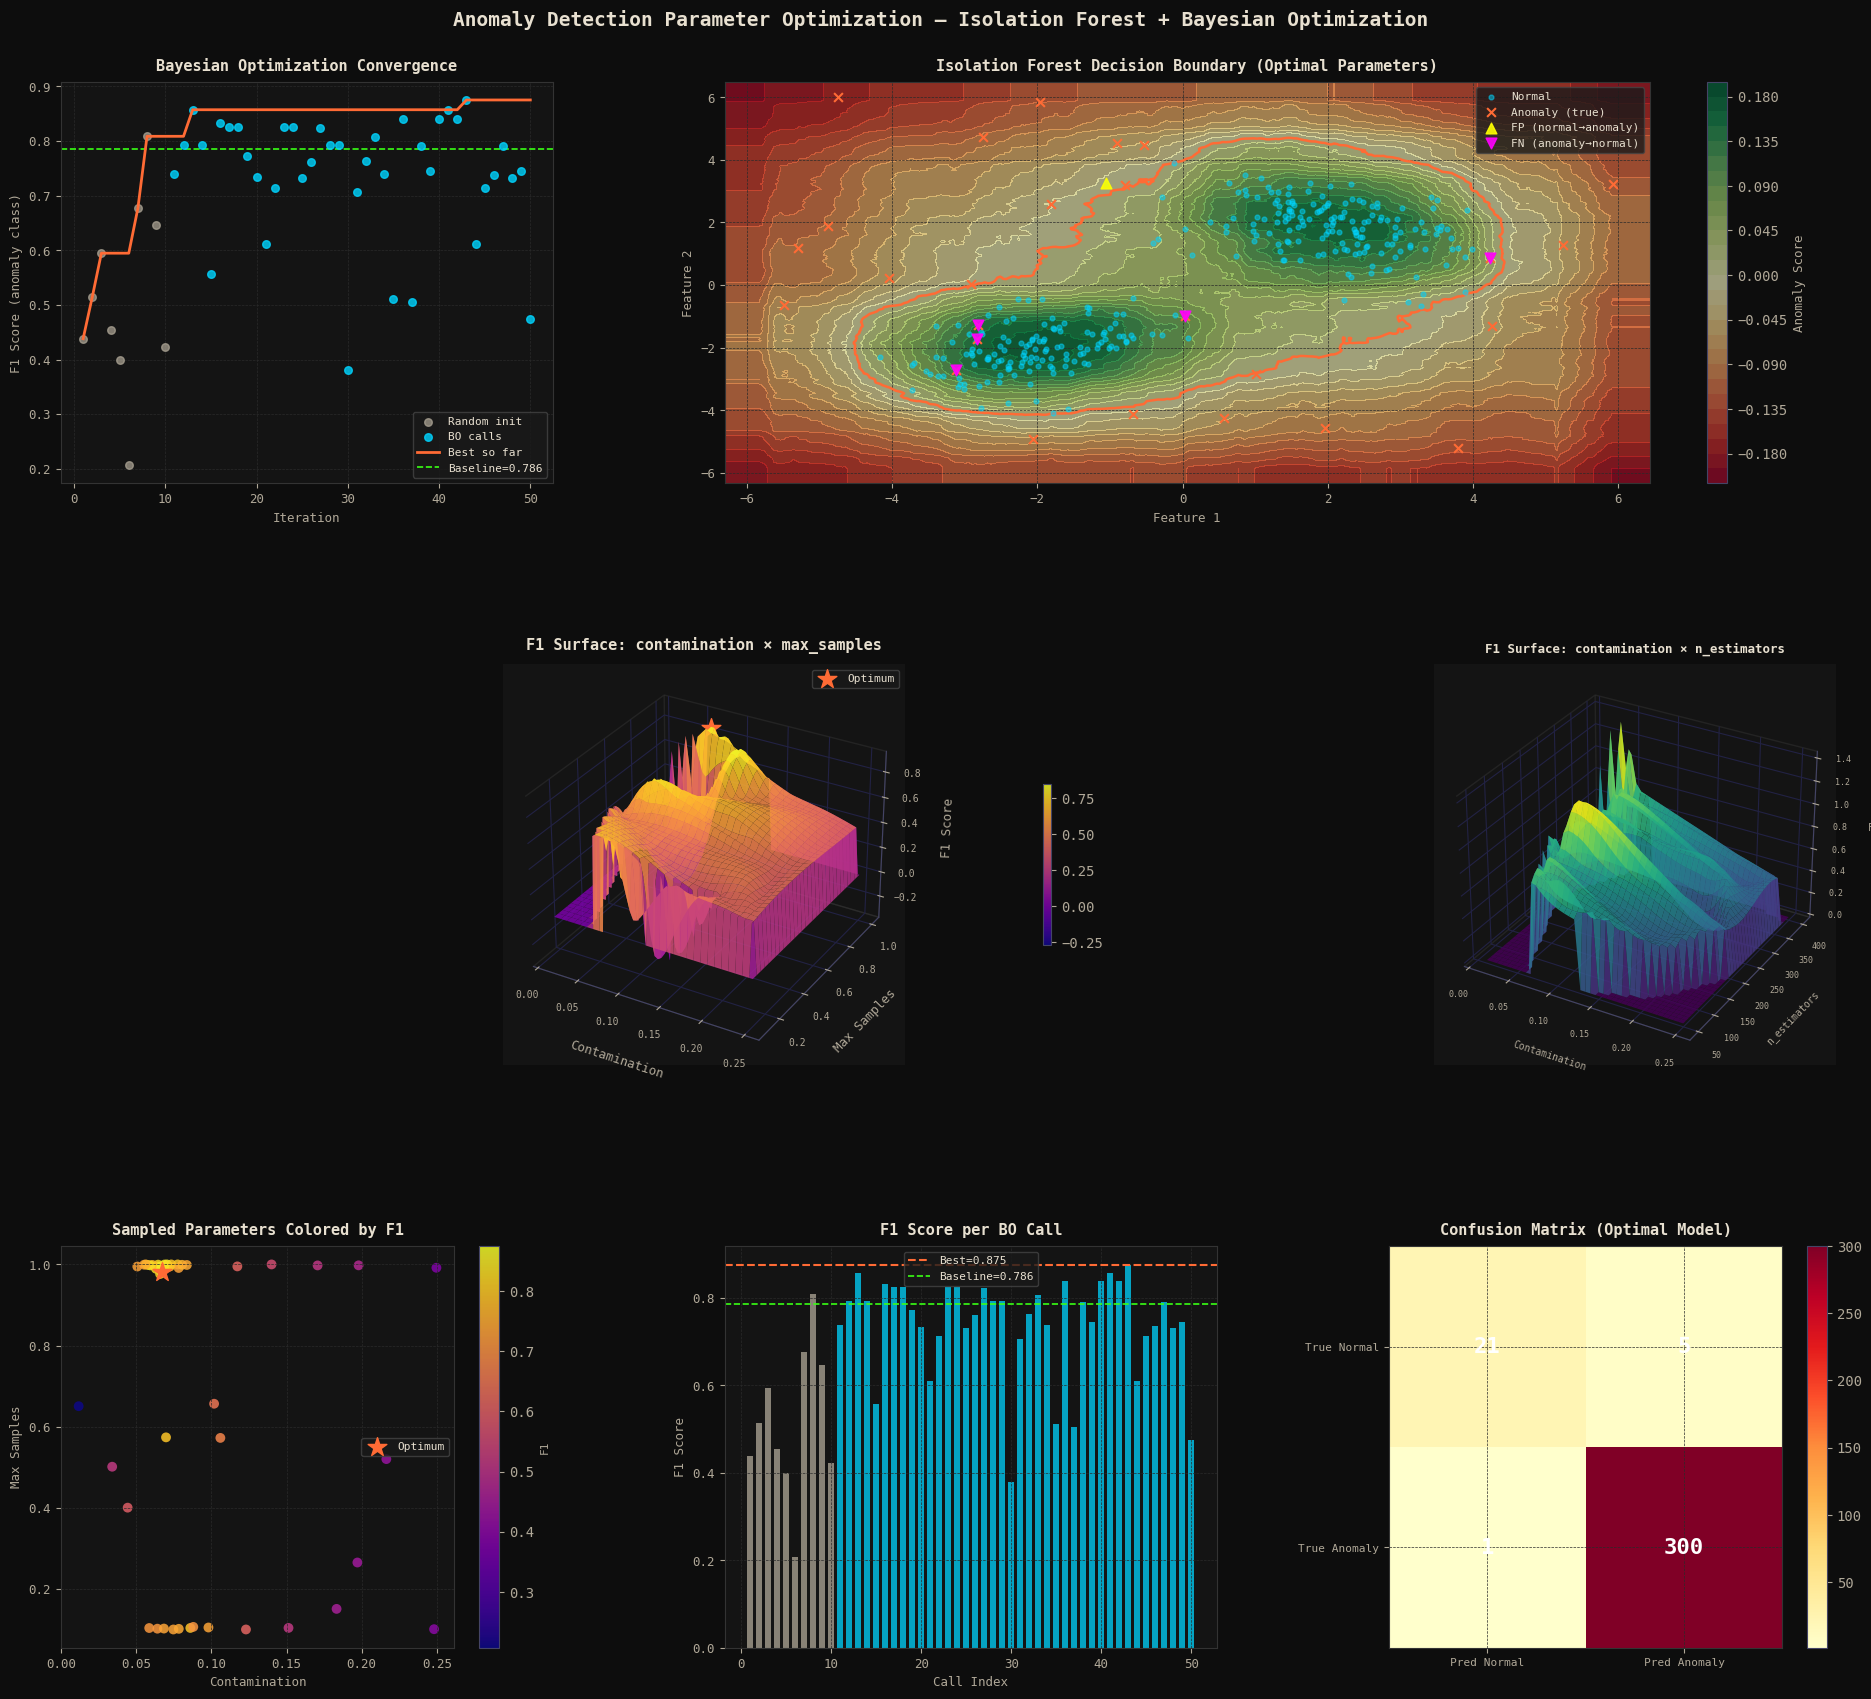
Figure saved.
Key Takeaways
The dominant insight is that the contamination hyperparameter drives most of the F1 variance: setting it far from the true anomaly rate $\rho = 0.08$ either misses anomalies (too low) or mislabels normal points (too high). The 3D surface in Panel 3 makes this ridge structure immediately visible.
Bayesian Optimization navigates to the optimal ridge in 50 evaluations. The surrogate-based acquisition balances exploitation of known good regions with exploration of uncertain ones:
$$\theta_{t+1} = \arg\max_\theta ; EI(\theta) = \arg\max_\theta ; \mathbb{E}!\left[\max!\left(\hat{f}(\theta) - f^+,, 0\right)\right]$$
where $\hat{f}(\theta)$ is the GP posterior mean and $f^+$ is the current best observed F1. This makes it the method of choice whenever each evaluation involves training a non-trivial model on a large dataset — precisely the regime that makes naive grid search impractical.