Dash 第62回(DashCanvas 画像の切り抜き)

DashCanvas 画像の切り抜き

画像を表示したキャンバス上で輪郭を指定して、その範囲の画像の切り抜きを行ってみます。

superpixel_color_segmentation関数を使って、ペンシルツールで指定した輪郭の内側を切り抜いて表示します。

[ソースコード]

1
2
3
4
5
6
7
8
9
10
11
12
13
14
15
16
17
18
19
20
21
22
23
24
25
26
27
28
29
30
31
32
33
34
35
36
37
38
39
40
41
42
43
44
45
46
47
48
49
50
51
52
53
54
55
56
57
58
59
60
61
62
63
64
65
66
67
68
69
70
import dash
import dash_html_components as html
import numpy as np
from dash.dependencies import Input, Output
from dash.exceptions import PreventUpdate
from dash_canvas import DashCanvas
from dash_canvas.utils import (array_to_data_url, image_string_to_PILImage,
parse_jsonstring, superpixel_color_segmentation)
from skimage import io

filepath = 'cherry.png'
image = array_to_data_url(io.imread(filepath))
app = dash.Dash(__name__) # Dashインスタンスを生成

# レイアウト作成
app.layout = html.Div(
[
html.Div(
[
DashCanvas(
id='image1',
image_content=image,
width=400,
lineWidth=5,
lineColor='lime',
goButtonTitle='remove'
)
],
),
html.Div(
[html.Img(id='image2',width=400)]
)
]
)

# 選択した長方形の範囲をテーブルに表示するコールバック
@app.callback(
Output('image2', 'src'),
Input('image1', 'json_data'),
Input('image1', 'image_content')
)
def remove_background(json_data, image):
if json_data:
if image: # imageが値を持つ場合
# もとの画像をnumpy.ndarrayに変換する
image_array = image_string_to_PILImage(image)
image_array = np.asarray(image_array)
else:
image_array = io.imread(filepath)
# 画像のarrayサイズを変数shapeに代入する
shape = image_array.shape[:2]

# アノテーションのjsonデータをパースし、ブール値に変換する
try:
mask = parse_jsonstring(json_data, shape=shape)
except IndexError:
raise PreventUpdate

if mask.sum() > 0:
seg = superpixel_color_segmentation(image_array, mask)
else:
seg = np.ones(shape)
filled_image = np.copy(image_array)
filled_image[np.logical_not(seg)] = np.array([255, 255, 255], dtype='uint8')
return array_to_data_url(filled_image)
else:
raise PreventUpdate

if __name__ == '__main__':
app.run_server(debug=True) # アプリケーションを起動

画像の背景を取り除く処理はremove_backgroundコールバック関数で行っています。(42行目)

入力項目は、画像へのアノテーションデータをもつjson_data属性と、画像データ文字列のimage_contents属性です。

処理の流れは以下の通りです。

  1. 画像データを取得し、numpy.ndarray型に変換する。(46~47行目)
  2. 画像へのアノテーションデータと画像の形状からブール値に変換する。(55行目)
  3. マスク処理したデータが存在する場合、superpixel_color_segmentation関数を使って類似した色を分割する。(60行目)
  4. 画像から3の結果を反転した領域を、白色(255.255.255)にする。(64行目)
  5. 処理した画像(numpy.ndarray)を文字列に変換する。(65行目)
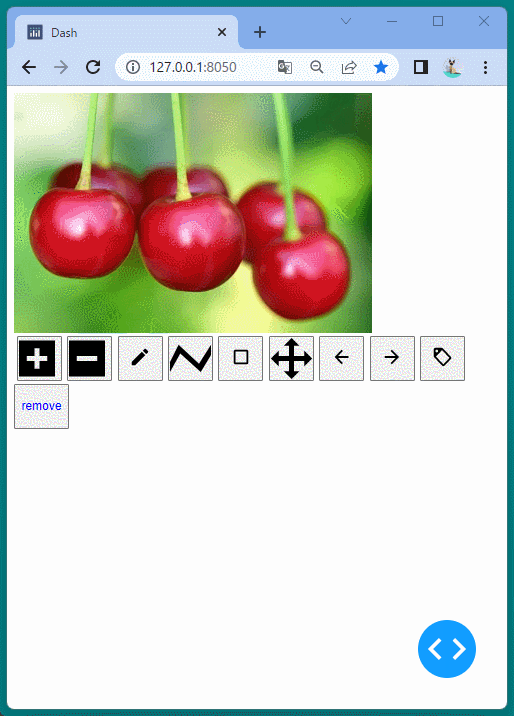
[ブラウザで表示]

対象を選択しremoveボタンを押すと、選択範囲が切り抜かれてツールの下に表示される・・・・はずなんですがはっきり切り抜きできませんでした。

2回、3回同じ範囲を選択するとうまく切り抜かれていくようです。

改善の余地がありそうですね😥